5 Best Free Geotagging Software For Windows
Here is a list of best free geotagging software for windows. Nowadays, most devices add GPS information to captured images automatically. Still, digital images of past or captured by old digital cameras or phones do not have GPS information. So, to add GPS information, you need photo geotagging software. These software help you add accurate GPS information like Latitude, Longitude, Altitude, etc. information to photos. Apart from GPS information, you can also add/edit EXIF information like flash on/off info, ISO, Camera settings, etc. To add geolocation information, most software provide a virtual world map through which you can select and add GPS information to photos. Virtual maps are pretty easy to navigate and they also let you change map view to Sattelite, Terrain, Hybrid, etc. views.
These software are also useful for finding out the accurate location of the photo where it was taken. To find out the location, these freeware read GPS location data of images and show that location on the map.
My Favorite Geotagging Software For Windows:
GeoSetter is my favorite software because it lets you add or edit a lot more information of images including GPS data. Plus, support for multiple image formats and its simple interface make it a desirable photo geotagging software.
You can also check out lists of best free GIS Software, Picture Location Finder, and Shapefile Viewer software for Windows.
GeoSetter

GeoSetter is a free geotagging software for Windows. Using it, you can add the geolocation data to the picture i.e. where it was taken. The geolocation or GPS data usually consists of accurate longitude and latitude coordinates, with altitude data in some cases. However, using this freeware, you can add a lot more information to photos such as Country, State, City, Caption, Date, Time, EXIF information, etc. Apart from geotagging, you can also use it as an image viewer and image explorer to view and find local images.
How to geotag image in GeoSetter:
In this software, you get a map on right side of the interface to get accurate coordinates of any location that you want to add to the image. In order to get coordinates, first, find the location on the map and click on that location to get the coordinates in the Coordinates Field. Now, just copy the location and then add image to this software. After that, double-click on the picture to open Edit data section and paste coordinates to the Location > GPS Data > Latitude/Longitude fields. Lastly, press OK to save the coordinates to the image.
Overall, it is a really good photo geotagging software. It supports image formats like JPEG, JPG, RAW, TIFF, and few more.
GPicSync

GPicSync is another free geotagging software for Windows. In this software, you can synchronize GPS coordinates to multiple photos at a time by providing a separate GPS file of TXT or GPX format. Or, you can manually add Longitude, Latitude, and Altitude information to one or more photos at a time. I find its manual option more helpful as this option is able to add and save the GPS data to an image successfully. Its syncing feature does not seem to be working, so I recommend using its manual geotagging option only.
Now, to geotag images, go to the Tools menu and select EXIF writer tool. In Exif writer, you get Latitude, Longitude, and Eventual Elevation (meters) fields. Fill these fields with the accurate GPS coordinates to geotag image. As this software does not come with a map or any other feature to find coordinates, so you need to use some third party software like Google Earth to get the coordinates. After entering the coordinates, press the Select and write in picture button to browse and add coordinates to the image or images.
Apart from geotagging images, you can also read EXIF or GPS data, GEO Rename Pictures, Inspect GPX files, and Generate KMZ files.
EXIF Pilot

EXIF Pilot is a free EXIF editor software which can also be used as a free geotagging software. In it, you don’t get a virtual map to geotag images. Instead, this software only lets you add and save GPS location to the photo using a third party application like Google Earth.
In order to add the GPS location, first, browse and select a folder with photos using its inbuilt Explorer. After that, you can view file names of all added photos on its interface. Now, select one photo from the interface and press the Edit EXIF/IPTC/XMP button to open Edit Properties Window. In the Edit Properties window, you get various sections like EXIF, EXIF GPS, IPTC, Keywords, etc. From the available menus, select EXIF GPS Section and enter Longitude, Latitude, Altitude, and Time Stamp values and click OK button to geotag an image. Similarly, you can geotag all added photos, one at a time.
Using this photo geotagging software, you can also view and edit a lot more information of images such as IPTC info (copyright, caption, source, writer, etc.), XMP info (create date, modify date, creator tool, etc.), etc. Besides various features, its ability to support a lot of image format like PNG, JPEG, DNG, TIFF, PEF, CRW, NEF, CR2, SRW, JP2, ORF, PSD, ARW, SR2, MRW, PGF, EPS, RAF, RW2, etc. is really impressive.
GEOPhoto
GEOPhoto is a free geotagging app for Windows 10. This app is also used as a picture location finder to get the location of pictures. In it, you can also add your Instagram, OneDrive, Flickr, and 500px accounts to view location of all your pictures. To locate the picture, this software use geotags data like longitude, latitude, etc. But, all images do not have the geolocation data, so in order to add that data, you need apps like this one.
How to geotag images using GEOPhoto:
- First, go to Settings and add one or more folders which have pictures in them.
- Return to the main interface and press Pictures without Geotag icon. Now, a window will open up with images not containing location information.
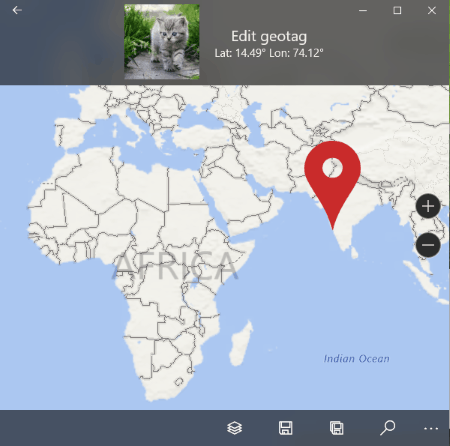
- Select one picture at a time and press the Pencil icon. Now, a world map will open up using which, you can select any location.
- After selecting the location, press the Save Icon to complete the image geotagging process.
When you return to the main interface of this software, you can view all the tagged picture over a world map. The map provided by this software is pretty advanced as it lets you toggle between various views namely, Satellite view, Map view, Hybrid view, and Terrain view. After geotagging, you can use its Slideshow option to run the slideshow of geotagged images as well.
Enny GEOTagger
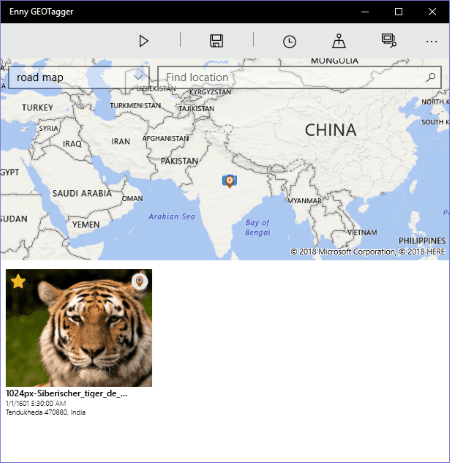
Enny GEOTagger is another free geotagging app for Windows 10. This app helps you add GPS information to your photos. Not just GPS information, but you can also Load photos and a Route as GPX and according to the GPX route information, the app will geotag photos. If you have images with Geotag information, then you can use this geotagging app as a standard picture location finder to find the actual image location over a map.
In order to geotag images, first, add images using Add photos from your Computer option. After that, the main interface with a map and all added image will open up. Now, drag and drop added images to the map to add geotag to that image. Similarly, you can drop multiple images one by one to the same or different parts of the map to geotag multiple images. Do not forget to press the Save icon after geotagging image.
The world map provided in it is pretty advanced in which you can view Road Map, Aerial Map, Terrain Map, 3D Aerial Map, etc.
Overall, it a simple and easy to use software with one limitation that it only supports JPG format images.


Naveen Kushwaha
Passionate about tech and science, always look for new tech solutions that can help me and others.
About Us

We are the team behind some of the most popular tech blogs, like: I LoveFree Software and Windows 8 Freeware.
More About UsArchives
- April 2024
- March 2024
- February 2024
- January 2024
- December 2023
- November 2023
- October 2023
- September 2023
- August 2023
- July 2023
- June 2023
- May 2023
- April 2023
- March 2023
- February 2023
- January 2023
- December 2022
- November 2022
- October 2022
- September 2022
- August 2022
- July 2022
- June 2022
- May 2022
- April 2022
- March 2022
- February 2022
- January 2022
- December 2021
- November 2021
- October 2021
- September 2021
- August 2021
- July 2021
- June 2021
- May 2021
- April 2021
- March 2021
- February 2021
- January 2021
- December 2020
- November 2020
- October 2020
- September 2020
- August 2020
- July 2020
- June 2020
- May 2020
- April 2020
- March 2020
- February 2020
- January 2020
- December 2019
- November 2019
- October 2019
- September 2019
- August 2019
- July 2019
- June 2019
- May 2019
- April 2019
- March 2019
- February 2019
- January 2019
- December 2018
- November 2018
- October 2018
- September 2018
- August 2018
- July 2018
- June 2018
- May 2018
- April 2018
- March 2018
- February 2018
- January 2018
- December 2017
- November 2017
- October 2017
- September 2017
- August 2017
- July 2017
- June 2017
- May 2017
- April 2017
- March 2017
- February 2017
- January 2017
- December 2016
- November 2016
- October 2016
- September 2016
- August 2016
- July 2016
- June 2016
- May 2016
- April 2016
- March 2016
- February 2016
- January 2016
- December 2015
- November 2015
- October 2015
- September 2015
- August 2015
- July 2015
- June 2015
- May 2015
- April 2015
- March 2015
- February 2015
- January 2015
- December 2014
- November 2014
- October 2014
- September 2014
- August 2014
- July 2014
- June 2014
- May 2014
- April 2014
- March 2014
