8 Best Free Green Screen Software For Windows
Here is the list of Best Free Green Screen Software for Windows using which you can easily remove green screen from a video. These software have Chroma key effect, which lets you easily remove green background from a video footage. Also, you can apply various effects other than Chroma Key, such as effects related to Motion and Transform, Blending and Color correction, Filters, and many different Artistic effects. Most of these software are advanced video editing and graphic software, which not only do chroma keying, but can be used to carry out various video edits.
Using these green screen software, you can easily color key the green background in a video footage. While removing green screen (background), you have to make sure that the green background is absolutely clear with no other color polluting it. A green screen/background behind a subject is detected by these software using chroma key effect. These software then remove the detected green background and subject remains the only visible part to the video footage. It is not really necessary to have a Green background, though it is much preferable while chroma keying. Green color is easily detectable by digital cameras used to create video footage.
Chroma Key is a popular post-production technique, also know as color keying. Using this technique, background of the subject of an image or a video is removed and replaced by another background. It is used heavily in many industries specifically in newscasting, motion picture, and video game industry.
My Favorite Green Screen Software
My pick is Lightworks. It has a simplistic interface and allows you to apply not only chroma key but numerous other effects. Also, it gives you a professional-like experience while editing videos. Even if you are new to video editing, you will find this editing software easy to use.
You can also check out the list of best free Video Broadcasting Software, Video Streaming Software, and Video Editors.
Lightworks
Lightworks is an advanced and popular video editing software, which can easily be used to chroma key green screen videos. It is an amazing video editing software and really popular among professional video editors. Since it’s a comprehensive video editing software, chroma key is not done in one or two steps, but can be a little tricky. It comes full of many advanced features for green screening or color keying a green screen video footage and putting other awesome effects.
Best thing about this green screen software is its awesome interface, though it takes a while to get along with.
How To Remove Green Screen using Lightworks
- When Lightworks loads, first thing to do is create a project and define frame rate. If you are not really sure with what should be the frame rate, then leave it to Auto.
- After the main interface loads, you will see a Toolbox on the left side. From the toolbox, choose import files by simply using the hotkey F1. Import your green screen video file and other media files, like an image or any other video file you want as a background. All these files will be displayed in a panel.
- Again from the toolbox, open Edit panel. An interface will appear with its timeline where you are going to insert the green screen video file. In the same interface, you will add other media files that are to be combined while chroma keying green screen. These media files will be added in separate tracks. Do note that in Edit Timeline, there is only one video track available by default. You need to add more tracks as per the number of your media files. In the first track you have to put green screen video file so as to keep it on front while combining with other media files. To do that, drag and drop the green screen video file on the timeline’s very first track. Afterwards, other media files can be put the same way on different tracks as per your desired order. The reason we’d put the green screen file in the first track is that, if we remove the green screen we will be able to see the background media that the green screen video was hiding in the first place.
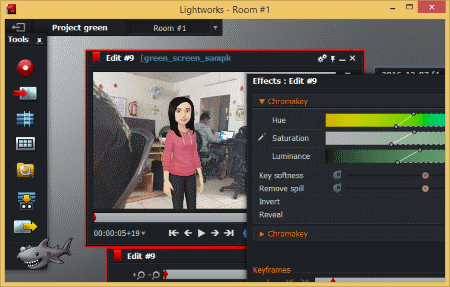
- Once they are all on the edit timeline, right click the green screen video from the timeline and click Add > Keying > Greenscreen.
- As soon as you select Greenscreen, it will remove the green background from the video. Then, all the other media hiding behind the green screen video will become visible. If it doesn’t make the green background invisible completely, you can adjust the Hue, Saturation, and Luminance, and Key softness to get desired results.
- Once you get the desired result on the preview panel, you can export the final file in which Green screen background has been replaced by the media files that you added. To export, there are only two export options available in free version: for YouTube (max 720p) and Vimeo (max 1080p) and in only MP4 format.
There are plenty of other effects that you can apply to your combined video or each media file individually. These effects include Color correction/temperature/tint, Fusion, Mattes, Masks, DVE, etc.
All in all, it’s a nice green screen software for compositing and for best video quality.
Open Broadcaster Software
Open Brodcaster Software is one of the most popular open source green screen software among live streamers. It’s primary focus is to broadcast your content to online streaming services; however, you can use it to apply chroma key to green screen videos along with various other video effects.
Best thing about this software is that you can chroma key recorded video, as well as live feed from webcam. All you need to do is setup a green background while recording yourself, and when you broadcast yourself, OBS can replace Green screen with some other background in real-time.
How To Chroma Key Using OBS
- After the application loads, add a scene. A scene can have as many videos, images, or other media sources. In the created scene, add your green screen video file and other media files, like an image or any other video files that you want to put as your background.
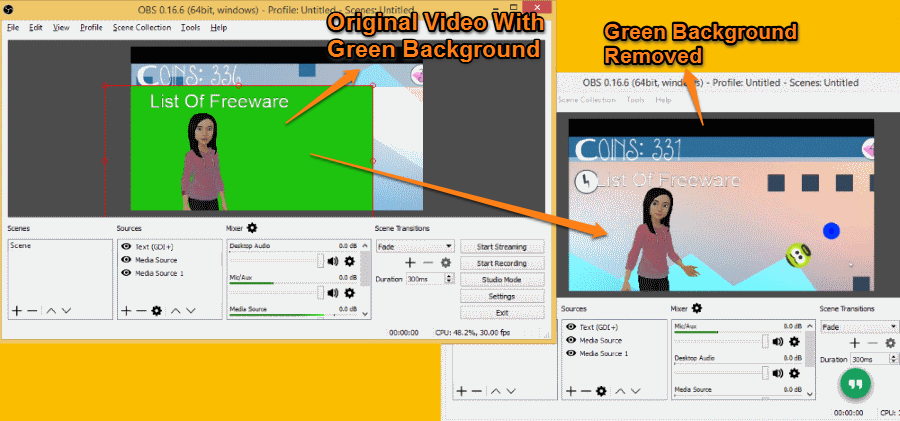
- You can see all of your imported media files overlaid onto the preview screen. Make sure your green screen video is playing at the front. So, when you remove the green background, all the other media behind it that you want as its background will become visible. And if not, use move up and down buttons to easily change the order of the media playing on the preview and take the green screen video to the front.
- Next step is to select the green screen video, then right click on it and click on Filters option in the context menu. A new window opens where you have to add Chroma key filter by clicking on the plus (+) sign. As soon as you select the Chroma key option, the green screen background from your video will be automatically removed and all the other media behind the green screen will become visible; a preview window displays the same.
- While removing green background, you can adjust Similarity, Smoothness, Opacity, Contrast, Brightness, and Gamma. Not only this, but you can add Color key Effect to do color correction.
OBS lets you manage the size and position of the contents in a scene. You can easily resize a video, move a media content to foreground or background, and carry out various other transformations.
There is no trick involved while saving a video. It’s absolutely simple. You have to click on Start Recording and whatsoever you’ve set up on screen will be recorded. In Settings option, you can change the recording output extension from flv to mp4, mkv, ts, m3u8, and mov. Plus, you can broadcast the content to different streaming services online such as YouTube Live, Twitch, HitBox, and many others.
XSplit Broadcaster
XSplit Broadcaster is another popular broadcasting software, which you can use to add chroma key to green screen videos. It’s just as comprehensive as OBS. XSplit Broadcaster comes with a variety of options for chroma keying green screen videos and various color related options to add more effects to the video.
Just like OBS, it allows you to apply chroma key to live feed from a webcam, by removing the green background from it.
How To Chroma Key Using XSplit Broadcaster
You have to sign up with XSplit before you can use this software. You can directly sign up from the software’s interface.
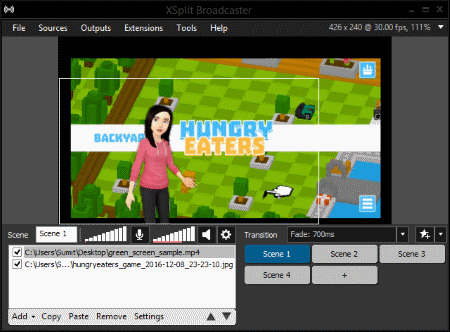
- There is already a scene created. Click the plus (+) button to add green screen video and other media files that you wish to use as background such as an image or any other video file. The preview panel displays all the media file that you import. On the preview panel, you have to keep the green screen video at front. To do that, use move up and move down buttons to change the order of the media appearing on the preview panel.
- Right click on the green screen video right from the preview panel. A pop up will appear with different menu bar options. Choose the Color option, where you have to check mark the Keying option, after which you will see the green background automatically removed from the video. And media sources that were hidden due the green screen are now visible.
- Apart from Chroma keying, you can adjust a lot of color related options of the visible part. You can adjust Brightness, Contrast, Alpha, Hue, and Saturation. Also, by checking the Legacy mode, you can adjust advanced color properties.
- You can resize, adjust, and move a media file on the screen. You can also change the order of a media file to back or front.
You can record and save the file locally in MP4 and FLV file formats.
Working with XSplit Broadcaster for producing chroma key applied videos is as simple and easy as removing green screen in OBS.
Openshot

Openshot is one of the most popular video editor and open source project, which can easily be used to chroma key green screen videos. It has a nice user interface and different effects to add while editing. It is available for Windows, Linux, and OS X. Removing green background from a video in Openshot is easy and doesn’t involve many steps.
Apart from removing green screen, it also gives you a nice video editing experience. You can choose from many effects to add to your video such as Color correction, Saturation, Masks, Blur, Negative, etc. Also, its exporting option is awesome, where you can choose from multiple profiles and formats.
How To Remove Green Background From A Video In Openshot
- Start a project in Openshot. Import the green screen video along with the media files you want to use as a background after chroma key is applied to the green screen. These media files could be a picture or any other video file.
- Drag and Drop the green screen video on the very first track of the video timeline and all the media files on the other Tracks in desired order. The reason for doing that is to keep our green screen video in front. So, when the green screen from the video is removed, all the media hiding behind the green screen can become visible as its background.
- From the Effect panel, which contains different effects, select, then drag & drop Chroma Key effect on the green screen video file on the timeline.
- Once the effect loads, you will see its properties appearing on the left side of the timeline. By default, the key color is set to black. Double click on the key color and a color picker will appear, which lets you directly pick the color to remove from the video. As soon as you finish that, you will see the green screen fading and the media behind becoming visible.
- If the green background does not disappear completely, you can adjust Fuzz until the video’s green background is absolutely invisible.
- When you are satisfied with the background, you can put in various other effects related to bending and transformation and other artistic effects. Also you can add filters and perform color correction.
- Once all set, you can export your video in different profiles, like Blu-ray, DVD, and Web. If you are exporting simply to your desktop, then you can export in formats like MP4, FLV, OGG, MOV, and WEBM, with different resolutions, fps rate, and quality. Moreover, you can choose Advanced mode to export the video, where you can set everything manually, such as Width, Height, Frame rate, Pixel ratio, Image sequencing, and Video/Audio settings.
It works fine while removing green screen from a video and combining videos to make a nice quality video.
VSDC Free Video Editor

VSDC Free Video Editor is an easy to use video editor for chroma keying. The interface is very easy and inclusive of all the essential tools for basic as well as advanced video editing. With this software, you will be able to produce awesome movies with fancy backgrounds, like professionals do in movies, with least effort.
Working with VSDC is really simple because it allows you to have multiple media files on a scene and each file can easily be dragged freely across the screen. It comes with a variety of features to add many effects to your video content.
How To Chroma Key In VSDC Free Video Editor
- To begin with, you need to start a project. Import your green screen video and all the other media files to the interface. All the imported files will appear on the timeline at the bottom as separate layers. You can drag them up and down to change their order. Keep the green screen video on the very first position on the timeline to keep it visible at front. So when you chroma key the green screen, other media that you want to as your background like a picture or a video will become visible.
- Right click on the Green Screen video file, go to Video Effect > Transparency >Background remover. This tool gives you the options to remove green background from the cursor position, from the beginning, for whole parent duration, or you can also lock start and end time for this effect to occur. After setting the time duration, click OK.
- Now, go to the Background Remover Setting on the right side of the interface. Click on the Color picking icon option, and move the cursor to the preview screen, and click on the green part of the video. This will pick the background color that you want to remove and it will automatically remove the background.
- Lastly, you can export the final content in different formats, like AVI, MPG, MOV, WMV, FLV, MKV, RM, and SWF. You can also choose different profiles, like MPEG4, AVC Profiles, and Loseless Profiles.
Most of the features while chroma keying are not available for free and reserved for Pro version of VSDC, like Min brightness threshold, Min chromaticityU(V) threshold, Brightness, and Blend value.
Blender
Blender is another very popular open source computer graphic software which you can use for green screen video editing. Blender is a huge application, plus it’s bit complex for chroma keying. Blender uses node-based modelling technique to create animation and is really popular among animators. We are going to use node-based modelling to remove green background from videos as well.
How To Green Screen Chroma Key Using Blender
- After Blender loads, the first thing to do is to change its mode from Video editing to Compositing mode. This way, you will be able to combine two or more videos by using node modeling.
- Next step is to check mark Use Nodes option. Also, check mark Auto Render to keep your creation real-time updated.
- As soon as you check Use Nodes, you will see two nodes appearing right upfront with their properties mentioned on the right. Delete the first node, which is Render Layer (its of no use while chroma keying), simply by selecting and pressing Del key from the keyboard. Leave the Composite layer as it is.
- Click on Add > Input layer > Movie clip. Now here, you have to add the green screen video. For each media file you have to repeat the same steps to create a new node but by choosing different input layers for different media files. These other media file nodes can be an image or any other video node that is to be your background with green screen media file. Fetch the video files from an inbuilt file explorer.
- After all the media nodes are created, you need to create another node called View Node to preview the progress of your work. Click on to Add > Output > Viewer in the new node to be able to preview your work. Place the View node to the right, and Video node to the left.
- Next step is to join the Video node to the View node. This can be done by dragging the Image socket on the Video Node to the Image socket of the View Node. A connecting line appears between the two nodes. After the connection, activate the view node and you can preview your work on a bigger screen.
- To combine all the media files, you need to drag the image socket of all the media nodes to the Composite node. With this, we can have a combined video.
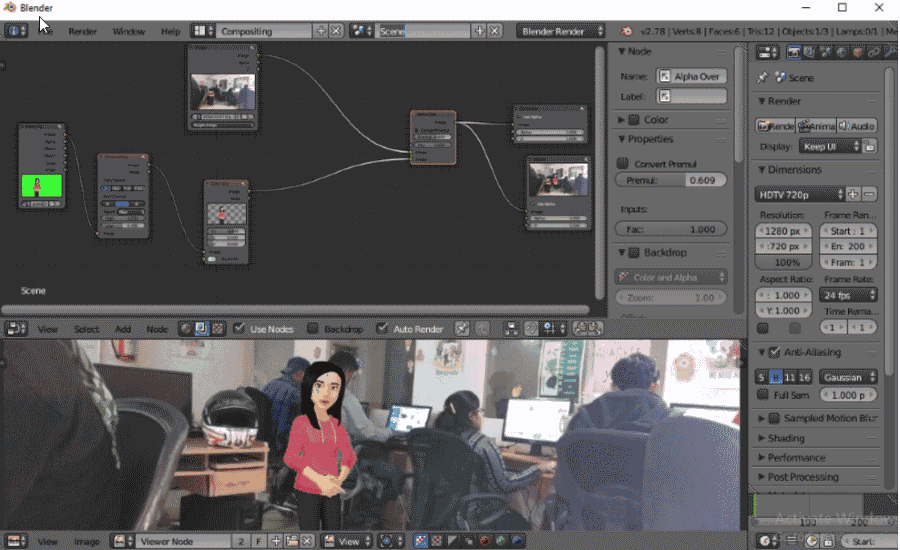
- Now you have to create Channel key Node; this node is to remove the green background. Create this node by clicking on Add > Matte > Channel key. After creating Channel key node, drag it on the wire connecting green screen Video node and all the other nodes, and drop it. It will automatically be connected as a middleman between Movie and View node. You will find that most of the green background in the Video node has been removed. Still, you can scroll the Channel key color value till the image looks okay and the remains of green screen is not visible, if any.
- You can drop as many nodes between Movie and View nodes to add more effects, such as Different masks and keys. Nodes related to Color config would be of great help. In these nodes, you can easily change Brightness, Hue, Gamma, Color saturation, and different other effects.
- While producing the final output, you can go through a lot of different settings, such as selecting different Resolution, Aspect ratio, FPS, Video Extension, Codec, etc. Once all set, click Animation and the composited video will be rendered and saved on your desktop.
Blender is no doubt an awesome graphic software to work with. But, if your only aim is to add chroma key to a green screen videos and not complex video editing, then you may opt for some other video editing software.
Shotcut
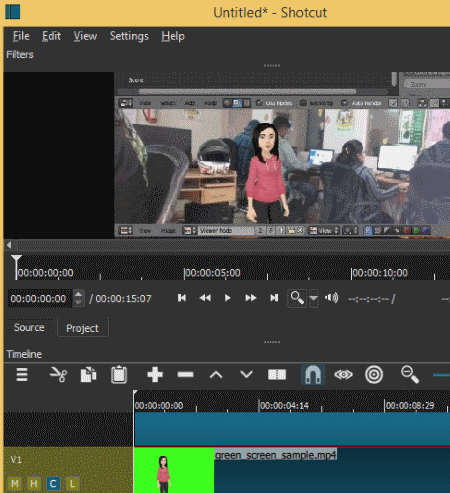
Shotcut is another popular free and open source video editing software to be used as a green screen software. Using chroma key in Shotcut is really easy, because of its feature rich and easy to use work environment. It is cross-platform and available for Windows, Mac, and Linux.
How To Replace Green Screen Background Using Shotcut
- Import green screen video and other media files that you want as your background like an image. Put them on timeline one by one and make sure that put green screen video at the first position.
- After adding all the media files on the timeline, you have to activate the Composite value of the green screen video file. This will let the green video file to be combined with other media files. This can be done by selecting the green screen video, then clicking on the C icon, that is available right next to the timeline, on its left side. C stands for Composite.
- After activating the composite function, select the green screen video. From the Filters panel at the top, add the filter called Chroma Key Simple. Set the key color of chroma by picking the background color from the green screen video on the main interface. This means that you can use this software to Chroma key other videos as well, like, Blue screen videos. Now adjust the Distance slider to clear the edges of the visible part of the green screen video, from the remains of green background.
- Finally after everything is set, you can export the video file in different formats, such as mp4, md5, mkv, flv, mpeg, etc. Also, you can set video resolution, fps rate, scan mode, interpolation, etc.
Applying chroma key with Shotcut is easy. It has numerous effects to choose from other than Chroma key, such as Color correction, Contrast, Grading, Brightness, Blur, etc. This software frequently crashed while testing; however, the video editing options and overall experience was good.
Videopad Video Editor
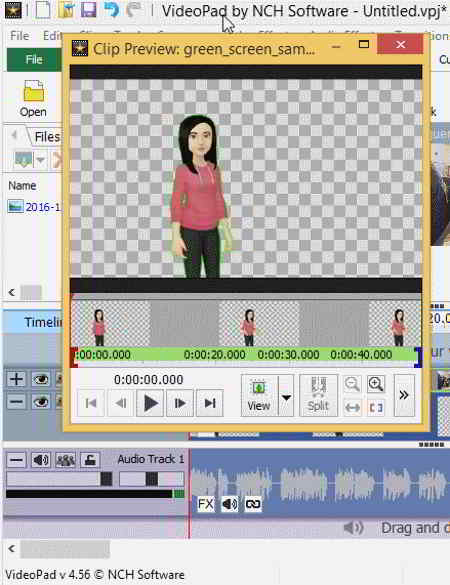
Videopad Video Editor is a general video editor that can also be used for chroma keying. It is absolutely free as long as you are not using it for any commercial purposes. It has a great interface and an easy to use work environment. While starting with it, you have to go though different steps in order to remove green background from a video and compositing with other media files.
How To Chroma Key With Videopad Video Editor
- Once the interface loads, drag and drop the green screen and other media files on the Media Bin to the left of the main interface. These media files will be your background so it may be an image file or any other video file.
- You do not need to create different tracks in timeline to add the media files. But you have to drag and drop all the media files one by one from the media bin to overlay them in a single track. Once all the media files are on the timeline, you have the change the order of green screen video and keep it at the top, by simply dragging it up and down.
- Right click the green screen video on the Media bin. Click on Add effect and a long list of different effects will appear. From these effects, choose Green Screen effect. It will make the green background go invisible, but not completely. You have to adjust the visibility of remaining of green screen by scrolling its threshold.
- For adjusting the video position on the display screen, add Position effect. You can adjust the position of the video horizontally and vertically.
- It has many types of effects that you can apply to the visible part of your video, such as Motions & Transforms, Blending & Color correction, Filters, and Artistic.
Lastly, you can export the film to your local system or online portals such as YouTube, Facebook, Dropbox, and Google Drive. It allows you to change Resolution, FPS, Codec, and File Format of video. You can export your media content in flv, mp4, mov, avi, asf, swf, ogv, gif, etc. Working with this software to remove green screen is as easy as working with any other software in this list.


About Us

We are the team behind some of the most popular tech blogs, like: I LoveFree Software and Windows 8 Freeware.
More About UsArchives
- April 2024
- March 2024
- February 2024
- January 2024
- December 2023
- November 2023
- October 2023
- September 2023
- August 2023
- July 2023
- June 2023
- May 2023
- April 2023
- March 2023
- February 2023
- January 2023
- December 2022
- November 2022
- October 2022
- September 2022
- August 2022
- July 2022
- June 2022
- May 2022
- April 2022
- March 2022
- February 2022
- January 2022
- December 2021
- November 2021
- October 2021
- September 2021
- August 2021
- July 2021
- June 2021
- May 2021
- April 2021
- March 2021
- February 2021
- January 2021
- December 2020
- November 2020
- October 2020
- September 2020
- August 2020
- July 2020
- June 2020
- May 2020
- April 2020
- March 2020
- February 2020
- January 2020
- December 2019
- November 2019
- October 2019
- September 2019
- August 2019
- July 2019
- June 2019
- May 2019
- April 2019
- March 2019
- February 2019
- January 2019
- December 2018
- November 2018
- October 2018
- September 2018
- August 2018
- July 2018
- June 2018
- May 2018
- April 2018
- March 2018
- February 2018
- January 2018
- December 2017
- November 2017
- October 2017
- September 2017
- August 2017
- July 2017
- June 2017
- May 2017
- April 2017
- March 2017
- February 2017
- January 2017
- December 2016
- November 2016
- October 2016
- September 2016
- August 2016
- July 2016
- June 2016
- May 2016
- April 2016
- March 2016
- February 2016
- January 2016
- December 2015
- November 2015
- October 2015
- September 2015
- August 2015
- July 2015
- June 2015
- May 2015
- April 2015
- March 2015
- February 2015
- January 2015
- December 2014
- November 2014
- October 2014
- September 2014
- August 2014
- July 2014
- June 2014
- May 2014
- April 2014
- March 2014
