14 Best Free MAC Backup Software
Here is a list of the best free MAC backup software. Using these you can easily backup MAC. These MAC backup freeware let you easily backup Mac data locally or on cloud. With the help of these software, you can directly upload backup data to different cloud services, like: Google Drive, Google Docs, Amazon S3, Dropbox, Azure, Openstack, HPCloud, HPHelion, Rackspace, SoftLayer, OracleCloud, Microsoft OneDrive, OneDrive for business, OpenStack, Remote FTP/SFTP server, etc. The files can also be recovered from the backup as and when required. The options are also provided to schedule the backups and many more such options.
My Favorite MAC Backup Software:
Out of the list of the MAC backup software listed here, I like Time Machine the most. It is due to the fact that it is quite simple, feature rich, and lets you easily backup data. The backup can be set to automatically backup data at defined time intervals. The best part is that, it backups only the files changed since previous backup, thereby consuming less space and time. The backup can be done locally, on Time Capsule, OS X server, or external hard drives. Some versions of MAC can perform backups with this MAC backup freeware even while sleeping. Data recovery using Time Machine is also very easy.
Also check out the list of Best Free System Backup Software for Windows, MAC Data Recovery Software, and Best Free Registry Backup Software.
Time Machine
Time Machine is a very good inbuilt backup software for MAC that can be used to backup MAC for free. Time Machine keeps hourly backups for past 24 hours, daily backups for past month, and weekly backups for all previous months. Older backups are deleted when the disk is full. Option is provided to delete older backups on your own. You can also choose the option to backup at a particular instant. The backup process can be toggled On/Off anytime. It can also be stopped, paused, or resumed. Option can be set to display Time Machine in menu bar, so as to display the Time Machine backup status, i.e. whether it is backing up, idle until next automatic backup, or unable to complete backup. In some MACs, backup can be carried out even when the computer is sleeping. Time Machine does incremental backup on Mac, which means it backs up only the files changed since previous backup, thereby making the process of backing up even faster. Set the options to exclude some of the files/folders from backup, i.e. not to be backed up. The data can be backed up on hard drives, Time Capsule, OS X Server on the network, or external hard drive. The backups can be encrypted if required for security purpose, where you have to enter a password in order to encrypt the files.
How to backup MAC using Time Machine:
- Turn Time Machine on.
- Specify the folders/files to be excluded from backup.
- Specify the Drive/Airport Time Capsule where you want to add the backup. Choose whether you want to encrypt the backup data and enter the password if you want to do so.
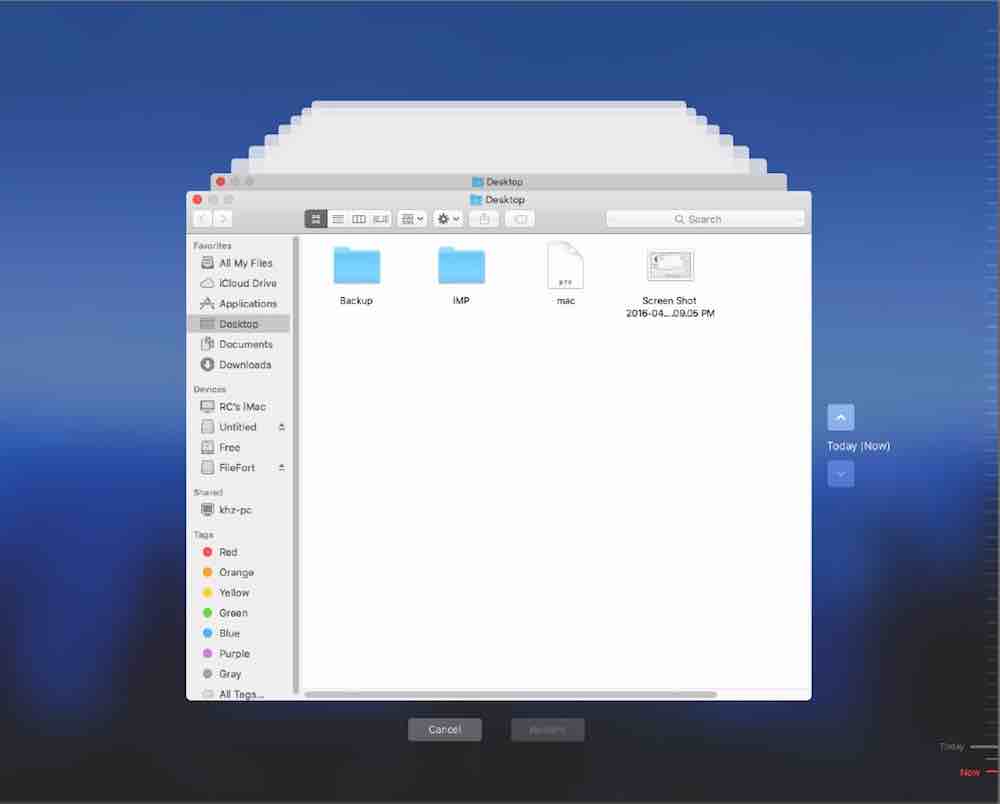
How to restore files from Time Machine backup:
- Perform a Spotlight Search for Time Machine. This will lead you to the Time Machine view.
- Select the timeline of any time duration or you can also search for a file name to quickly go to the time duration with the specified file name. Then you can choose the option to restore MAC to the previous version.
- If required, you can also choose to restore all the files from the time machine backup. In this case, you have to hold the Command+R keys while the MAC is starting, and release the key when Apple logo appears. After that, you have to select the option to restore from Time Machine Backup.
Time Machine is available for OS X Snow Leopard, OS X Lion, OS X Mountain Lion, OS X Mavericks, OS X Yosemite, and OS X El Capitan.
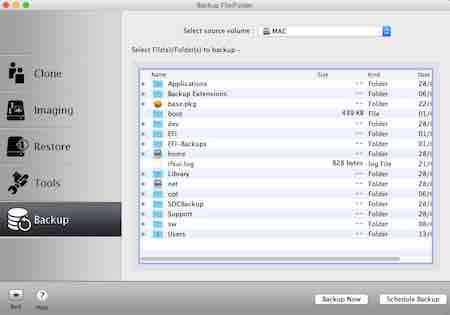
FileFort
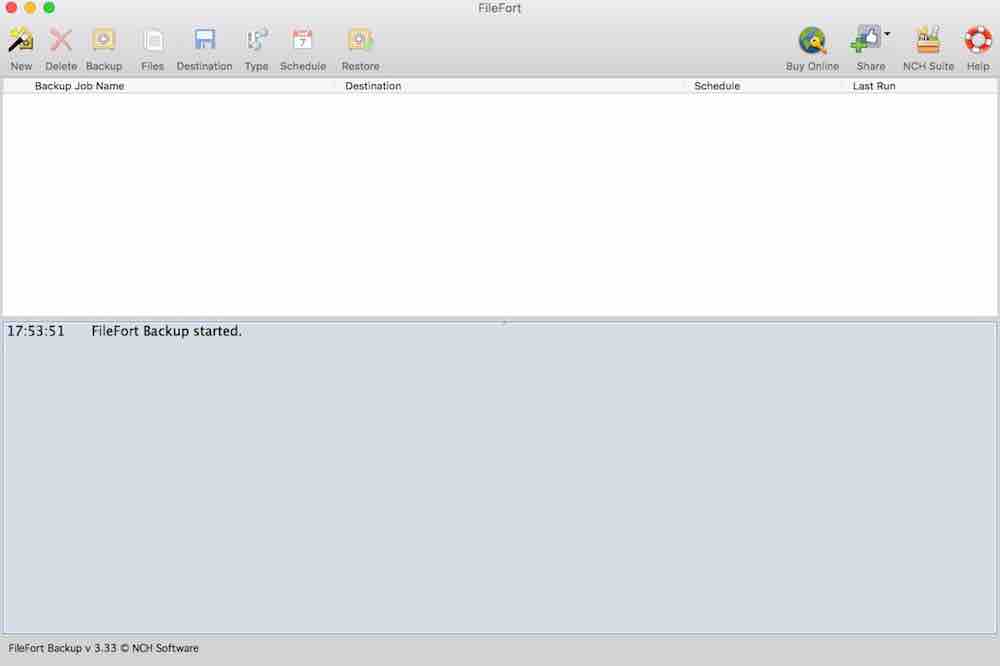
FileFort is a simple software to backup MAC. You can choose which files or folders are to be backed and which files or folders are to be excluded from backup. Here you can do a full backup, historical backup, or incremental backup. If required, it can be used to create BKZ files, create self-extracting app files, create ZIP files, mirror files in subfolder, or encrypt using MEO encryption. It provides you the option to backup on either cloud or do a Hard Backup. Cloud options available are: Google Drive, Google Docs, Amazon S3, Dropbox, or Remote FTP server. In order to use the cloud options, you have to login. Hard Backup options available are USB stick, CD/DVD/Blu-ray using express burn, External or Backup Hard Drive, Network Folder, or another folder on the same computer. The backups can be scheduled at any specified time. Run backup at startup if required. It also lets you restore backup file or download FTP backup file.
How to backup MAC using FileFort:
- Specify which folder/file types are to be backed.
- Include or exclude certain types of files. Exclude files that are larger than a specified size. Also, there is an option to exclude audio, video, and image files.
- Choose the backup file type from the options to create a BKZ file, create self-extracting app file, create ZIP file, mirror files in subfolder, or encrypt using MEO encryption. In case you choose the option of MEO encryption, you have to enter the encryption key.
- Option to schedule backup at any specified time or run backup at startup are available. If required, change the backup option settings at any moment of time, delete the backups, or restore from the backup.
- You can also choose to backup all jobs, restore backup file, or download FTP backup file.
- In the paid version, i.e. FileFort Plus, you are provided with the option to encrypt data, automate backup, and backup emails.
FileFort can be used on OS X Leopard, OS X Snow Leopard, OS X Lion, OS X Mountain Lion, OS X Mavericks, OS X Yosemite, and OS X El Capitan.
Backuplist+
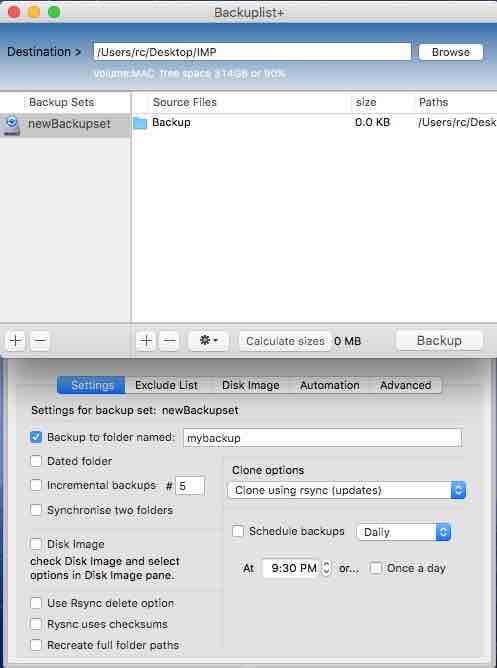
Backuplist+ is a simple freeware that can be used to backup MAC. It is quite a feature rich MAC backup software. The best part of this software is that it creates copies instead of archives, so that you don’t have to restore your files. Choose the option to create backups, create incremental backups, sync two folders, clone drives, backup whole system, backup some files, and make a copy of hidden recovery HD. The backup data can be encrypted if required. Some files can be added to the Exclude List so as to take less time and space for the backup process. The backups can be scheduled to run automatically daily, weekly, hourly, or each minute. Disk Images can also be created for the backup set. Several automation options can be set for the backup to repair permissions of startup disk, run Applescript file, run Shell command, send email notification, sleep computer, shutdown computer, etc. A number of Backup sets can be created for different data sets. Expert users can enter their own string of options or commands. You can make cloned volumes bootable, set imported from older backuplist+ version, create duplicate of backup sets, add system and application preferences, etc. Different logs can be viewed from a set of options: rsync log, rsync error log, backuplist + log, debug log, scheduling, and volumes folder.
How to create backup for MAC using Backuplist+:
- Open Backuplist+. Gain root access by entering password.
- Drag the destination folder/volume.
- Add the files that you want to backup. Click on the settings and change the preferences that you want to incorporate in the backup, i.e. folder settings, incremental backups, synchronize folders, disk image settings, Resync options, clone options, exclude options, disk image options, automation, encryption, and any advanced options if required.
- If required, the size of the backup can be calculated. Finally clicking on the Backup button, backs up the data to the desired location as per the selected settings.
Backuplist+ is available for OS X Mountain Lion, OS X Mavericks, OS X Yosemite, and OS X El Capitan.
CrashPlan

CrashPlan is a software that lets you backup MAC. Though the paid version is used for cloud backup for MAC, it can also be used to backup locally. It can be used to backup friend’s computer on your MAC using a backup code, create backup on another computer, create backup in folder, and backup on external drive for free. You are also provided with the option to backup to CrashPlan central for free for 31 days. The data that is backed up can be secured with the encryption keys from the option: Standard encryption, Archive key password, and custom key. The options can also be set to frequently update the data backup. The backup data can also be restored using this software. The option can also be set to set backup security alerts which help you to get notified of backup status through Email. Email notifications can be set to send backup status report, send warning alert, and send critical alert. The options can also be set to which backups are to be kept or deleted after a specified time interval.
How to backup MAC using CrashPlan:
- Open CrashPlan. Register with CrashPlan and then you are taken to the main interface.
- Select the files that you want to backup.
- Select the location where you want the files to be backed up from the options: local, cloud, friends computer, or any other folder. Then simply click on the option Start Backup to backup MAC to a desired location.
- In case you want to backup your friend’s MAC on your own MAC, you just have to enter the backup code into your friend’s computer and then the data can be backed up.
CloudBerry Online Backup
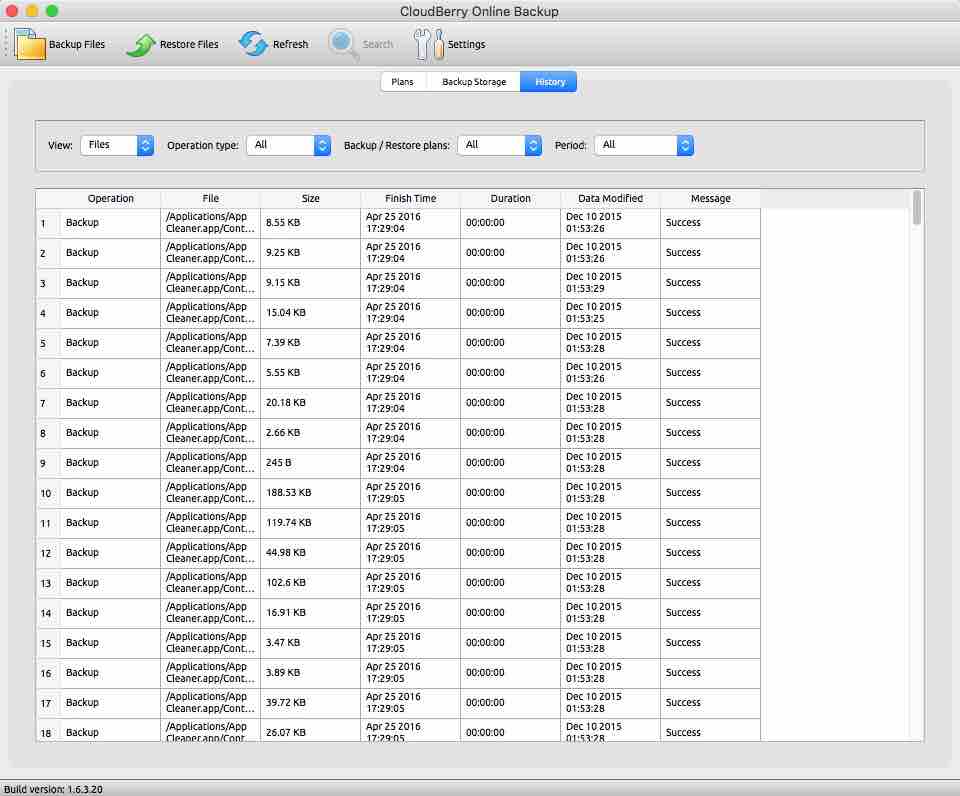
CloudBerry Online Backup is a good MAC backup software where you can choose to backup MAC locally or on cloud. It can also be used to restore files from backups. You have the option to backup Mac on AmazonS3, Azure, Openstack, HPCloud, HPHelion, Rackspace, SoftLayer, OracleCloud, and GoogleCloud. This software can also be used to create backup schedules and delete older versions of the files. If required, choose the option to be notified by Email about any backup errors or about all the backup information.
How to backup hard drive for MAC using CloudBerry Online Backup:
- Create a backup plan by undertaking the following steps:
- Specify plan name.
- Select cloud storage option.
- Select Files and Folders you want to backup.
- Choose whether to exclude system folders or not.
- Specify the retention policy for backup files, which may be either defaults, or custom retention policy.
- In the custom retention policy the options can be chosen to delete older versions of the file and the number of versions of the file to be kept.
- The option can be chosen to delete the files that are deleted locally.
- The schedule option can be set to run scheduled backups at a particular time, like: manually, specific date or recurring.
- Set the options for scheduling the backups and choose the options to be notified by email about the backup.
- Create a restore plan in the same way.
- After the backup plan is created, choose the run now option, and then the backup process starts. The files can also be restored in the same way.
The history of backup scan also be viewed. It is available for OS X Mountain Lion, OS X Mavericks, OS X Yosemite, and OS X El Capitan.
IDrive
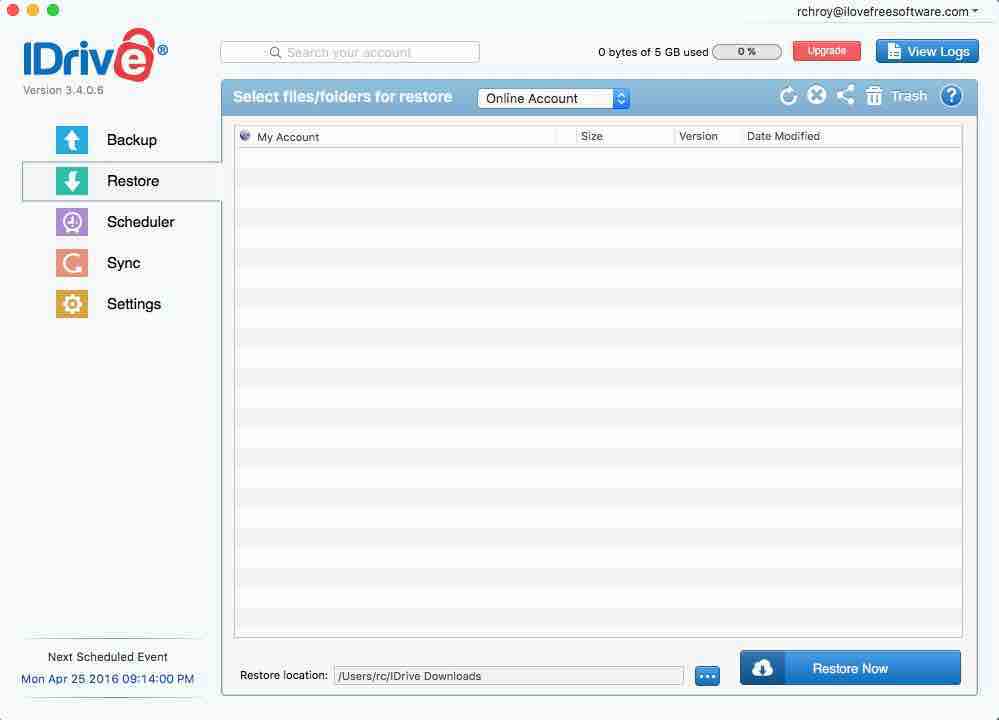
IDrive is a good software that provides free online backup for MAC. It can also be used to backup data locally or on Wi-Fi device. In the free version, you are provided with 5GB free data. In case you require more storage, you have to upgrade your account. It can be used to backup a number of devices, like: PC, MAC, iPhone, iPad, and Android. The computers can be managed remotely via web console. IDrive can be used to Backup MAC, restore data on MAC, Schedule backups, sync files with linked devices, etc. If required, files and folders can also be synchronized to the web interface. Documents can also be shared with others through this freeware.
How to set up cloud backup for MAC using IDrive:
- Open IDrive and register for a free account.
- Install the software and login.
- Choose the option whether you want to backup files locally or to IDrive account. Select the location where you want to backup. Select the files that you want to backup.
- Set the option whether you want to start backup locally or create a backup schedule. If required, various files can be excluded from backup. In case of online backup, Bandwidth Throttle can also be set up. Different options can also be set up for continuous data protection, backup location of IDrive account, set alerts, and many more options.
- The Schedule Backup options can be set to notify about the backup through Email or desktop notifications.
- Finally when data is backed up, it can be restored from both online account or local backup.
IDrive is available for OS X Snow Leopard, OS X Lion, OS X Mountain Lion, OS X Mavericks, OS X Yosemite, and OS X El Capitan.
SuperDuper!
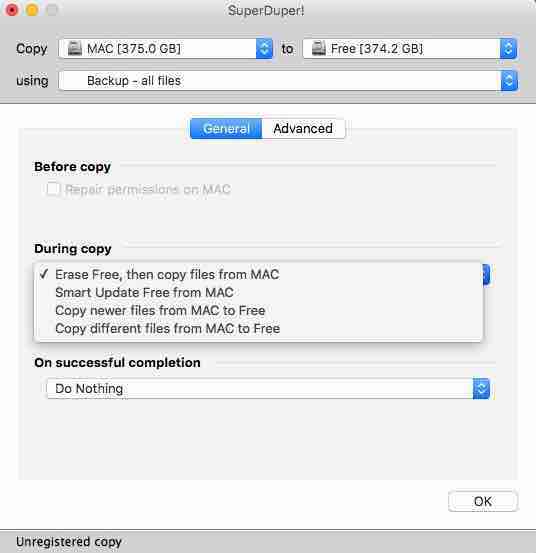
SuperDuper! has a free version of the software that can be used to create MAC backups and recover data from backups. If required it can also be used for cloning drives. This can also be used to schedule backups. Different Backup and restore options are available to help you perform different tasks. Choose the option to erase destination drive and then copy. You can choose to perform different actions once backup is complete, like: Do Nothing, Restart from Destination drive, Set Destination Drive as Startup disk, Eject destination drive, Shut Down computer, Sleep computer, or Quit SuperDuper!. The option can also be set to Run Shell Script before these operations start: Copying ACLs from target drive, Creating Disk Image of destination drive, Installing package on destination drive, and Running Shell Script after the completion of Copy.
How to backup MAC using SuperDuper!:
- Open SuperDuper!.
- Set the target drive that you want to backup and the destination drive where you want to create backup for MAC.
- Choose the script from the list of Standard Scripts: Backup all files, Backup user files, and Restore all files. The option can be chosen to enter your own script.
- Change the options to set the actions Before copy, During Copy, and On successful completion.
- Finally click on the Copy Now button, which in turn creates backup and performs actions as requested.
- It can also be used to recover files from backup.
SuperDuper! is available for OS X Lion, OS X Mountain Lion, OS X Mavericks, OS X Yosemite, and OS X El Capitan.
iBackup
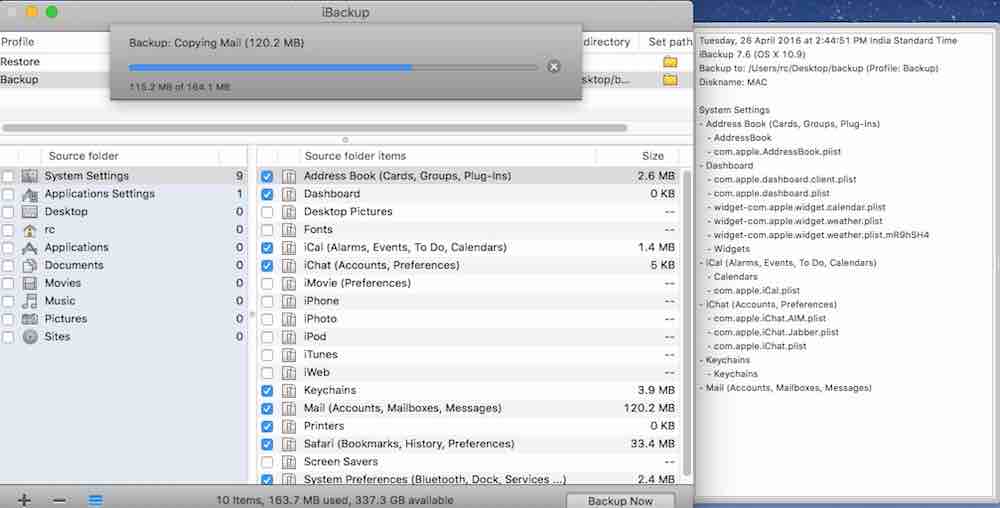
iBackup is a simple freeware software that can be used to create backup for MAC. It can also be used to restore data from backup. It backups different types of data, like: user data, system and application settings, and other third party applications settings. Here you can select which data is to be backed up and which data is not to be backed up. It lets you backup data on servers and also lets you backup data locally. The backup process can be automated and the option can also be chosen to run scripts during backup. There are a number of plugins available to help you further enhance backup options. The log files of the backup can also be viewed.
How to backup MAC using iBackup:
- Open iBackup.
- Choose the data that you want to backup and the data that you don’t want to backup.
- Specify the location where you want to backup the data.
- The log file of the backup can also be sent by mail.
- Set the backup connection if you want to perform a cloud backup for MAC.
- After you are done selecting data, details are displayed, like: number of items, space required, and various other information.
- Finally click the button Backup Now and data is finally backed up to the desired location.
iBackup can be used on OS X Puma, OS X Jaguar, OS X Panther, OS X Tiger, OS X Leopard, OS X Snow Leopard, OS X Lion, OS X Mountain Lion, OS X Mavericks, OS X Yosemite, and OS X El Capitan.
CloudBacko
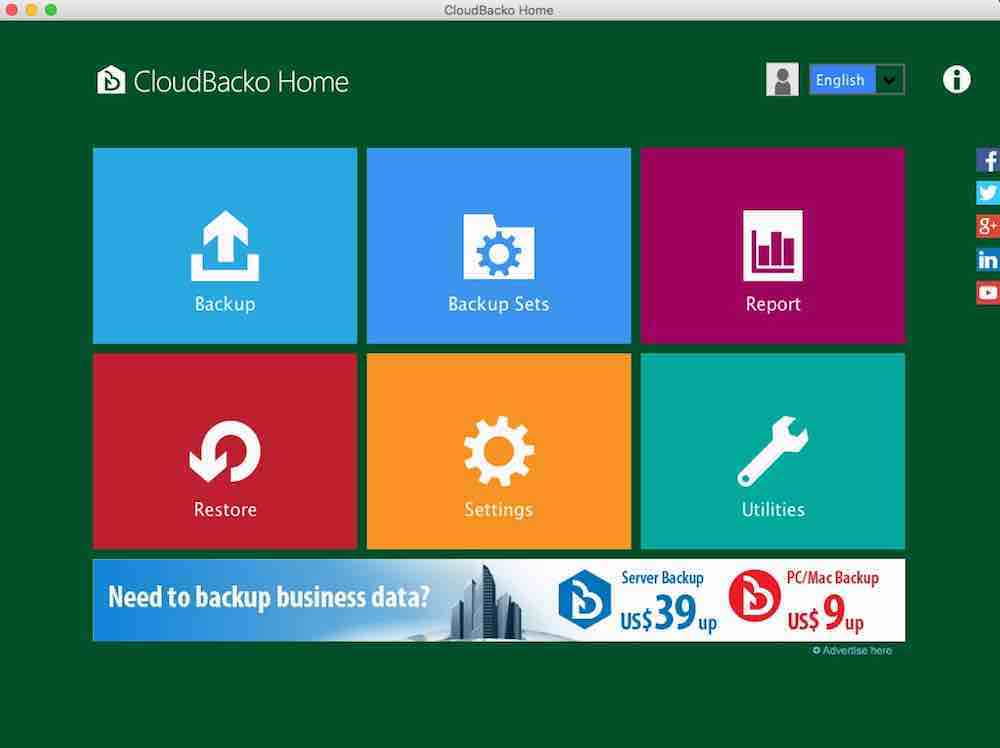
CloudBacko is a simple freeware that lets you backup MAC and restore documents from MAC backup. Using CloudBacko, the cloud backup for MAC and the local backup of MAC can also be done. Cloud backup can be done on Aliyun, Amazon Cloud Drive, Amazon S3, AWS API Compatible Storages, CTYun, Dropbox, FTP/SFTP, Google Cloud Storage, Google Drive, Microsoft Azure, Microsoft OneDrive, OneDrive for business, OpenStack, Rackspace Cloud files, External USB drive, and Mapped network drive. Different options can be set to set Proxy. There are some other utilities as well, like: Data Integrity Check, Space Freeing Up, Export settings, delete backup data, and decrypt backup data.
How to activate CloudBacko:
- Open CloudBacko.
- Then you have to sign into it with any social media account, like: Google+, Facebook, Twitter, etc.
- Then you are provided with an Authorization code, which you have to paste in the software.
How to backup Mac data using CloudBacko:
- Select the files/folders that you want to backup.
- Select the destination storage of the backup.
- If required, a Privacy lock can be set with a password.
- Choose the option to run the backup.
- Finally the files are backed up to the desired location.
SilverKeeper
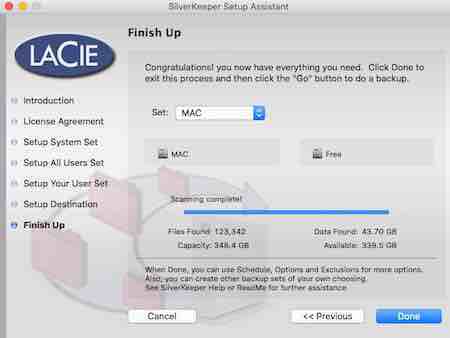
SilverKeeper is a simple freeware that can be used to backup MAC for free. It can also be used to synchronize folders/files and create scheduled backups. The options can also be set synchronization, log files, which items are to be displayed in the log files, whether to show and count invisible files, show and count package contents, and many other such options. Data can be restored from the backup.
How to backup MAC hard drive using SilverKeeper:
- Open SilverKeeper.
- Select the Source files that you want to backup. Select the Destination where the data is to be backed up.
- The details about the data to be backed up are displayed.
- Choose the schedule options which may be either: daily, monthly, or weekly as per your requirement.
- Set any exceptions for the files that you don’t want to be backed up or not to be removed.
- Click on the Go button and this in turn backups MAC files.
Snap Backup
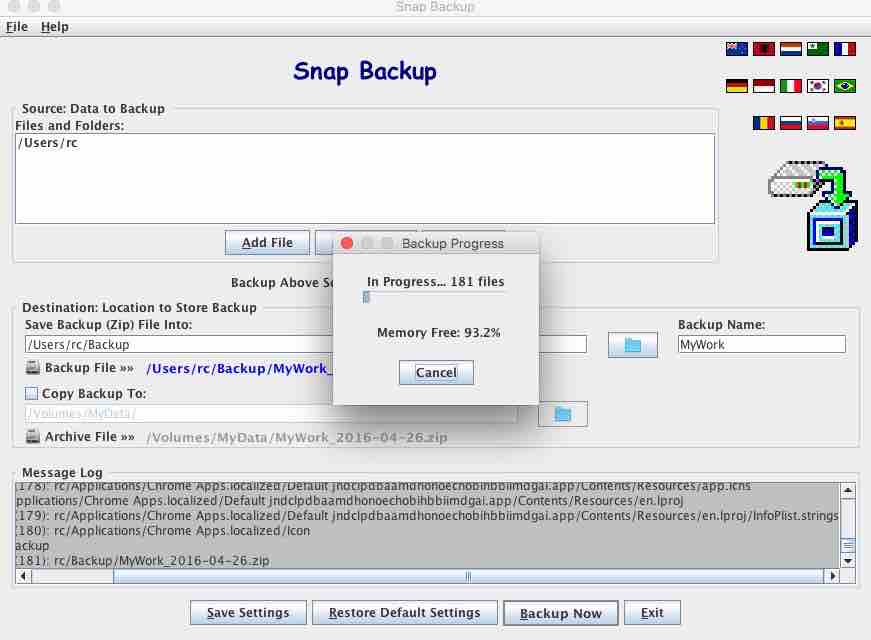
Snap Backup is a good freeware to create backup for MAC. Using this freeware, you can backup hard drive MAC. If required, the filters can also be applied or edited. Different backups are saved with different names along with the backup date, that helps you to easily identify the backups. Data can be backed up on the same drive or some other folder, like: hard disk, USB flash drive, memory stick, etc.
How to backup MAC using Snap Backup:
- Open Snap Backup.
- Add the files/folders that you want to backup.
- Add/Edit the filters that you want to be applied. Here different rules can be included or excluded to backup files, skip files/folders matching a particular statement.
- Specify the location where you want to backup data.
- Specify the backup name and change the file name format.
- Finally on clicking the Backup Now button, data is backed up to specified location.
rsync
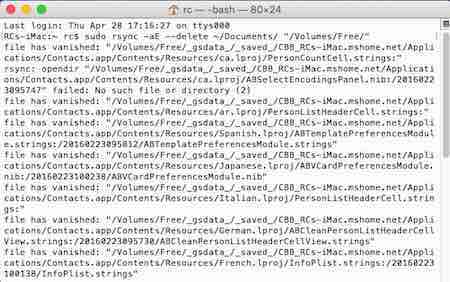
rsync is a command line tool that can be used to backup MAC. This command is already available on MAC. In order to use this feature you have to simply type a command in the Terminal. Just enter the command and the data is backed up to your desired location. There are a number of other options that can be done using rsync, like: copy files, synchronize files, etc.
rsync -aE --delete ~/Documents/ "/Volumes/Free/“
The above command copies the files available in Documents to the drive Free.
rsync can also be paired with automator to create a workflow so that the data is easily backed up without the need to go back to the terminal every time.
Bonkey
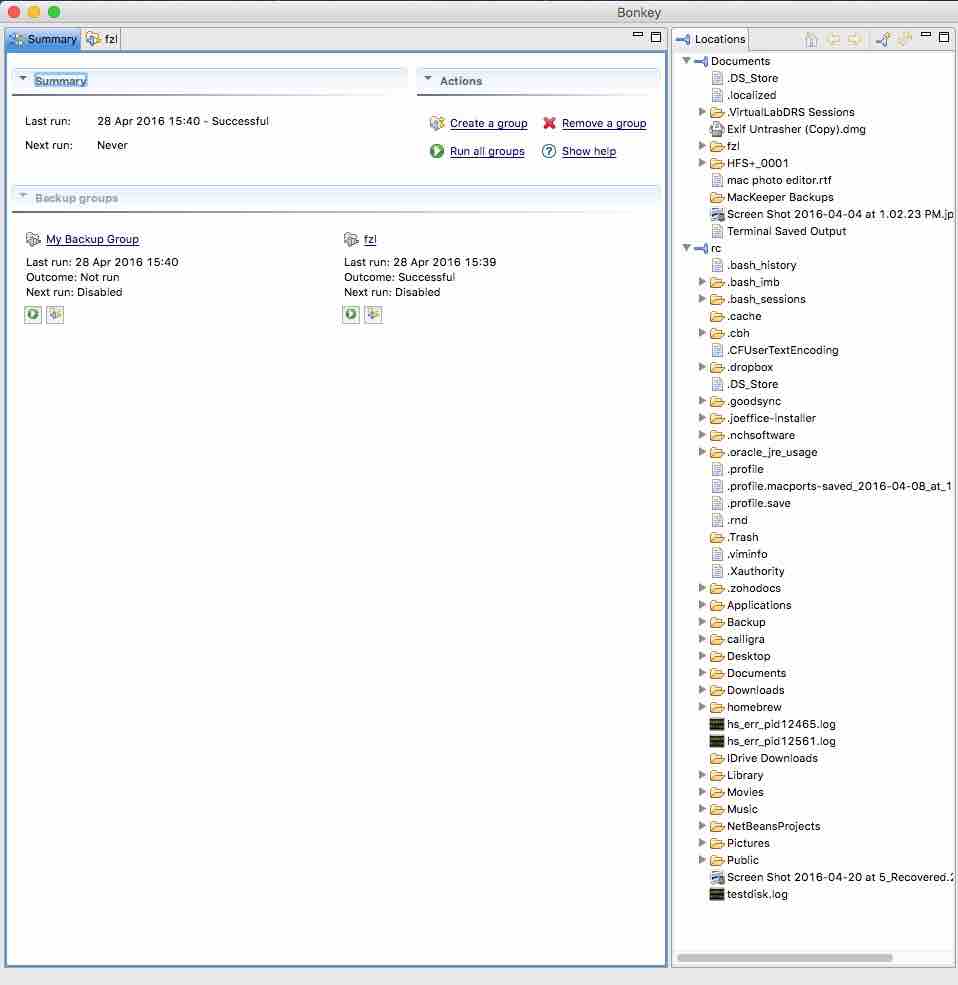
Bonkey is a simple software that lets you backup data on MAC for free. Data can be backed up on Local disk, Local folder, Network Location (Windows Share), FTP location, SFTP location, SQL Server database, Amazon S3, and Rackspace Cloud Files. The files can also be encrypted and be set to require a username and password. The backup process can be automated to run at specified times. The option can be selected to either make a complete backup or to perform backup of modified files only. The log files can also be maintained about the backup and if required the notification option can be set to be notified about backup via Email.
How to perform MAC Backup using Bonkey:
- Open Bonkey and choose the option to create a group.
- Enter the name of the backup group and set the frequency after which it is to be updated. Choose the location where you want to backup from a number of options available. Enter different details, like: password, name, address, etc. Choose the option if the backup is to be encrypted.
- Click on the run all groups option to perform the backup of all the groups or run the backup of single groups using the play button next to every group.
- The backup process runs at specified times as scheduled. If desired, the schedulers can be turned ON/OFF as and when required.
StellarDriveClone
StellarDriveClone free lets you easily backup MAC data files.
How to backup MAC using StellarDriveClone free:
- Open StellarDriveClone free.
- Choose the backup option and select the files to be backed up.
- Select the location where it is to be backed up.
- Click on the Backup Now button to backup the files.
The software has a paid version as well, that comes with features like Clone Mac to create bootable dmg, image Mac hard drive, etc.


About Us

We are the team behind some of the most popular tech blogs, like: I LoveFree Software and Windows 8 Freeware.
More About UsArchives
- April 2024
- March 2024
- February 2024
- January 2024
- December 2023
- November 2023
- October 2023
- September 2023
- August 2023
- July 2023
- June 2023
- May 2023
- April 2023
- March 2023
- February 2023
- January 2023
- December 2022
- November 2022
- October 2022
- September 2022
- August 2022
- July 2022
- June 2022
- May 2022
- April 2022
- March 2022
- February 2022
- January 2022
- December 2021
- November 2021
- October 2021
- September 2021
- August 2021
- July 2021
- June 2021
- May 2021
- April 2021
- March 2021
- February 2021
- January 2021
- December 2020
- November 2020
- October 2020
- September 2020
- August 2020
- July 2020
- June 2020
- May 2020
- April 2020
- March 2020
- February 2020
- January 2020
- December 2019
- November 2019
- October 2019
- September 2019
- August 2019
- July 2019
- June 2019
- May 2019
- April 2019
- March 2019
- February 2019
- January 2019
- December 2018
- November 2018
- October 2018
- September 2018
- August 2018
- July 2018
- June 2018
- May 2018
- April 2018
- March 2018
- February 2018
- January 2018
- December 2017
- November 2017
- October 2017
- September 2017
- August 2017
- July 2017
- June 2017
- May 2017
- April 2017
- March 2017
- February 2017
- January 2017
- December 2016
- November 2016
- October 2016
- September 2016
- August 2016
- July 2016
- June 2016
- May 2016
- April 2016
- March 2016
- February 2016
- January 2016
- December 2015
- November 2015
- October 2015
- September 2015
- August 2015
- July 2015
- June 2015
- May 2015
- April 2015
- March 2015
- February 2015
- January 2015
- December 2014
- November 2014
- October 2014
- September 2014
- August 2014
- July 2014
- June 2014
- May 2014
- April 2014
- March 2014
