8 Best Free Websites to Sharpen Image Online
Here is a list of the best free websites to sharpen image online. Sharpness describes the clarity of the detail in an image. This comes within the camera and in post-processing. In this post, we are talking about the sharpness that comes under post-processing. In the case of a blurry image, adding sharpness can significantly reduce the blur and make the image clear. You can easily find the sharpness setting in almost every photo editing tool, online or offline. But if that seems like a hassle then you can try simple and easy online tools to do the same.
This post covers 8 free websites where you can sharpen images online. Most of these websites offer dedicated sharpness tools. These tools are quite simple and serve one purpose only. You can add your image and set the sharpness level or percentage. It shows the real-time preview of the image with applied sharpness.
A couple of these websites are online image editors that offer a direct link to their sharpness effect. You can add your image and add sharpness to it. You can go through the post and explore these websites in detail.
My Favorite Website to Sharpen Image Online
ImageOnline.co is my favorite website on this list to sharpen images online. This is one of the simplest tools to sharpen your images within seconds. It has a slider for sharpness and shows a side-by-side comparison of the images. You can apply the desired level of sharpness and download the image.
You can check out our other lists of the best free Online AI Image Upscaler Websites, Image Distortion Online Websites, and Online EXIF Editor Websites.
ImageOnline.co
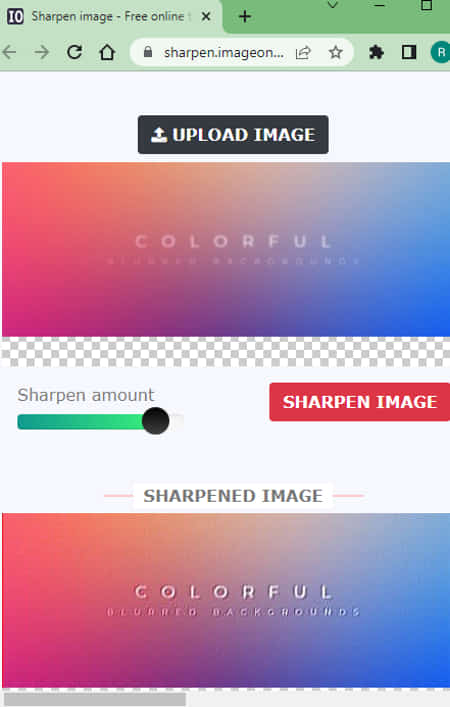
ImageOnline has a free tool to sharpen image online. This is simple to use with straightforward steps to sharpen the image. It supports commonly used image file formats including JPG, PNG, GIF, WEBP, BMP, etc. You can add your image without worrying about the compatible format or size. This tool loads the added image on the right. You get a sharpness slider below it. The slider lets you pick the amount of sharpness that you want to apply to the image. When done, it shows the resulting image on the right. This side-by-side view gives you a comparison between both images. You can change the sharpness level and regenerate the final image. You can do this as many times as you need. In the end, you can just download the resulting photo with a click.
How to sharpen image online on ImageOnline?
- Go to this sharpen image tool by following the link given below.
- Click on the Upload Image button and add your image.
- Use the slider to set the Sharpness amount.
- Then click the Sharpen Image button to get the result.
- You can retry with a different Sharpness amount.
- Once done, use the Download Image button to save the sharpened image.
Highlights:
- Input Image Format(s): Works with various commonly used image file formats.
- Input Image Size: No size limitation on the input file.
- Sharpness Options: Sharpness level slider.
- Output: Preview and download (JPG).
- Input and Output Comparison: Yes, side-by-side comparison.
ImgOnline.com
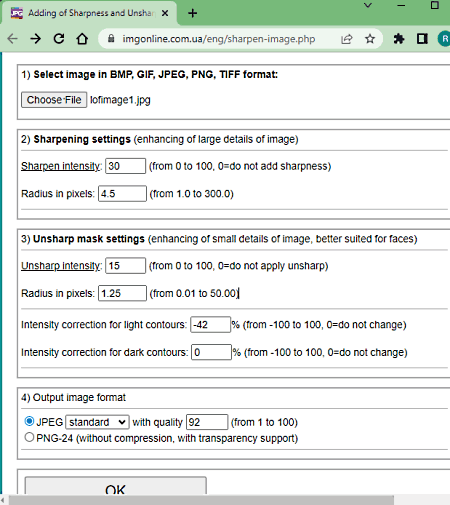
ImgOnline offers a free tool to sharpen images online. This tool uses a combination of sharpening and unsharp masks to increase the details in images in an authentic way. With the sharpness settings, you can set a sharpness level and define a radius for that. You can configure this setting only and get the output. But if you need to keep specific details in the image, like a face, then you can set an unsharp mask for that area in the image. In the end, you can pick an output format for the image and process it. The final page offers you the option to preview the processed image online along with another option to download it. From there, you can save the final image or go back to reconfigure sharpness settings. If you want something simpler then you can try its image enrichment tool.
How to sharpen image online on ImgOnline?
- Go to this image sharpening tool on ImgOnline using the link given below.
- Click on the Choose File button and add upload the image.
- From Section 2, set the Sharpness intensity and Radius.
- Similarly, you can configure an Unsharp Mask in Section 3, if needed.
- Then select the output image format of choice and click the OK button.
- This gets you options to preview and download the processed image.
Highlights:
- Input Image Format(s): JPEG, PNG, BMP, GIF, and TIFF formats.
- Input Image Size: up to 128 MB.
- Sharpness Options: Sharpness Intensity and Radius along with Unsharpening Mask options.
- Output: Preview and download (JPG or PNG).
- Input and Output Comparison: No.
PineTools.com
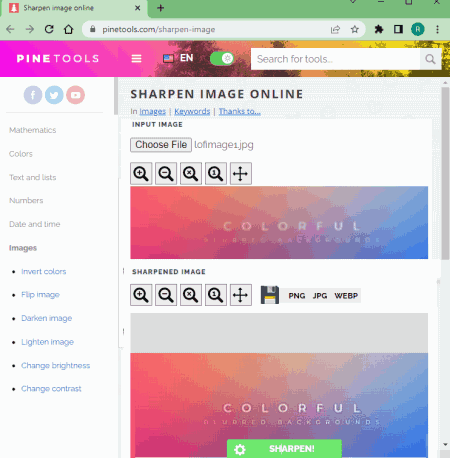
PineTools is a free website with a wide collection of online tools coveting Mathematics, Colors, Texts, Images, Programming, Videos, and more. Among 100+ image tools, it has a free “Sharpen Image Online” tool. This tool supports all common image file formats with no size restrictions. It shows the sharpening tools on the screen where you can pick a convulsion mask and set its strength. This way, you can add your image and sharpen it online. This tool shows the preview of the initial image and final image. You can compare the results and re-configure the sharpening tools if needed.
How to sharpen image online on PineTools?
- Open this image sharpening tool by following the link given below.
- Click on the Choose File button and add upload the image you want to sharpen.
- Then configure the convolution mask and strength as per your liking.
- Then click the Sharpen button to view the results.
- You can configure the convolution mask and strength again and get a new result.
- In the end, use the PNG, JPG, or WEBP options to save the sharpened image in the respective format.
Highlights:
- Input Image Format(s): Works with various commonly used image file formats.
- Input Image Size: No size limitation on the input file.
- Sharpness Options: Configure the Convolution Mask Size and Strength.
- Output: Preview and download (JPG, PNG, or WEBP).
- Input and Output Comparison: Yes, side-by-side comparison.
wtools.io
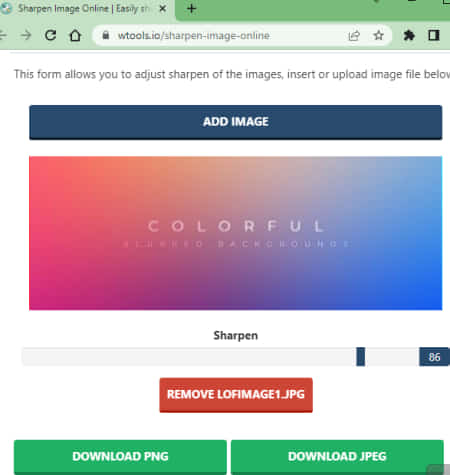
wtools.io offers a free Shapen Image Online tool that you can use to enhance the image quality. This is a simple tool where you can drag and drop your image and use a slider to set the sharpness percentage. When you do that, it shows the result on the screen. You get an instant preview of the resulting image. You can try different sharpness levels to get the best result. Right below that, it shows two download options, one for JPEG and one for PNG. You can use the respective option to save the sharpened image.
How to sharpen image online on wtools.io?
- Follow the link given below to open this Sharpen Image Online tool.
- Drag and drop the image that you want to sharpen.
- Then set the sharpness percentage using the slider below the image preview.
- After that, use the PNG or JPEG download buttons to save the image in the respective format.
Highlights:
- Input Image Format(s): Works with various commonly used image file formats.
- Input Image Size: No size limitation on the input file.
- Sharpness Options: Sharpness percentage slider.
- Output: Preview and download (JPG & PNG).
- Input and Output Comparison: Yes, real-time preview.
Lunapic.com
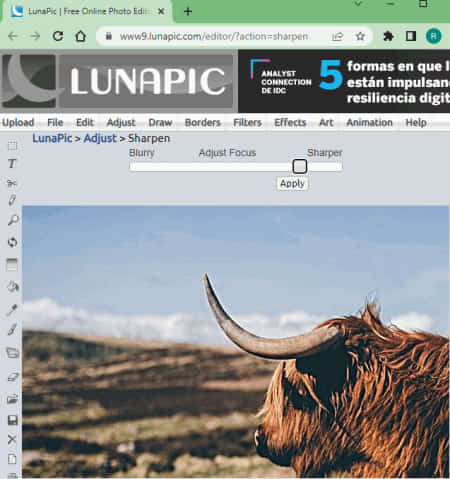
Lunapic is an online image editor that offers lots of editing tools and features. You can use the sharpness effects in this editor to sharpen your images. The process is simple to follow. This editor has a Sharpness effect under Adjust menu. Choose this loads a slider above the image. You can use that slider to set a desired level of sharpness. While doing so, it shows you a real-time preview of the image. This way, you can sharpen your image on Lunapic and export the result.
How to sharpen image online on Lunapic?
- Open the Lunapic online editor by following the link given below.
- Click on the Upload button and add the image that you want to sharpen.
- In the editor, go to the Adjust menu and select Sharpen.
- Use the slider to set the level of sharpness with a real-time preview.
- Then go to File -> Save Image and pick the output format to download.
Highlights:
- Input Image Format(s): Works with various commonly used image file formats.
- Input Image Size: No size limitation on the input file.
- Sharpness Options: Sharpness percentage slider.
- Output: Preview and download (JPG, PNG, GIF, BMP, TIFF, WEBP, ICO, etc).
- Input and Output Comparison: Yes, real-time preview.
Raw.Pics.io
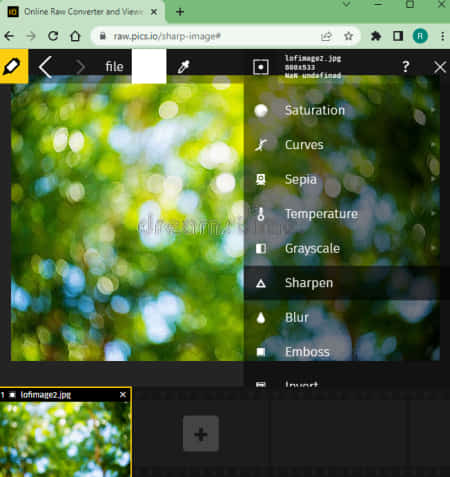
Raw.Pics.io is an online image converter and editor. It is designed to convert and edit RAW image format online. It supports various RAW image file formats. You can add one or multiple images to the editor and process them together. In this case, you can select the images you want to sharpen and apply the sharpness effect from the Edit menu. It automatically applies a certain level of sharpness per click. You can click multiple times to increase the sharpness level or undo it to decrease it. In the end, you can export the image in JPG or PNG format with options to choose quality, size, and pixel density.
How to sharpen image online on Raw.Pics.io?
- Follow the link given below to open this website,
- Scroll down and click START to open Raw.pics.io online converter and editor.
- Add your image to the editor. You can add multiple images as well.
- Once done, select the image(s) you want to sharpen in the editor.
- Open the left sidebar and choose Edit.
- Find Sharpen among other tools in the toolbar on the right.
- Click on Sharpen tool to apply the Sharpness tool to your image.
- Then go to the File section from the top and select Save.
- Configure the output options and click OK to download the image.
Highlights:
- Input Image Format(s): JPG, PNG, DNG, RAW, CRW, etc.
- Input Image Size: No size limitation on the input file.
- Sharpness Options: Sharpness Effect.
- Output: Preview and download (JPG & PNG).
- Input and Output Comparison: Yes, real-time preview.
Pixelied.com
Pixelied is an online image editor with lots of features. It has landing pages for commonly used features including Sharpness. The page shows what the feature is and how it works. It has an image upload button where you can add your image. After the upload, it opens the image in the editor and highlights the Sharpness under the Effects & Filters menu. From there, you can change the sharpness and view the changes it makes to the image in real-time. This way, you can sharpen your image. However, to download the image, you have to create a free account. Doing that lets you download the final result in JPG, PNG, SVG, WEBP, and even PDF format. Do note that, you only get 3 free downloads per month here.
How to sharpen image online on Pixelied?
- Go to this free tool on Pixelied using the link given below.
- Click on the Upload Your Image button and select the image that you want to sharpen.
- On the next screen (in the editor), scroll down the Effects to find Sharpness.
- Set the level of sharpness using the slider with a real-time preview.
- Then click the Download button from the top.
- Configure the output options as per your needs.
- Then click the Download button to save the image (account required).
Highlights:
- Input Image Format(s): JPG, PNG, JFIF & SVG.
- Input Image Size: up to 25 MB.
- Sharpness Options: Sharpness level slider.
- Output: Preview and download (JPG, PNG, PDF, SVG & WEBP). Only 3 free downloads per month.
- Input and Output Comparison: Yes, real-time preview.
OnlineImageTools.com
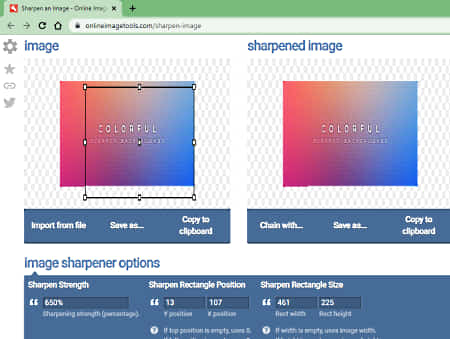
OnlineImageTools is another free website to sharpen image online. It has a special tool where you can add your image and add sharpness by percentage. This tool uses a rectangle to capture the area that you want to sharpen in the image. You resize and re-position it to cover the specific area. Or, you can set it to cover the entire photo. This way, you can sharpen the specific part of the image or the entire image.
How to sharpen image online on OnlineImageTools?
- Use the link given below to open this tool in your browser.
- Scroll down to the image section and click on it to add an image.
- In the next step, resize the rectangle on the screen to cover the area of the image that you want to sharpen. You can resize it to cover the whole image as well.
- Then enter the percentage in the Sharpen Strength box and click enter.
- In the end, click the “Save as” button from the output preview section.
- Then click the Download button to save the final image.
Highlights:
- Input Image Format(s): Works with various commonly used image file formats.
- Input Image Size: No size limitation on the input file.
- Sharpness Options: Sharpness percentage.
- Output: Preview and download (PNG).
- Input and Output Comparison: Yes, side-by-side preview.


About Us

We are the team behind some of the most popular tech blogs, like: I LoveFree Software and Windows 8 Freeware.
More About UsArchives
- May 2024
- April 2024
- March 2024
- February 2024
- January 2024
- December 2023
- November 2023
- October 2023
- September 2023
- August 2023
- July 2023
- June 2023
- May 2023
- April 2023
- March 2023
- February 2023
- January 2023
- December 2022
- November 2022
- October 2022
- September 2022
- August 2022
- July 2022
- June 2022
- May 2022
- April 2022
- March 2022
- February 2022
- January 2022
- December 2021
- November 2021
- October 2021
- September 2021
- August 2021
- July 2021
- June 2021
- May 2021
- April 2021
- March 2021
- February 2021
- January 2021
- December 2020
- November 2020
- October 2020
- September 2020
- August 2020
- July 2020
- June 2020
- May 2020
- April 2020
- March 2020
- February 2020
- January 2020
- December 2019
- November 2019
- October 2019
- September 2019
- August 2019
- July 2019
- June 2019
- May 2019
- April 2019
- March 2019
- February 2019
- January 2019
- December 2018
- November 2018
- October 2018
- September 2018
- August 2018
- July 2018
- June 2018
- May 2018
- April 2018
- March 2018
- February 2018
- January 2018
- December 2017
- November 2017
- October 2017
- September 2017
- August 2017
- July 2017
- June 2017
- May 2017
- April 2017
- March 2017
- February 2017
- January 2017
- December 2016
- November 2016
- October 2016
- September 2016
- August 2016
- July 2016
- June 2016
- May 2016
- April 2016
- March 2016
- February 2016
- January 2016
- December 2015
- November 2015
- October 2015
- September 2015
- August 2015
- July 2015
- June 2015
- May 2015
- April 2015
- March 2015
- February 2015
- January 2015
- December 2014
- November 2014
- October 2014
- September 2014
- August 2014
- July 2014
- June 2014
- May 2014
- April 2014
- March 2014
