24 Best Free Software to Screen Capture MAC
Here is a list of the best free software to screen capture MAC. There are a number of inbuilt software to help you capture screen on MAC. You can make use of different applications, like: Grab, Preview, and Screen Capture tool to take the screenshot. You can also make use of Terminal to take screenshot using commands. There are several other software as well that let you take screenshot on MAC for free, and are quite easy to use. You can also annotate the screenshot, and share it online on Facebook, Twitter, Email, and various other websites.
My Favorite Screen Capture MAC software:
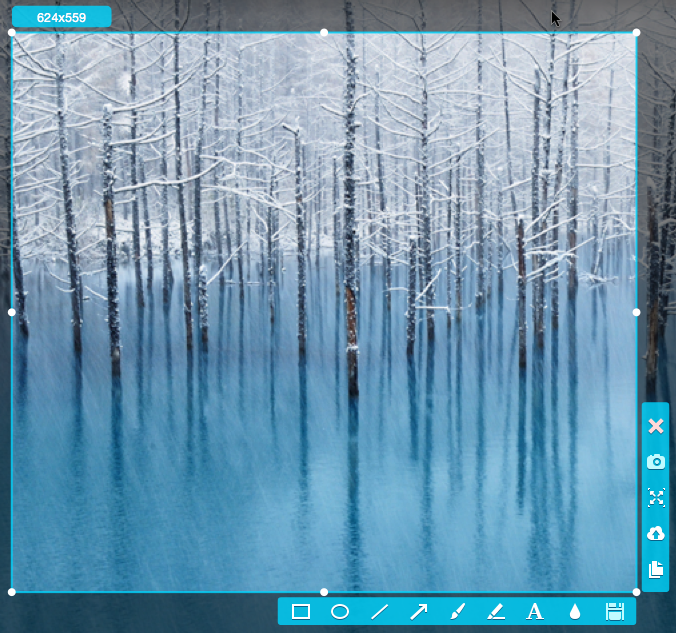
Out of the complete list of software, I like Skitch the most. It is due to the fact that it is quite simple, easy to use, and can annotate the images quickly. It can also be used to take screenshot of Fullscreen, Screen Snap, or Timed Screen Snap, Crosshair Snapshot, Timed Crosshair Snapshot, Full Snapshot, Window Snapshot, Menu Snapshot, and Camera Snapshot. The screenshot taken can be saved as PNG, Skitch PNG, JPG, Skitch JPG, TIFF, GIF, BMP, and PDF. The screenshot can also be shared on Evernote.
Also check out the list of Free Screen Capture Software, Best Free Screen Magnifiers, and Pdf To Word Converter For MAC.
Screen Capture

MAC has a built in feature that lets you take screenshot on your MAC. It is quite simple, and you have to just remember the keyboard shortcuts. The screenshots are automatically saved as PNG files on the desktop, and are saved as Screen Shot Date at Time. In order to take the screen shot of different types, you have to use combination of different keys, and remember them to take the appropriate screen shot. The options below are applicable on OS X Leopard, OS X Snow Leopard, OS X Lion, OS X Mountain Lion, OS X Mavericks, OS X Yosemite, and OS X El Capitan.
Keyboard shortcuts to take screen shot on MAC:
- Press Command (⌘)+Shift+3 to take the screen shot of the complete screen.
- Press Command (⌘)+Shift+4 to take the screen shot of a part of the screen. After you click the keys, pointer changes to crosshair pointer. Then select the area for which you want to take the snapshot using the mouse. Then as you release the mouse the screen shot is taken and you can easily find the screenshot on the Desktop. It can also be used to take the screenshot of the menu items. Here you have to select the menu, and follow the steps specified above. To take the screenshot of the menu without the title, you have to click on the menu, Press Command (⌘)+Shift+4, and then press the space bar. Then you can click on the menu, and the screenshot is taken.
- In order to take the screenshot of a Window, Press Command (⌘)+Shift+4, and after the crosshairs appear, click on the Space button. This changes the pointer to camera pointer. Move the camera pointer over the Window whose screenshot you want to take. The window is highlighted, and after you click on the Window the snapshot is taken.
- Press Command (⌘)+Control+Shift+3, to save the screenshot to clipboard, and further use it somewhere else.
- You can also choose the option to change the folder location where the screenshot is to be saved.
- The option can also be chosen to remove the date, and time suffix in the screenshots that is taken.
- The option can be set to change the screenshot file format in which the screenshot is to be taken, screenshot name format.
- You can also change the hotkeys to capture the screenshot. In order to do do browse to System Preferences > Keyboard > Shortcuts > Screen Shots. Then you can easily change the screen shot hotkeys with the keys you prefer.
Grab
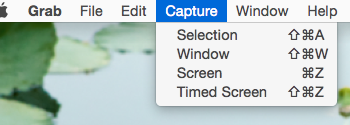
Grab is also an inbuilt utility in MAC that can be used to take screen shot. Here you can take the screenshot of a selected area, window, screen, or timed screenshot. There are different shortcuts associated with it that help you to take a printout on your screen. It is applicable in all the MAC OS X versions.
How to take screenshot using Grab onMac:
- Open Grab by going to Applications > Utilities > Grab. You can also perform Spotlight search for Grab, and open Grab utility. The Grab utility is displayed in the top. Then click on the settings.
- Click on Command+Shift+A to take the screen shot of the selection. Then you can easily take the screenshot.
- Click on Command+Shift+W to take the screen shot of Window. In the new Window that appears, click on Choose Window button, and then click on the window whose screenshot you want to take. After clicking on the window, the screenshot is taken.
- Click on Command+Shift+Z to take the screenshot of the timed screen. The software takes the screenshot 10 seconds after clicking on the Start Timer button.
- Click on Command+Z to take the screen shot of a screen. Then click outside the popup window to take the screen shot of the screen.
- After the screenshot is taken you have to save the screen shot at the desired location, and desired file name. The screenshot can be saved as TIFF file.
- You can also take the screenshot taken in Grab, and copy the image to clipboard. Then open Preview, choose the option New From Clipboard, and then you can choose the option to save the screenshot in the desired location, with desired name, and choose any of the format from: JPEG, JPEG-2000, OpenEXR, PDF, PNG, or TIFF. Grab can also be used to take screenshot, and insert it into different applications, like: Mail, TextEdit, and many more. Right Click, or control click on the application, and choose the option Capture Selection From Screen. Then you can select the region which you want to take the screenshot. The taken screenshot can then be used in the available application. In case you want to have some other options, browse to Preferences > Keyboard > Keyboard Shortcuts > Services. Then you can choose the options that you want to incorporate in the context menu by choosing the appropriate options.
Skitch
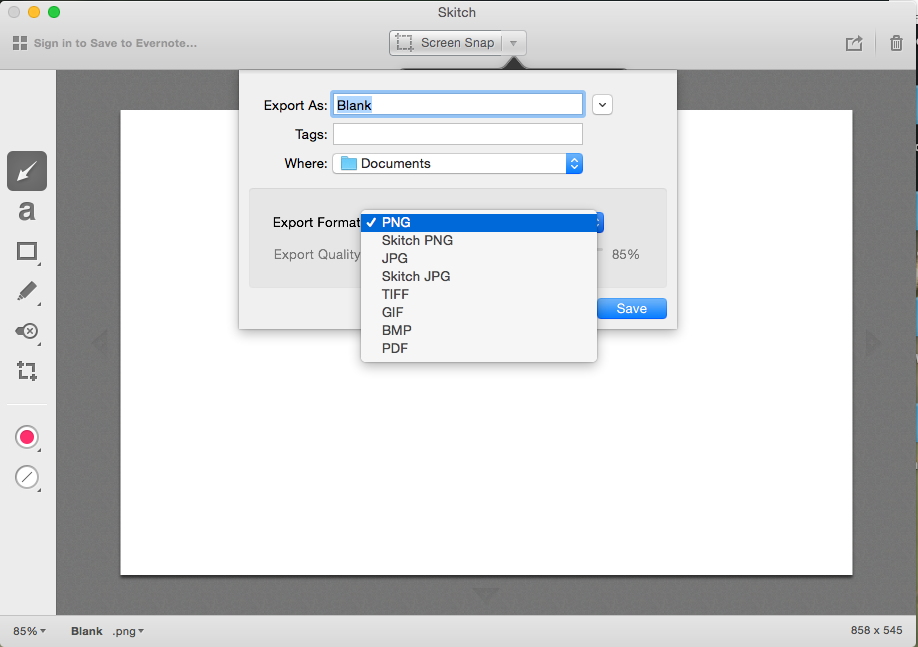
Skitch is a good freeware application that can be used to take screenshot for MAC. It is quite simple, and easy to use. It is also available on statusbar. It can be used on OS X Mavericks, OS X Yosemite, and OS X El Capitan.
How to take screenshot on MAC using Skitch:
- Open Skitch.
- In the new window that appears, an option is displayed to take the screen snap. Here you can choose the option to take the screenshot of the Fullscreen, Screen Snap, or Timed Screen Snap. In case you choose the option to take the screenshot of the Fullscreen, the screenshot of the full screen is taken. In the Screen Snap, crosshairs appear, and you can select the area for which you want to save the screenshot. The Timed Screen Snap lets you select the area, and the screenshot is taken after 5 seconds. In case you want to change the timed screen snap delay, you can do it in Preferences tab.
- In case you wish to access some extra features go to Capture button, and choose the option to take Crosshair Snapshot, Timed Crosshair Snapshot, Full Snapshot, Window Snapshot, Menu Snapshot, and Camera Snapshot. These features can also be accessed using hotkeys.
- You can also edit the snapshot taken, by adding arrows, text, rectangle, rounded rectangle, shapes, drawings, stamps, crop your image, pixelate your image, and change the color.
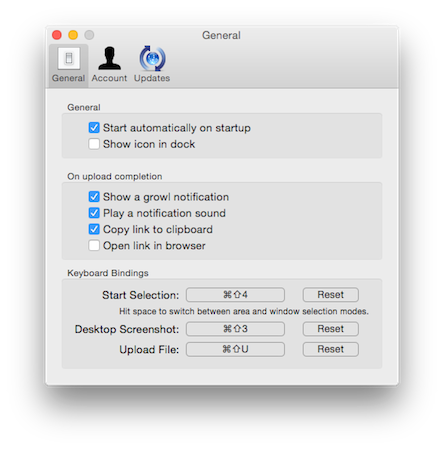
- The screenshot can also be saved as PNG, Skitch PNG, JPG, Skitch JPG, TIFF, GIF, BMP, and PDF. The taken screenshot can also be saved, and shared to SMS, Email, Message, and Evernote. A time frame can be allotted to automatically sync with Evernote, and save every new Skitch with Evernote. You can also set up FTP, and SFTP to share your screen shots. It can also be used to save the Screenshot as background image.
- In the preferences tab different options can be set to place arrowheads at the beginning of shape or not, type to create new text nodes in the canvas or not, auto expand canvas, and to show or hide advanced options after a screen snap.
Monosnap
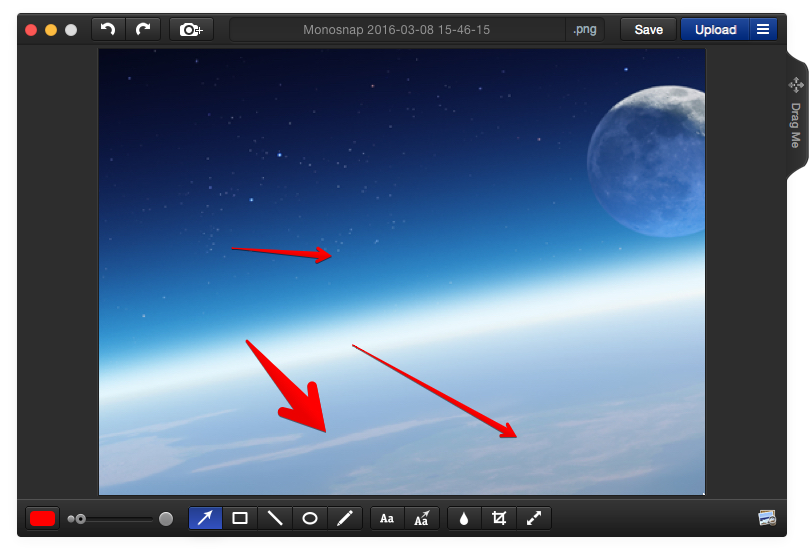
Monosnap is a good status bar application freeware that can be used to take screenshots for your MAC. It can be easily used to take the screenshot on MAC system. You can take screenshots using Monosnap on OS X Mavericks, OS X Yosemite, and OS X El Capitan.
How to use Monosnap to take screenshot on MAC:
- Open Monosnap.
- Then you can choose the option to capture Area, capture Fullscreen, or take selfie using webcam. You can also use hotkeys to initiate the option to capture the area, or the fullscreen. You can take the timed screenshot, screenshot of window, or part of the screen. You can also choose to select the color. It can also be used to record screencasts.
- After taking the screenshot you can then choose the option to edit the taken screenshot, like add arrow, line, rectangle, ellipse, pen, text, bubble, blur image, resize image, and many other options. The image can then be saved as PNG, JPEG, or Auto. After taking the screenshot you can upload the screenshot on Monosnap, Twitter, Facebook, send via Email, Dropbox, Evernote, Box, Yandex. You can also set your own CloudApp, SFTP, FTP, WebDAV, and Amazon S3.
- The images can be uploaded by using simple drag and drop. You can also upload image right from the editor.
- Under the options tab you can choose the option to assign after screenshot options, after upload options, assign external image editor, and change hotkeys that you want to use to assign to perform to capture the screenshot tasks. You can also specify the fonts to be used while annotating the images.
- The videos can be uploaded to YouTube, and Monosnap.
Captur
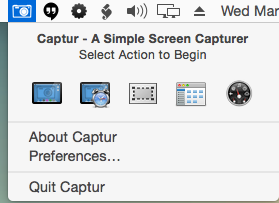
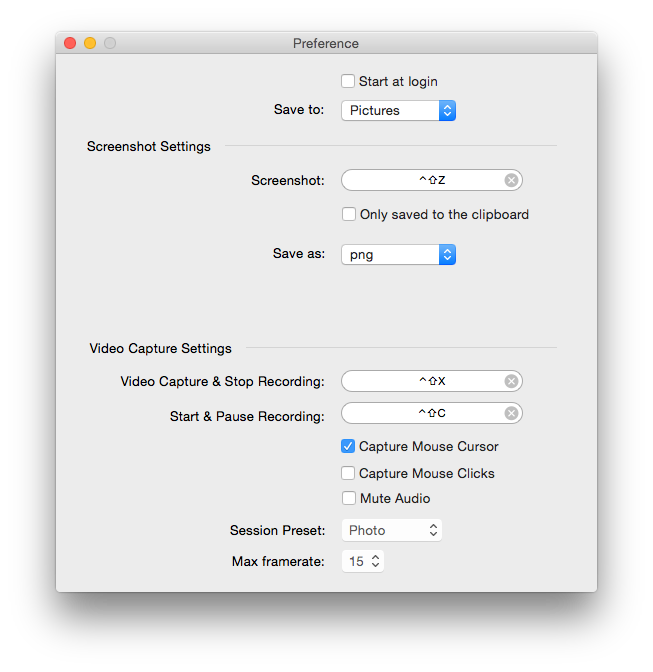
Captur is a simple status bar application that can be used to take screenshot on MAC. It is quite simple and easy to use. It provides you a number of options to save the screenshot in different formats, like: JPG, PNG, TIFF, GIF, and BMP. You can also choose the time and date format, and choose whether to add the time and date, and whether to add date and time after file name, or before file name. You can also specify the file name, and the default folder location where the screenshot is to be saved. There are various other options as well to play or not play the sound, capture or not capture the shadow of the Window, capture or not capture the cursor, and start at login or not. Here you can take the option to take the screenshot of the whole screen, window, widget, or selection. It is available for OS X Snow Leopard, OS X Lion, and OS X Yosemite.
How to use Captur to capture screenshot on MAC:
- Open Captur. Open the preferences tab, and choose different preferences options, like file name, format, file location, add date, and time settings, and various other options.
- Then choose the option to take the screenshot of the whole screen, window, widget, or selection. Based on your preferences the screenshot is taken, and saved to your required destination.
Preview

Preview is also a built in application that can be used to take the screenshot. It can also be used to take the screenshot of a selection, window, and entire screen. It is available for all the MAC OS X versions.
How to take the screenshot using Preview:
- Open Preview.
- Click on file, browse to Take Screen Shot, and choose whether to take screen shot from either the selection, window, or entire screen.
- In case you choose to take the screenshot of the selection, the cross hairs appear, and you have to select the desired area where you want to take the screenshot.
- If you wish to take the screenshot of a window, the camera button appears, and you have to select the desired window of which the screenshot is to be taken.
- After you choose the option to take the screenshot of the entire screen, the timer starts, and at the end of the timer, the screenshot is taken.
- You can further rotate the screenshot, and choose to add markup options, by using selection tools, instant alpha, sketch, and choose the option to add text, add shapes, add sign, adjust color, and adjust size. You can also choose the option to to change text style, shape style, choose border color, and fill color options.
- After the screen shot is taken you can then save the screen shot to the desired location, with desired name, and choose from any of the formats: JPEG, JPEG-2000, OpenEXR, PDF, PNG, or TIFF.
Apowersoft Screenshot
Apowersoft Screenshot is a simple status bar application that can be used to take screenshot easily. You can use it to take either full screenshot, or screenshot of a region on MAC. It also features intelligent Window detection that helps you to easily take the screenshot of the specific window only. You can also assign your own hotkeys to take screenshot of MAC. You can also edit the screenshot, like add rectangle, ellipse, line, arrow, pen, highlight, text, blur, You can also specify the image quality of the capture, which can be either standard, or High (Retina). It also features a screen magnifier to enhance readability. The screenshot can be saved in various formats, like: PNG, BMP, TIFF, JPG, and GIF. It can also be copied to clipboard, view in full screen, and choose to recapture the screenshot. The screenshot can finally be uploaded to Screenshot.net. You do not need to login to share the screenshot. After the upload you can simply share the screenshot on Google, Facebook, Twitter, Google+, Pinterest, and many more. After the upload you are provided with four different types of links to insert in Blog, Forum, and share directly. It works on OS X Snow Leopard, OS X Lion, OS X Mountain Lion, OS X Mavericks, OS X Yosemite, and OS X El Capitan.
How to use Apowersoft Screenshot to take screenshot on MAC:
- Open Apowersoft Screenshot. Then use the hotkeys to take the screenshot. Magnifier is provided to help you take screenshots correctly.
- After that you can make some minor edits to the screenshot and edit it.
- You can also choose the option to share the screenshots on Screenshot.net, or save the file on hard disk.
DuckLink Screen Capture
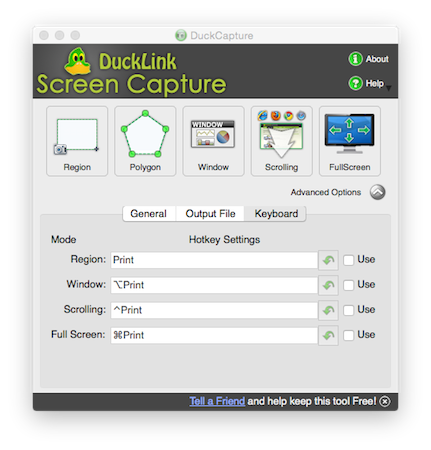
DuckLink Screen Capture is a good freeware to take snapshots on MAC. It is a good software that lets you take screenshot of the rectangular area, polygonal area, capture window, capture scrolling window, and capture full screen.
Its most outstanding feature is its ability to capture Polygonal area which is not available in other software.
After you capture the screen you can also choose the option to annotate the screenshot using line, arrow, arc, polyline, rectangle, polygon, circle, ellipse, and text. The option can also be chosen to add boundary, and fill it with color. You can then choose the option to save to file, or save to clipboard. The screenshot can be saved as Bitmap, JPEG, and PNG. You can also specify the folder where the image is to be saved, and ask for a name before saving the file. You can also specify the time interval for scrolling pages, and various other options. Hotkeys can be put to use to take screenshot of different regions.
Terminal
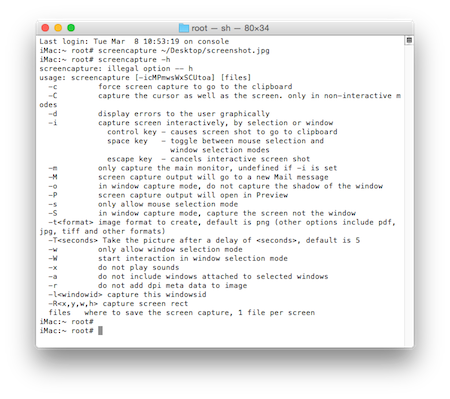
In case you want to take screenshot on MAC using Terminal, you can also do so using the screencapture command. It is quite simple and easy to use, and you have to remember the commands in order to do so.
- Open Terminal, and type the commands with the options you want.
-
screencapture lof.jpgcaptures the whole screen, and names it lof.jpg in the current working directory. - Specify the location where you want to save the screenshot, like:
screencapture ~/Desktop/lof.jpgand the screenshot is saved to the specified location. -
screencapture -csaves the screenshot to a clipboard. -
screencapture -T 10 timedlof.jpgtakes the timed screenshot after 10 seconds. -
screencapture -t tiff lof.tifftakes the screenshot and saves it as TIFF. It can also be used to take screenshot as JPEG, PNG, PDF, and many more such formats. - You can use
screencapture -hcommand to view other options available to you while taking screenshot using terminal.
Snapshotor
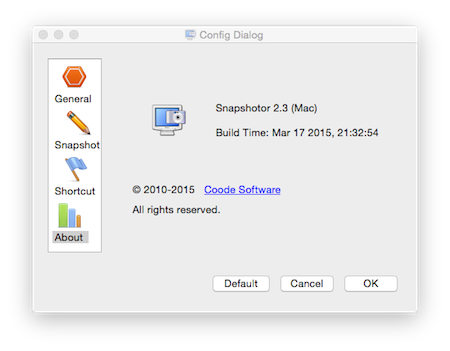
Snapshotor is another freeware to take screenshot on MAC. It is quite easy to use. Just open Snapshotor, and click on the capture button. Then you can select the region to take the snapshot, and choose the option to further edit the snapshot file. You can add arrows, lines, text, and many more such options to annotate the screenshot. In the Config Dialog box, you can choose the option to take the snapshot, and choose various other options, like: show shadow for draw item, copy to clipboard after finish, and save to file after finish. Then you can further change the option to specify the file path, and file name. You can save the file in different formats like: PNG, JPG, BMP, and XBM. You can also make use of hotkeys to show main window, and start snapshot.
Gyazo
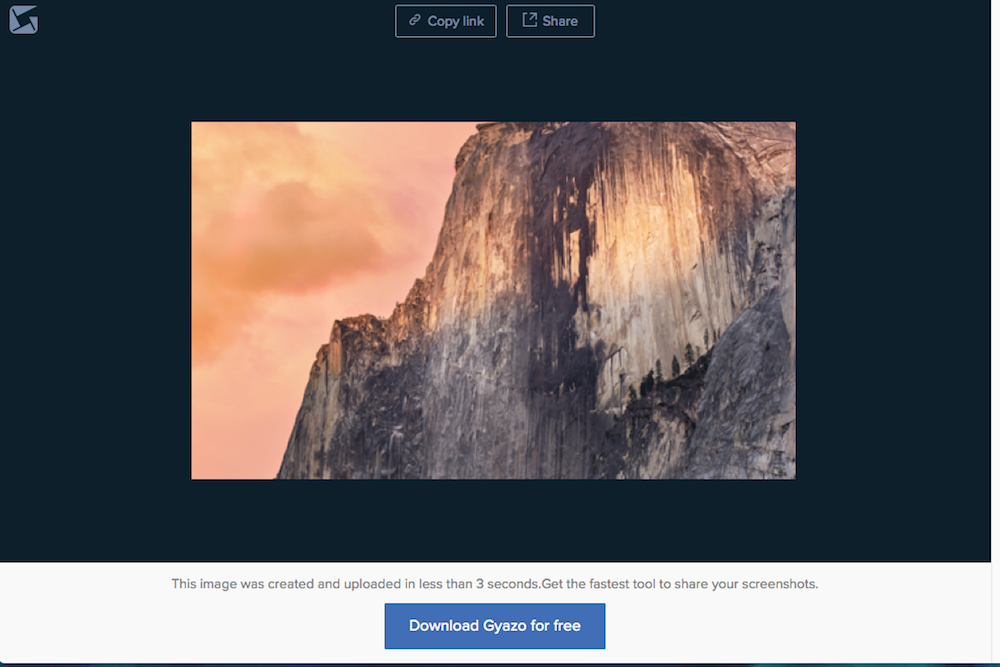
Gyazo is a simple application which is also available in freeware version. This freeware lets you to take the screenshot, and upload it to Gyazo website. After the image is uploaded, a link is generated, and you can then share the link. Only the persons having the link are able to view the screenshot taken. It is quite simple and easy to use.
After installation of Gyazo, you are provided with 2 options: Gyazo, and Gyazo GIF. Gyazo saves the screenshot as PNG, while Gyazo GIF saves the screenshot as GIF. Click on either of the option to take the screenshot. Then the crosshairs appear, which let you take the screenshot. After the screenshot is taken, it is uploaded to Gyazo, and then a link is provided which you can share with the person you want to share the screenshot. The uploaded images are automatically organized based on app name, web address, file name, and date. This lets you easily search for and browse the files, without the need of folder, or tags. In the free version, you can browse , and search for the images, that are two months old. You can also preview 10 images per month with Slack, and Skype.
Lightshot Screenshot

Lightshot Screenshot is a simple status bar application that can be used to take screenshots on MAC. In addition to that, it also lets you annotate screenshots using basic drawing tools. It also lets you upload screenshots, and gives you a link that you can share with others.
How to use Lightshot Screenshot to take screenshots on MAC:
- Open Lightshot Screenshot.
- Choose the option Take Screenshot or press the keys Shift + Command + 9 to take the screenshot.
- Then the whole screen turns grey. Select the area for which you want to take the screenshot.
- You can also edit the screenshot taken by adding arrows, line, text, rectangle, ellipse, and many more such options.
- You can also share the screenshot on Facebook, Twitter, and search for similar images on internet, and upload images on prntscr.com.
- You can also save the screenshot to the clipboard, save it on hard drive as PNG, and take its printout.
Screenshot Helper
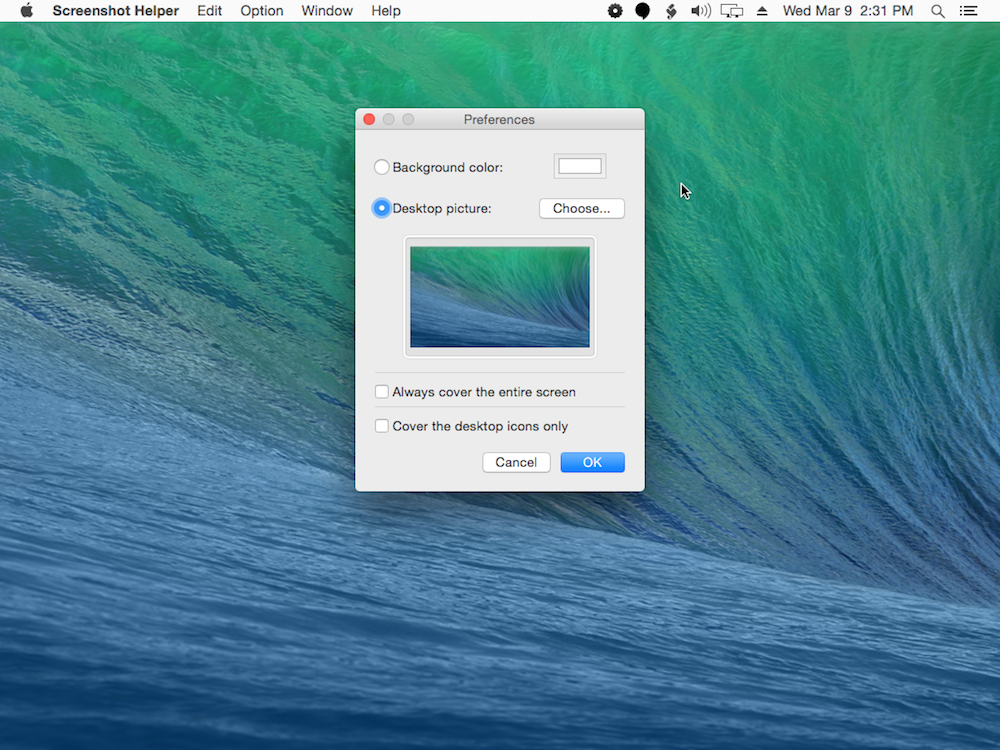
Screenshot Helper, as the name suggests, helps you take the screenshot. It covers the screen with a solid color, or desktop picture so that you can get clean screenshot. Here you can choose different options to choose the color options, or select a desktop picture to display. Then you can choose the option to either cover the entire screen, or cover only the desktop icons. After applying the settings you can easily take the screenshot. Screenshot Helper helps you take the screenshot on OS X Snow Leopard, OS X Lion, OS X Mountain Lion, OS X Mavericks, OS X Yosemite, and OS X El Capitan.
There are a number of hotkeys, which you can use to easily enable the screenshot helper with different settings:
- Command + B shows/hides the menu bar and the dock.
- Command + U shows/hides the mouse cursor.
- Command + E covers the entire screen.
- Command + D covers only the desktop icons.
Snappy
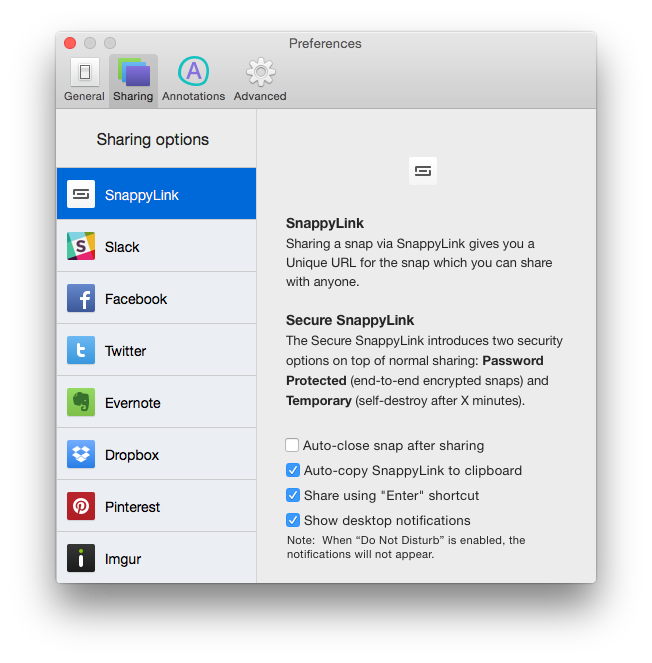
Snappy is a simple freeware that can be used to take snapshots quite easily. The screenshots can be taken using Snappy on OS X Mavericks, OS X Yosemite, and OS X El Capitan. Using this you can take the screenshot, and save it to your hard drive, or can share it on different sites, like: SnappyLink, Slack, Facebook, Twitter, Evernote, Dropbox, Pinterest, Imgur, and Email. You can also choose the option to annotate the screenshot using selection tool, brush, text, eraser, and quickdraw. You can also resize, and change the opacity of the screenshot. The screenshots are visible, till you discard them, so it proves out to be quite useful. There are several hotkeys to take snap, hide all snaps, close all snaps, and show snaps library. The snaps library keeps track of all the snapshot taken, and keeps it organized based on the applications of which the snapshot was taken. You can also finally upload the images on iCloud, and use it on different devices. You can also set the password to view the shared snaps, and the option can also be set to self destruct the screenshot after a specified time.
Grabilla
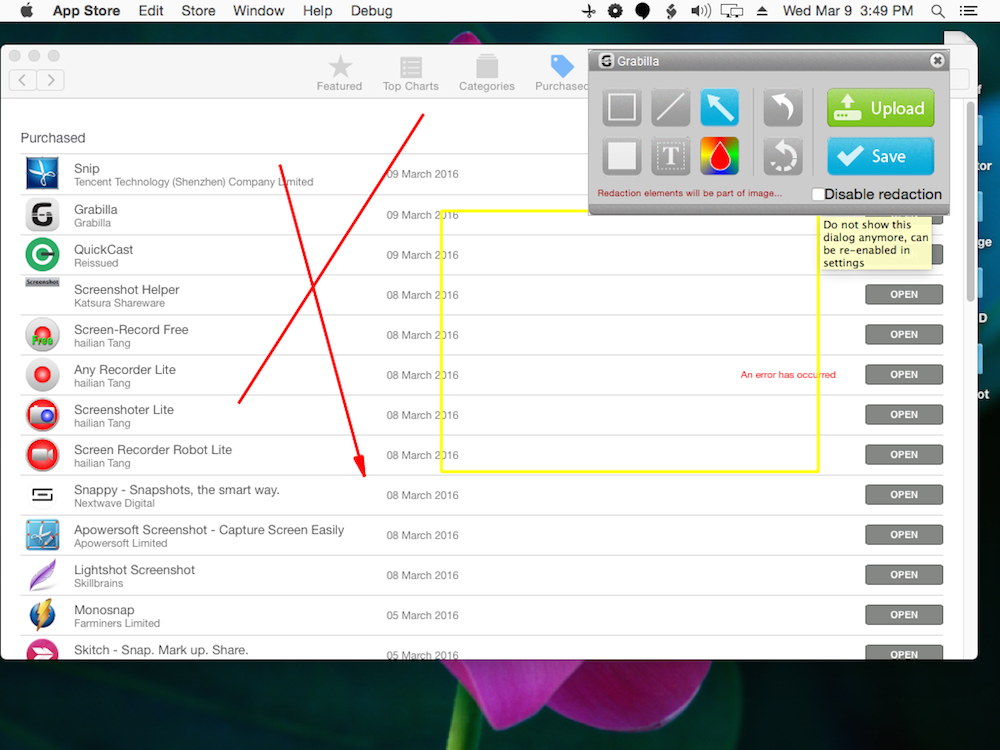
Grabilla is a simple freeware software that can be used to take screenshot on MAC for free. It can also be used to capture animated GIFs for 10 seconds, and record videos. You can also annotate screenshots and upload screenshots.
It can used to take screenshot on OS X Leopard, OS X Snow Leopard, OS X Lion, OS X Mountain Lion, OS X Mavericks, OS X Yosemite, and OS X El Capitan.
How to Take Screenshots using Grabilla:
Open Grabilla. Choose the option to take the screenshot, which can be either full screen, or of a window. Further you can edit the screenshot and annotate the screenshot file. You can use different annotation tools, like: create rectangle, line, arrow, add text, fill with color, and choose the option to disable redaction. You can save the screenshot on hard disk, and also choose to upload the screenshot online. You can also set the hotkey to enable Grabilla.
Puush
Puush is a simple Mac freeware that can be used to take the screenshot and upload it to Puush website. You have to simply take the screenshot using Command + Shift + 4 button, to take the screenshot of the selected area, or the window selection mode. You can use Command + Shift + 3 button to take the screenshot of the desktop. Then you can choose the option to upload the screenshot. But in order to upload the file to the website you have to register first. You can also choose the option to share the screenshot with your friends by providing them the link. You can also make the screenshots as private. On MAC OS X Snow Leopard, OS X Lion, OS X Mountain Lion, OS X Mavericks, OS X Yosemite, and OS X El Capitan works the best.
Any Recorder Lite
Any Recorder Lite is a simple software that can be used to take the screenshot of the screen. It also auto identifies the windows and menu automatically. It also features a magnification tool. The basic details of the screenshot being taken is also provided, like: location, width, and height. Even after the selection, you can change the area for the screenshot to be taken. Then after taking the screenshot you can easily annotate the screenshot by using arrows, lines, text, mosaics, blur, rectangle, and circle. You can also change the graph color, adjust graph size, adjust graph line width, and many more such options. The screenshot can be finally be saved as PNG, JPG, BMP, TIFF, GIF, and JPG2000. You can also specify its location to be saved. It works on OS X Yosemite, and OS X El Capitan.
It can also be used to record screen, record camera, record audio, edit recorded video, and edit recorded audio.
ScreenCloud
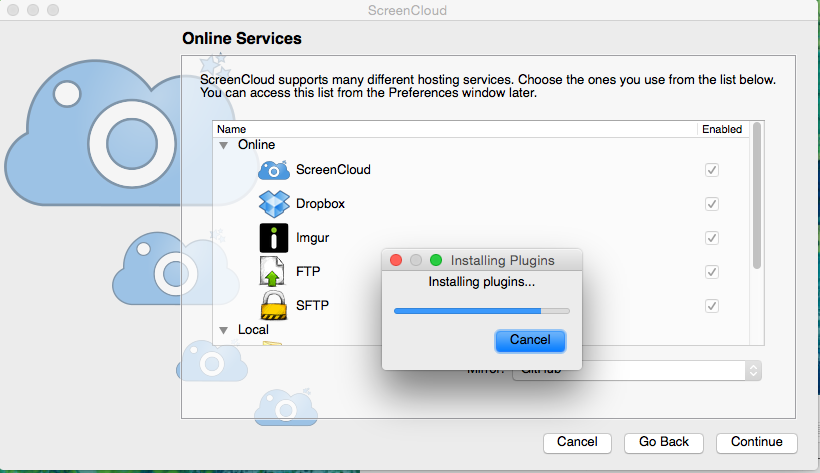
ScreenCloud has a freeware version that can be used to take the screenshot, and then upload it to the ScreenCloud website. In order to do this, you have to first register. After the screenshot is uploaded, the link is copied to the clipboard, which you can easily share with others. The option can also be chosen to copy the screenshot to the clipboard. The screenshot can be saved as PNG, or JPG. You can also specify the delay before taking screenshot. The option can also be chosen to change the hotkeys, to take the screenshot. It also supports different hosting services, like Dropbox, Imgur, FTP, SFTP, local file, and Shell Script, which you have to select during setting up the account. It can run on OS X Snow Leopard, OS X Lion, OS X Mountain Lion, OS X Mavericks, OS X Yosemite, and OS X El Capitan.
The option which I found most interesting in this software is the option to directly FTP the screenshot. Once you have provided the FTP details, you can use this software to take the screenshot and FTP the screenshot. After FTP is done, it places the URL of the screenshot on your clipboard.
SnapNDrag
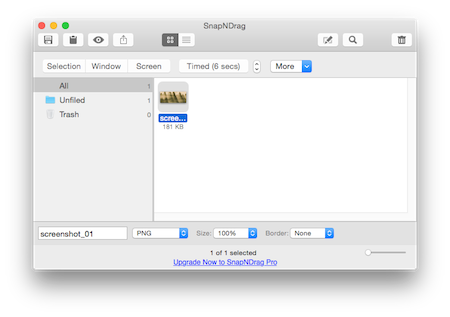
SnapNDrag is a simple software that can be used to take screenshots on MAC. Here you can take snapshot of a selection, Window, or the screen. You can also take the timed snapshot of the screen. You can also annotate the screenshot using arrows, rectangle, lines, text, ellipse, blur the image, crop the image and many more such options. You can save it as JPEG low, JPEG med, JPEG high, PNG, TIFF, and GIF. You can also specify the border size. SnapNDrag can be used to take screenshots on OS X Yosemite, and OS X El Capitan.
Apart from it being ridiculously easy, the feature that I like most in SnapNDrag is that it lets you quickly transfer the screenshots to applications that accept image. For example, you can take a screenshot using this, and transfer to Mail. Similarly, you can transfer screenshot to Twitter, Facebook, etc., so as to quickly share screenshots on social networks.
Advanced users will also like the fact that hotkeys can be customized, and it can also be run as a background app.
The software also comes with a feature of Batch Rename, which you can use to rename all the screenshots you have taken.
SnapNDrag comes with a Pro version as well, which is paid, but has some more powerful features.
JShot

JShot is a simple tool which can be used to take the screenshot on MAC. Here you can choose the option to take the snapshot of a region or the whole screen. The screenshot can be saved as BMP, JPG, JPEG, and PNG. The screenshot can be shared on ImageShack, can be edited with JShot, and copied to clipboard. It can also be used to capture after a specified time duration. You can also share the screenshots on Dropbox, Picasa, Minus, Twitpic, and FTP. You need to activate these in order to share the screenshot.
Snip
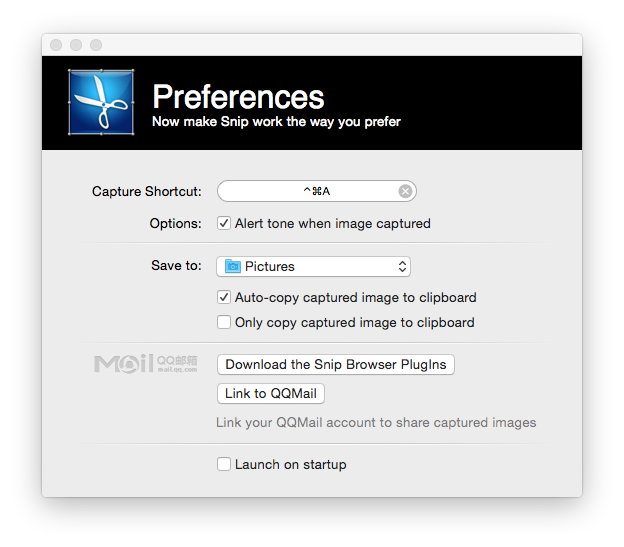
Snip is a simple tool that helps you to take screenshots on your Mac. Further you can also annotate the screenshot taken, using text, arrow, lines, paint, pen tools, and many more such options. The option can also be chosen to copy copy captured image to clipboard, and add the link to QQMail to share with your friends. It also claims to take the screenshot of the scrolling window, but I was not able to do so even after downloading the software from the Website, and adding the exception to the privacy tab on MAC. It auto auto detects windows, and support Retina display. Snip works best on OS X Snow Leopard, OS X Lion, OS X Mountain Lion, OS X Mavericks, OS X Yosemite, and OS X El Capitan.
Snaplr
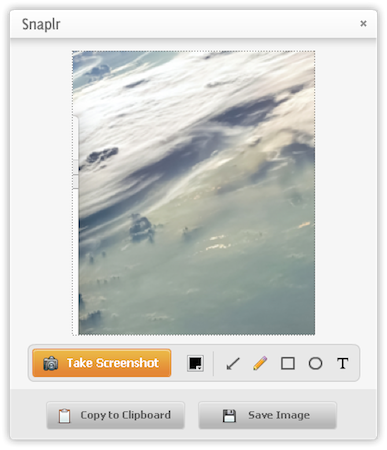
Snaplr is a simple software that can be used to take snapshot of the screen. It is quite easy to use. Open Snaplr, and then click on the button Take Screenshot. Then select the region for which you want to take the screenshot. After the screenshot is taken you can edit the screenshot using arrow, pen tool, rectangle, ellipse, and add text. Then you can copy the screenshot to the clipboard, or save the image as PNG. It works on all OS X versions.
XnViewMP

XnViewMP is a good freeware that can be used to take screenshot on MAC. Click on the capture button after opening XnViewMP. Then you have to choose the option to select the whole window or the rectangular area. You can also specify a time duration, or initiate it using some hotkey. Then after the screenshot is taken you can save the screenshot in many different formats, like JPEG, PNG, GIF, ICO, IFF, RAW, PS, PSD, TIFF, TGA, PDF, and many more. You can then resize the image, enhance colors, crop the image, rotate it, and perform many other actions. It can also be used to view and organize your images. You can also batch convert images, and it supports more than 500 formats.
Do note that XnViewMP is free for private use only. For commercial use, you’ll need to buy a license.
Backdrop
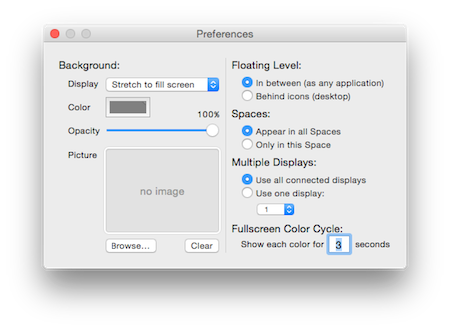
Backdrop is a good software that assists you in taking screenshot. Here during taking the screenshot, you can choose the option to fill the screen with a color, or with the wallpaper that you deem fit. You can also set the opacity. The option can be set to choose the floating level, spaces option, and choose the option of multiple displays. If required you can also specify the option to cycle the full screen color. It supports multiple displays, can be used to take screenshot of one or more documents, It can also be useful for web designers, as it helps you to create a full size image with outlines, of common screen sizes, to help you check the look of the website on different monitors. It works on OS X Snow Leopard, OS X Lion, OS X Mountain Lion, OS X Mavericks, OS X Yosemite, and OS X El Capitan.


About Us

We are the team behind some of the most popular tech blogs, like: I LoveFree Software and Windows 8 Freeware.
More About UsArchives
- May 2024
- April 2024
- March 2024
- February 2024
- January 2024
- December 2023
- November 2023
- October 2023
- September 2023
- August 2023
- July 2023
- June 2023
- May 2023
- April 2023
- March 2023
- February 2023
- January 2023
- December 2022
- November 2022
- October 2022
- September 2022
- August 2022
- July 2022
- June 2022
- May 2022
- April 2022
- March 2022
- February 2022
- January 2022
- December 2021
- November 2021
- October 2021
- September 2021
- August 2021
- July 2021
- June 2021
- May 2021
- April 2021
- March 2021
- February 2021
- January 2021
- December 2020
- November 2020
- October 2020
- September 2020
- August 2020
- July 2020
- June 2020
- May 2020
- April 2020
- March 2020
- February 2020
- January 2020
- December 2019
- November 2019
- October 2019
- September 2019
- August 2019
- July 2019
- June 2019
- May 2019
- April 2019
- March 2019
- February 2019
- January 2019
- December 2018
- November 2018
- October 2018
- September 2018
- August 2018
- July 2018
- June 2018
- May 2018
- April 2018
- March 2018
- February 2018
- January 2018
- December 2017
- November 2017
- October 2017
- September 2017
- August 2017
- July 2017
- June 2017
- May 2017
- April 2017
- March 2017
- February 2017
- January 2017
- December 2016
- November 2016
- October 2016
- September 2016
- August 2016
- July 2016
- June 2016
- May 2016
- April 2016
- March 2016
- February 2016
- January 2016
- December 2015
- November 2015
- October 2015
- September 2015
- August 2015
- July 2015
- June 2015
- May 2015
- April 2015
- March 2015
- February 2015
- January 2015
- December 2014
- November 2014
- October 2014
- September 2014
- August 2014
- July 2014
- June 2014
- May 2014
- April 2014
- March 2014
