7 Best Free Image Sequence To Video Software For Windows
Here is a list of best free image sequence to video software for Windows. These software help you convert multiple associated images into a continuous video. These are especially beneficial when you have a whole series of captured images related to a project. By default, all of these freeware will provide the same resolution in output as the frame size (resolution) of the images. However, in most software, you can also manually change the resolution if you want. Besides this, options to change frame rate, frame orientation, frame editing, etc. are also available in these image sequence to video converters. These software are also quite flexible with both the input image formats and output video formats. Some of the popular image and video formats that these converters support are JPG, PNG, BMP, AVI, WAV, MP4, etc.
In these freeware, you can also sort or adjust the image position of each image to create the right image sequence. To further help you in creating the video, some of these converters also provide various video editing tools. Overall, all of these converters are equipped with all essential tools to create video from a sequence of images.
My Favorite Image Sequence To Video Software For Windows:
Images to video is my favorite software because it provides one of the best output videos. Plus, it supports a lot of input image formats and output video formats, unlike other similar software. Its advanced Max CPU thread feature is also quite handy as it helps in reducing the conversion time.
You can also check out lists of best free Image To URL Converter, Image Converter, and Image Compressor software for Windows.
Images To Video
Images To Video is a portable and free image sequence to video converter software for Windows. This software lets you convert images of various formats (including JPG, PNG, and JPG) to videos of different formats (WMV, MOV, FLV, MPG, etc.).
How to convert images sequence to video using Images To Video software:
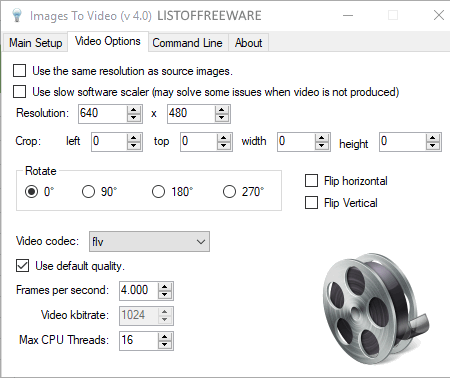
To convert images to videos, you need to import images by providing the source images folder path to the folder containing images field. At the same time, also specify the image format of input images to Search for field, so that this software can easily recognize and import the right image sequence. Now use the Sort images option to sort images according to either creation time, file name, or time of last change. After that, open the Video Options menu and set video resolution, video codec, frame rate, etc. parameters. From here, you can also perform some editing operations namely cropping, flipping, and rotating on the image sequence. As last, move to the main setup section and press the Convert Images to Video button to start the conversion.
In this software, you also get an advanced Max CPU thread feature through which you can increase the number of threads to reduce the conversion time.
MakeAVI
MakeAVI is a free open source image sequence to video software for Windows. Using this software, you can easily convert a sequence of images into a video file. It supports images of almost all image formats like PNG, JPG, GIF, TIFF, BMP, etc. However, it does not give you the choice to change the output video format which is set to AVI.
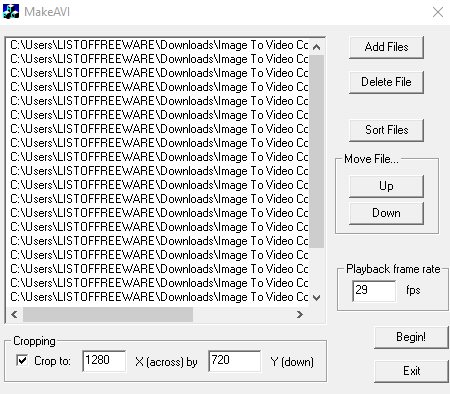
The process of converting multiple images to video is pretty simple. First, you need to input all the images to this software by using its Add Files option. After that, use its Sort Files and Move Up/Down options to set images in the right sequence. Now, specify the Video Frame Rate and Video Resolution through Playback Frame Rate and Cropping options, respectively. Lastly, generate the video by pressing the Begin button.
Overall, it is one of the simplest image sequence to video converter that anyone can use without much hassle.
Imagej
Imagej is another free image sequence to video software for Windows. It is mainly a Java based image processing and analyzing software that also has a feature to convert a sequence of images to video. It supports a lot of image formats like PNG, GIF, JPEG, TIFF, BMP, and more. Hence, you do not need to think about the image formats before using images of different formats with this software.
Let’s take a look at the process of image sequence to video conversion:
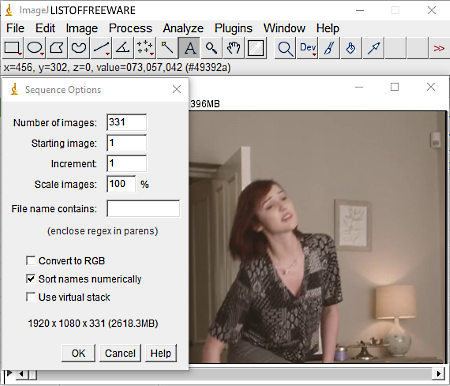
The first step is to add a sequence of images to this software through its Image option. As soon as you import images, a sequence option will open up from where you can select a number of images, starting image position, image scaling, etc. Plus, an automatic sort option is also available that you can enable to numerically sort images. After defining all the parameters, press the OK button to start the conversion.
After the conversion, an internal video player will automatically open up to show you the final video. Now, to export the video go to File > Save as option and select AVI format. Selection of AVI format triggers a small window that asks you to define the Compression (JPEG and PNG) and Frame Rate. Define the asked parameters and press OK to save the video as AVI video file. Besides AVI, this software does not support any other output video format.
As an image processing software, it also provides various Image Editing (crop, duplicate, color, etc.), Analyzing (analyze particles, distribute, summarize, etc.), and Processing (Calibrate, Histogram, plot profile, etc,) tools.
Windows Movie Maker
Windows Movie Maker is yet another free image sequence to video software for Windows. It is also a well-known video editor that provides various video editing and movie making tools. Using it, you cannot only create video from a sequence of images, but you can also add sound and transition effects to the final video. It lets you use images in formats including JPG, PNG, BMP, and GIF.
How to convert image sequence to video using Windows Movie Maker:
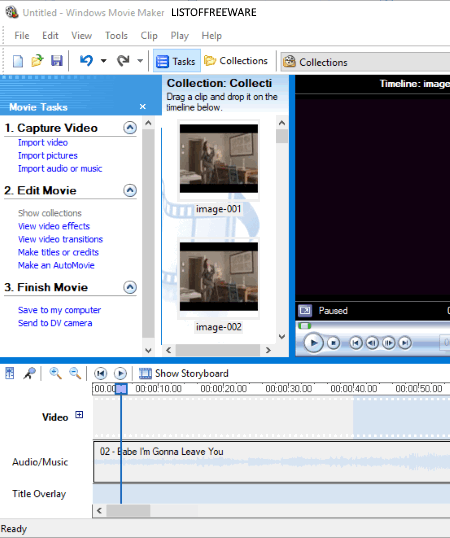
- Launch this software and import sequence of images by using the File > Import Into Collections option.
- You can view all added images in the Collection section of this software. From this section, select and drop images in the right sequence over the Video Timeline.
- After that, manually adjust viewing time of each image by dragging the edges of each image using the mouse.
- Now, you can add music by dropping the audio file to the audio timeline and add transition effects using video effects and transition tools.
- After editing and adding all possible effects and transition, use its preview player to play the video before the actual conversion.
- Lastly, save the video using its Save video file option.
The output produced by this software is not as smooth as other similar software. Plus, it can only save the final video in WMV format which is another drawback of this software.
Easy Video Maker
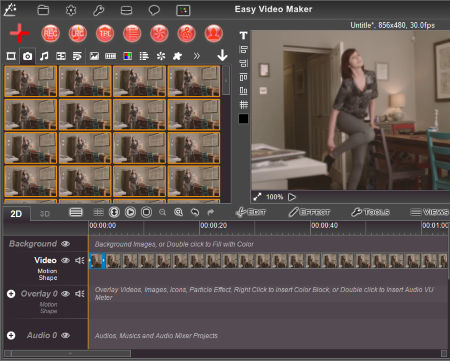
Easy Video Maker is a free video editing software that can also be used as an image sequence to video converter software. It supports a lot of image formats like PNG, JPG, BMP, TIFF, etc. which is really important for this type of software. It also provides all essential image to video conversion tools along with a lot of video editing tools. Apart from this, you can easily add audio and various transition effects to the final video.
How to convert image sequence to video using Easy Video Maker:
- Launch this software and add images through its Add Image option. All added images can be viewed from its Image section.
- Now, drop the images in the correct sequence over the video timeline. At this time, you can also add and drop audio over the audio time of this software.
- From the video timeline, select one image at a time and compress or stretch it to specify the time of each image.
- Now, use Edit, Effect, and Tool sections to make the desired changes to the video.
- Once the video gets completed, go to the Settings section to set the Framerate, Format (MP4, AVI, MOV, FLV, etc.), Sample rate, etc. of the video.
- Lastly, use the preview section to look at the final video before the actual conversion and then press the Render button to start the rendering process.
Note: In this free version of this software, you can create a video of up to 5 minutes only. To remove this limitation, you need to purchase the paid version of this software.
Avidemux
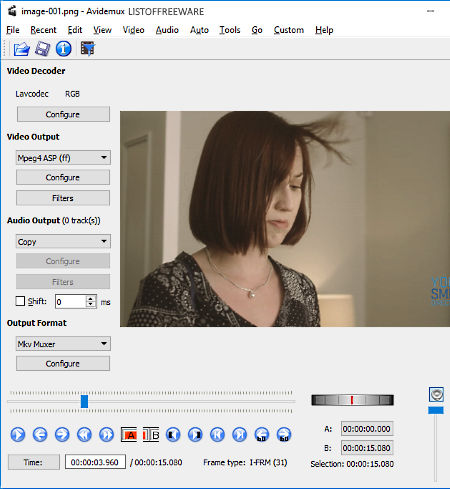
Avidemux is the next free image sequence to video software for Windows. It is one of the simplest software to convert images to video. Still, it contains all essential tools along with various editing tools which is always a bonus.
In this software, you do not have any image sorting feature, hence you need to manually sort image numerically in the source folder. Now to convert images to video, you just need to add images to this software by using its File > Open option. After adding images, you can immediately preview the video in its inbuilt video player. Before saving the final video, you can add audio, change frame rate, apply color filters, change video decoder, etc. using various available tools.
Once the video gets completed, go to the Output format menu and select one of the available output formats (AVI, FLV, MP4, MPEG, MKV, etc.). Now, to save the video, go to File menu and use the Save option or Ctrl + S hotkey.
FFMPEG
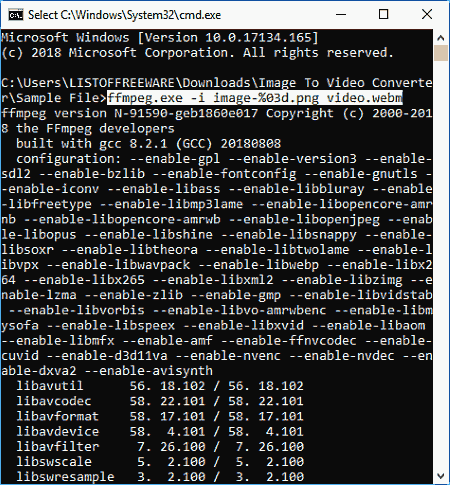
FFMPEG is a free and open source image sequence to video software for Windows. It is also a complete media framework software through which you can perform various media related tasks like audio/video editing, media merging, media splitting, video conversion, audio conversion, and more. In its enormous list of features, image sequence to video converter is its another feature. However, it requires commands to perform specific tasks.
How to convert image sequence to video using FFmpeg:
- The first step is to paste the ffmpeg.exe file in a folder where all the images are present.
- After that, launch the command prompt from the same folder and write this command
ffmpeg.exe -i image-%03d.png video.webm. - Lastly, press the Enter button to start the conversion.
In the image sequence to video conversion command, you can replace the PNG extension with the extension of input images and WEBM extension with any video extension that you want. image-%03d.png is the filename pattern in the above command. You can know more about related commands from this link.


Naveen Kushwaha
Passionate about tech and science, always look for new tech solutions that can help me and others.
About Us

We are the team behind some of the most popular tech blogs, like: I LoveFree Software and Windows 8 Freeware.
More About UsArchives
- May 2024
- April 2024
- March 2024
- February 2024
- January 2024
- December 2023
- November 2023
- October 2023
- September 2023
- August 2023
- July 2023
- June 2023
- May 2023
- April 2023
- March 2023
- February 2023
- January 2023
- December 2022
- November 2022
- October 2022
- September 2022
- August 2022
- July 2022
- June 2022
- May 2022
- April 2022
- March 2022
- February 2022
- January 2022
- December 2021
- November 2021
- October 2021
- September 2021
- August 2021
- July 2021
- June 2021
- May 2021
- April 2021
- March 2021
- February 2021
- January 2021
- December 2020
- November 2020
- October 2020
- September 2020
- August 2020
- July 2020
- June 2020
- May 2020
- April 2020
- March 2020
- February 2020
- January 2020
- December 2019
- November 2019
- October 2019
- September 2019
- August 2019
- July 2019
- June 2019
- May 2019
- April 2019
- March 2019
- February 2019
- January 2019
- December 2018
- November 2018
- October 2018
- September 2018
- August 2018
- July 2018
- June 2018
- May 2018
- April 2018
- March 2018
- February 2018
- January 2018
- December 2017
- November 2017
- October 2017
- September 2017
- August 2017
- July 2017
- June 2017
- May 2017
- April 2017
- March 2017
- February 2017
- January 2017
- December 2016
- November 2016
- October 2016
- September 2016
- August 2016
- July 2016
- June 2016
- May 2016
- April 2016
- March 2016
- February 2016
- January 2016
- December 2015
- November 2015
- October 2015
- September 2015
- August 2015
- July 2015
- June 2015
- May 2015
- April 2015
- March 2015
- February 2015
- January 2015
- December 2014
- November 2014
- October 2014
- September 2014
- August 2014
- July 2014
- June 2014
- May 2014
- April 2014
- March 2014
