6 Best Free Panorama Software For Windows
Here is a list of Best Free Panorama Software for Windows. These Panorama maker software let you stitch images together to create a panorama. These software automatically take care of overlapping part of the images to create a nice looking big panoramic image.
All you have to do is add the images to these panorama maker software for stitching. The images are auto aligned, and some also let you manually align images. With some of these Panorama software, projection of panorama can be changed, while some simply create a panorama without any extra options. In case you do not have a tripod, and the aligned output panorama is not rectangular, auto crop feature available in some of these free photo stitching software helps. Desired output image size, quality, and format can also be set manually.
If you have come here looking for a Panorama maker, then you must be familiar with the term Panorama. For those who have a very basic idea about it, a Panorama is basically a wide landscape captured in a single picture. Capturing an outspread landscape in a single shot is tough if you do not have a wide angle lens/camera, so you take multiple pictures of a landscape in fragments, then stitch them together. When you click the pictures, you have to make sure that fragments are overlapping a bit at the ends; this helps creating seamless panorama images. The stitching part needs a special type of software, and that’s when these Panorama software or image stitching software come into picture. It is suggested to have a camera that has manual settings (so that all images have same exposure; auto mode keeps changing the camera settings) and a tripod to click pictures (for stable frame).
Once you have your images ready, you can choose any of the mentioned Panorama stitching software.
Go through this list of best free photo stitching software to know more about their features and also get to know how to make panorama using them.
You can also checkout the list of best free Image Editors, Bulk Image Resizer Software, and Software To Watermark Photos.
Image Composite Editor
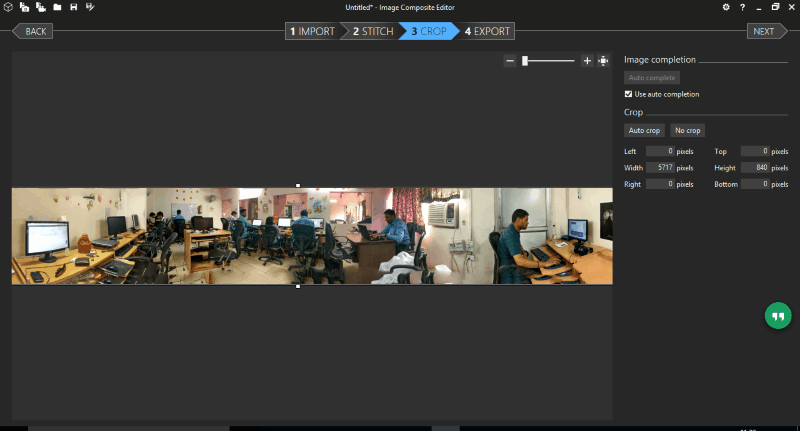
Image Composite Editor is a free panorama software developed by Microsoft’s Computational Photography Group. It provides seamless photo stitching of a series of pictures shot from a single point. It lets you make panorama from images or from video.
To make panorama from images, select and add a series of images shot from a single location. After you add the photos for image stitching, create a panorama in the Simple Panorama mode. Here you can select a Camera Motion in which images were shot; the Auto-detect feature works just fine. Other camera motion options are: Planar Motion, Planar motion with skew, Planar motion with perspective, and Rotating motion.
A Structured Panorama mode is also available, where you can select panorama layout, image order, angular range, and set image overlap options. The options are a bit advanced and can be used if you are a Pro at what you are doing, or if you have too much time in hand to experiment. Preview option is available if you want to checkout how your panorama is going to be, before you save it.
Move to the next step and set the Projection type for your panorama. Cylindrical and Spherical projections work the best with general panorama. Try other projection types then preview your panorama in the respective modes.
The next step involves cropping the panorama. Use the manual cropping option, or simply use the Auto Complete option. With this panorama stitching software, you can save your panorama image in JPEG, TIFF, PNG, BITMAP, or PSD formats. You can also set some image details for Photosynth section, such as: Title, Appearance, Description, Geotag, Visibility, Photo rights, etc.
You can also utilize this panorama maker to make panorama from video. It is easier to just pan and shoot videos across a horizon, than taking a series of photos without a tripod. So, if you have any such video, you can import it here to make a panorama from video, automatically.
AutoStitch
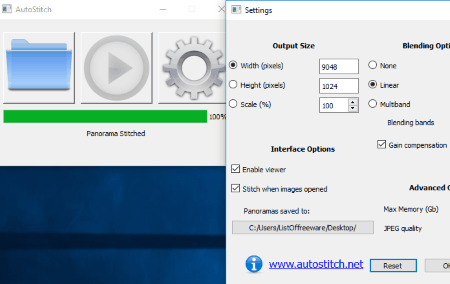
AutoStitch is available for free as a demo version, which can stitch up to 4 photos to make panorama. As the name suggests, this is an automatic panorama software, and carries out image stitching automatically. Once you add multiple photos of a scene, it automatically stitches them up and displays the result in your PC’s default image viewer; no hassle.
You can access the settings menu, and set the Output Size in pixels, set Blending Options, set Output image location, set JPEG image quality, and Maximum RAM to be used to process image stitching. That is all.
If you want to crop the output image, open the saved image in a third party image editor to do so.
The panorama images made by this free photo stitching software can be used for free, as long as you acknowledge the use of AutoStitch along with the images. Learn more about the licensing here.
PanoramaPlus Starter Edition
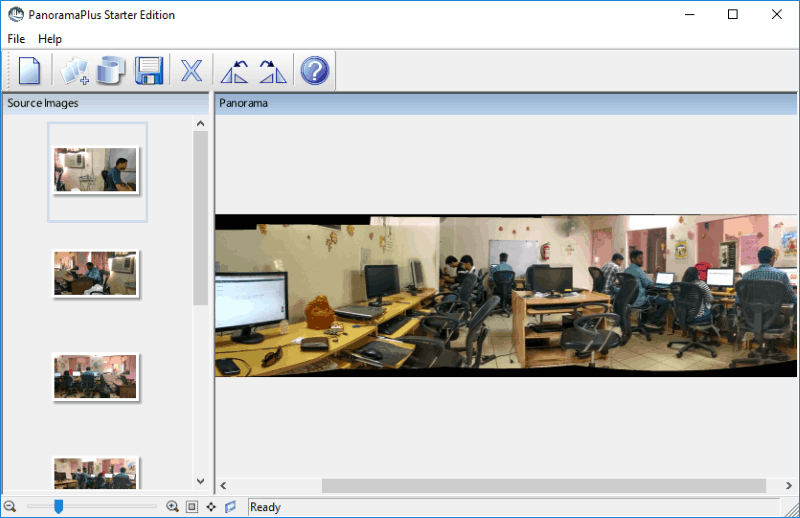
PanoramaPlus Starter Edition is another free panorama software, which lets you stitch images automatically, but with a limitation. Like Autostitch, this free version of panorama maker lets you stitch up to 4 images only. If you are on to creating a small panorama, then you should definitely go for it.
Select and import photos to the interface to stitch them. If any of the added images is in wrong orientation, you can rotate it manually before carrying out the process. Click on the Create Panorama option to start the process of image stitching. After processing the panorama is displayed on the interface.
Export panorama in JPEG format to a desired location.
P.S.: The paid version of this photo stitching software has no limit on the numbers of images to be stitched. It also lets you import RAW images and videos to create panorama. You can also add images of multiple sets to create multiple panoramas at a time.
PanaVue ImageAssembler
PanaVue ImageAssembler is another free photo stitching software, which can perform various other image related operations. Panorama Stitching being one of the options, can be carried out under a project. It has a Lens Wizard tool (helps you determine a perfect lens and camera setting for clicking Panorama pictures), a Mosaic Stitching tool, and a Batch Cropping tool.
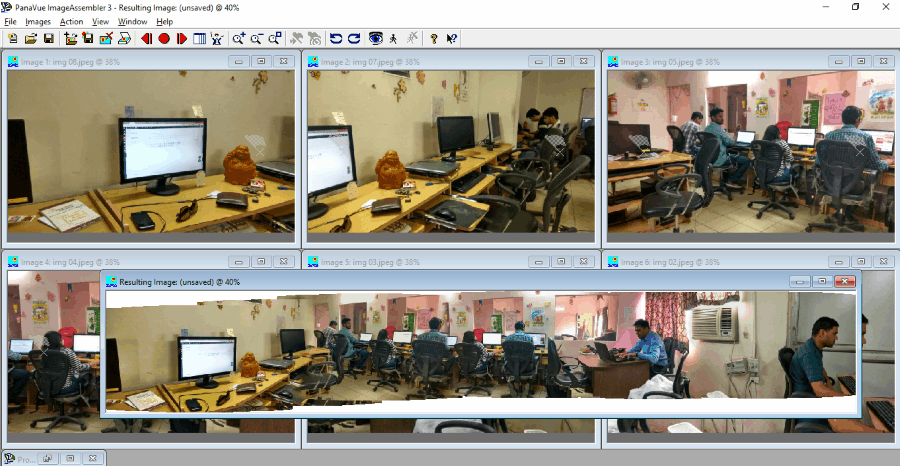
When you begin a Panorama project, you can choose if you want to create a single row panorama or a single column panorama. Now add images to the project and proceed to set panorama options. You can run the program to stitch images automatically, or do manual stitching by adding flags. Set image blending, 360 wrapping, anti-aliasing, auto crop, alignment, etc. options. You can also select a lens definition if you want. When you are all set, execute a Preview run or Full run. This gives the output Panorama as an image, which you can save to your computer.
Creating Panorama with this Panorama software was easy; however, the outputs were somewhat out of alignment at few places. You also may need to add images one by one in order of the pictures taken from left to right direction.
GIMP
GIMP is a very popular open source image manipulation software. Though it does not have a native panorama tool, there is a Panorama plugin for GIMP available, which can stitch two images with overlapping portions. Installing and carrying out image stitching on GIMP is as simple as they come. Go to the Homepage of Panorama plugin for GIMP to know more about it, or go to the download page and read further to know how to Install and use this plugin.
How To Install Stitch Panorama Plugin on GIMP:
Once you download the plugin, go to the download folder and copy the plugin file. Now you have to paste the plugin in the Plugin Folder of GIMP. The Plugin Folder is located at: C:/Program Files/GIMP/lib/GIMP/(GIMP version installed; its 2.0 for my PC)/plug-ins. Restart GIMP once you paste the plugin file.
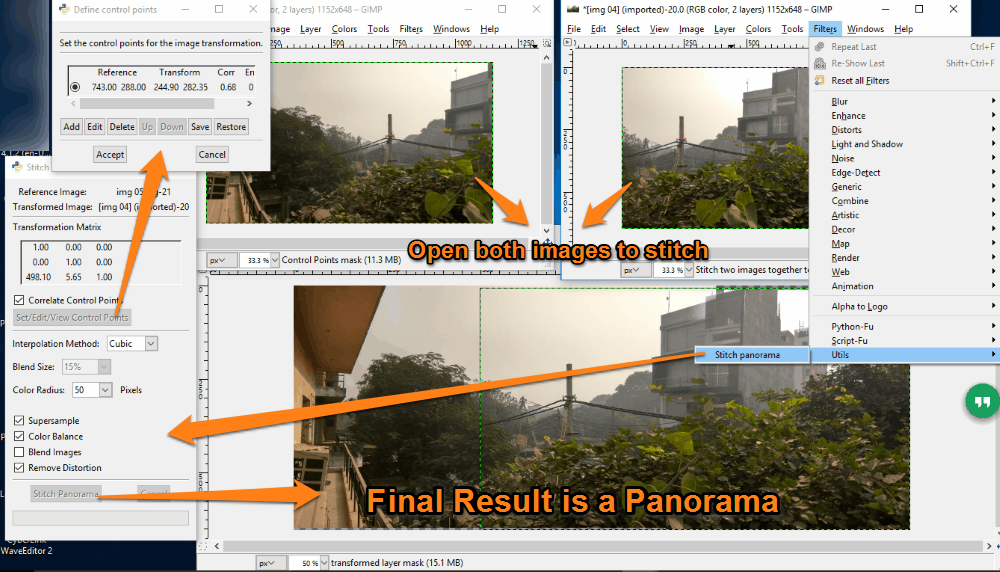
How To Make Panorama in GIMP:
- Open the two overlapping images that you want to stitch in GIMP.
- On any of the images, go to Filters> Utils> Stitch Panorama.
- A new window opens, where you have to select a Reference Image and a Transformed image. You can select any of the loaded images in these sections. Click Accept.
- Another window opens, where you have to set Control Points, Interpolation method, Blend size, Color radius, and other options. Setting Control Points properly is very important business while stitching images in GIMP. All other options can be left to default values. Click on Set/Edit/View Control Points.
- Another window opens up. Here you have to add Control points. To add Control points, go to the images and select control points using selection tool. Control points are common points that are overlapping in both the images to be stitched. Use the Selection Tool to select very tiny selection points on both the images. Its recommended to zoom the images and select common points of a size of around 4×4 pixels. If you select big Control Points, the tool hangs and stops responding.
- Once the selections are made on both images, click on Add option on the Define Control Points window.
- Get back to Stitch Panorama Control Panel and click on Stitch Panorama.
- The stitched image will appear in a new window. Save the image.
I tried to carry out the same process on two images clicked from my balcony, and the result came out to be pretty satisfactory. Click on the picture above to view the result.
Hugin

Hugin is an extremely advanced and professional Panorama software. It is an open source panorama maker and is available for Windows, MAC, as well as LINUX. This photo stitching software is a bit complicated, and takes a bit of getting used to for stitching images perfectly. Its generally used by professional photographers, and requires various photography related input to get a photo stitched. It is known for stitching photos with different exposures, inconsistent projections, and HDR image stitching.
To carry out image stitching, start a new project, add photos to it, import and apply mask on photos if you want, set control points, then set output options for stitching images. You can define the type of projection, field of view, Canvas size, and various other settings for the output panorama. A preview option is also available, so that you can make corrections.
To get used to this panorama stitching software, you can visit the Hugin tutorial page, where you will find many tutorials to learn how to make panorama using Hugin.


Harshwardhan Gupta
https://padangtoto-online.s3.wasabisys.com/index.html https://padangtoto.s3.us-west-004.backblazeb2.com/index.html
About Us

We are the team behind some of the most popular tech blogs, like: I LoveFree Software and Windows 8 Freeware.
More About UsArchives
- May 2024
- April 2024
- March 2024
- February 2024
- January 2024
- December 2023
- November 2023
- October 2023
- September 2023
- August 2023
- July 2023
- June 2023
- May 2023
- April 2023
- March 2023
- February 2023
- January 2023
- December 2022
- November 2022
- October 2022
- September 2022
- August 2022
- July 2022
- June 2022
- May 2022
- April 2022
- March 2022
- February 2022
- January 2022
- December 2021
- November 2021
- October 2021
- September 2021
- August 2021
- July 2021
- June 2021
- May 2021
- April 2021
- March 2021
- February 2021
- January 2021
- December 2020
- November 2020
- October 2020
- September 2020
- August 2020
- July 2020
- June 2020
- May 2020
- April 2020
- March 2020
- February 2020
- January 2020
- December 2019
- November 2019
- October 2019
- September 2019
- August 2019
- July 2019
- June 2019
- May 2019
- April 2019
- March 2019
- February 2019
- January 2019
- December 2018
- November 2018
- October 2018
- September 2018
- August 2018
- July 2018
- June 2018
- May 2018
- April 2018
- March 2018
- February 2018
- January 2018
- December 2017
- November 2017
- October 2017
- September 2017
- August 2017
- July 2017
- June 2017
- May 2017
- April 2017
- March 2017
- February 2017
- January 2017
- December 2016
- November 2016
- October 2016
- September 2016
- August 2016
- July 2016
- June 2016
- May 2016
- April 2016
- March 2016
- February 2016
- January 2016
- December 2015
- November 2015
- October 2015
- September 2015
- August 2015
- July 2015
- June 2015
- May 2015
- April 2015
- March 2015
- February 2015
- January 2015
- December 2014
- November 2014
- October 2014
- September 2014
- August 2014
- July 2014
- June 2014
- May 2014
- April 2014
- March 2014
