9 Best Free Software to Add Reverb to Audio for Windows
Here is a list of best free software to add reverb to audio for Windows. Reverb or Reverberation refers to sound waves reflect off from multiple surfaces before reaching to a listener. In the music industry, this reverb effect is widely used to add reverberation property to any audio file. Using these software, you can also add the reverb effect to audio with ease.
These software come with a dedicated Reverb Effect or Tool that lets you add the reverb effect to a portion of an audio or over the entire audio. In most software, you also get options to adjust reverb parameters (pre-delay, tone high, wet gain, in gain, etc.) to change the reverb effect behavior. These software also act as the audio editing software and provide audio editing tools like Duplicate, Paste Mix, Split Cut, Split Delete, etc. Plus, they also offer audio effects such as Delay, Compressor, Amplify, Distortion, Expander, and more. The process to add reverb to audio is quite simple. Still, to help you out, I have included the steps to add reverb in the description of each software.
The good thing about these editors is their ability to support multiple audio formats like MP3, WMA, WAV, AIFF, etc. Apart from editing tools and effects, these editors also come with additional tools that may come in handy. Some of the additional tools offered by these editors are Audio Recorder, Tone Generator, Audio Loop, and Scrub Mode. Go through the list to know more about these software.
My Favorite Software to Add Reverb to Audio For Windows:
Audacity is my favorite software because it offers a dedicated reverb effect that you can quickly add to audio. Plus, it offers various reverb parameters that you can manually adjust to specify the behavior of the reverb effect. I also like its ability to support audio files of multiple formats.
You can also check out lists of best free software to Add Echo to Audio, Add Text to Animated GIF, and Change Audio Bitrate for Windows.
Audacity
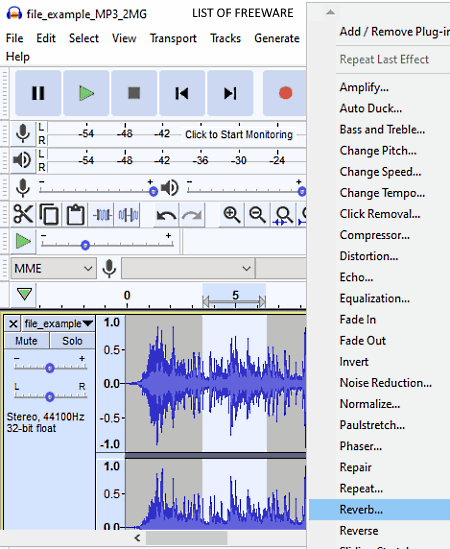
Audacity is a free open source software to add reverb to audio for Windows, macOS, and Linux. It is also a popular audio editing software that lets you edit audio and add various audio effects to audio files of various formats. Some of the audio formats supported by this software are OGG, FLAC, AIFF, MP3, WAV, and more. To edit audio, it offers multiple audio editing tools and effects like Cut Audio, Clip Boundaries, Duplicate, Amplify, Auto Duck, Distortion, Compressor, Echo, and more. From various available effects, you can choose the Reverb effect to add reverb to audio. After editing and adding a reverb effect to audio, you can export the final audio in WAV, MP3, AMR, WMA, AC3, MP2, etc., formats. Now, follow the below steps to add reverb to audio.
How to add reverb to audio using Audacity:
- Launch this software and go to File > Open option to load an audio file of a supported format.
- After that, select a part of the audio through mouse over which you want to add the reverb effect.
- Now, go to the Effects tab and select the Reverb option to open up the Reverb effect window.
- In the reverb window, you get multiple parameters (pre-delay, tone high, wet gain, stereo width, etc.) that you can adjust to adjust the reverb effect behavior.
- Now, you can further modify the audio using other available audio editing tools and effects, if you want.
- Lastly, go to the File > Export menu to export the final audio in the desired audio format.
Additional Features:
- Generate: It is a handy tool through which you can generate custom sounds like DTMF Tones, Chirps, Noise, etc.
- Record: Through this feature, you can record external microphone feed with ease.
Final Thoughts:
It is one of the best free software to add reverb to audio as it lets you precisely specify all necessary reverb effect parameters. Plus, it also offers many audio editing effects and tools to further enhance audio.
WaveShop
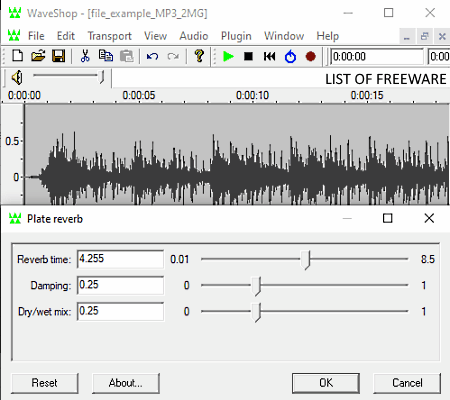
WaveShop is another free open source audio editing software that can also be used to add reverb to audio. It works on Windows. By default, it does not come with the reverb functionality. To add the reverb feature to this software, you need to download and add the LSDPA plugin to this software. To add LSDPA plugin to this software, first, you need to extract the plugin folder. After that, copy all the .dll files present in the LSDPA plugin folder and paste it to the Plugins folder of WaveShop, that you can find inside the Program Files folder. After that, restart WaveShop and start using the Reverb feature.
It is mainly an audio editing software, thus it offers many audio editing tools and effects like multi-channel audio editor, cut, begin selection, amplify, reverse, normalize, invert, and more. Plus, it also offers support for a good set of input and output audio formats like WAV, AIFF, FLAC, OGA, OGG, MP3, and more. Now, follow the below steps to add reverb to audio.
How to add reverb to audio using WaveShop:
- Start this software and click on the Open option to load an audio file.
- After that, select a part of the audio over which you want to add the reverb effect.
- Next, go to the Plugin tab and select the Plate reverb option to open up a Plate reverb window.
- Now, adjust the Reverb Time, Damping, and Dry/Wet Mix values to specify the amount of reverb effect you want to add to the audio.
- After that, you can also use other available effects and audio editing tools to make further enhancements to audio.
- Lastly, go to the Export option and select one of the supported output audio formats and press the OK button to save the audio.
Additional Features:
- Record: Through this feature, you can record voice and sound through microphone feed.
- Loop: It is another handy feature that lets you play a selected portion of audio in a continuous manner.
Final Thoughts:
It is another simple software to add the reverb effect to audio that anyone can use with ease.
Audio Pitch & Shift
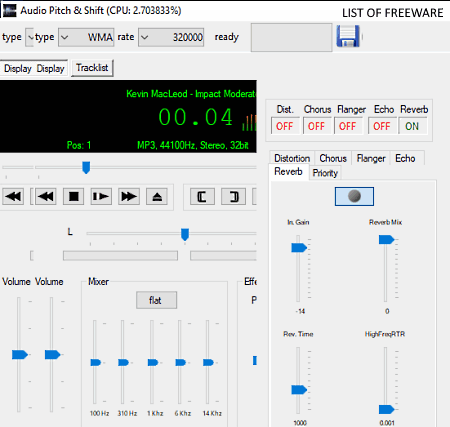
Audio Pitch & Shift is another free software to add reverb to audio for Windows. To add the reverb effect to audio, it offers a dedicated Reverb panel from where you can adjust four reverb parameters (In Gain, Reverb Mix, Reverb Time, and HighFreqRTR) to get the right amount of reverb in the final audio. However, unlike other similar software, it does not let you apply the reverb effect at a portion of the audio. Instead, it applies the reverb effect over the entire length of the audio. Apart from Reverb, it can also be used to add echo, flanger, chorus, and distortion effects to audio files. Plus, audio pitch and speed can also be adjusted through this software.
The main advantage of this software is its ability to apply the reverb effect over multiple audio files of various formats at a time. Some of the audio formats that it supports are WAV, OGG, WMA, MP3, MOD, etc. Now, check out the below steps to add reverb effect to audio files.
How to add reverb to audio using Audio Pitch & Shift:
- Start this software and press the right mouse button to open op the context menu of this software.
- From the context menu, select the Open option to add one or more audio files of supported formats.
- After that, enable the Reverb feature and then go to the Reverb section to adjust reverb parameters.
- Now, you can also apply other available audio effects as well, if you want.
- Lastly, select one of three output audio formats (MP3, WMA, and WAV) audio from the Type menu and click on the Save button to save the final audio.
Additional Features:
- L and R Slider: This tool lets you adjust the intensity of sound in the left and right audio channels.
- Loop: Through this feature, you can continuously play a selected audio file.
Final Thoughts:
It is another simple software to add reverb to audio through which you can also add other effects like echo, distortion, etc., to audio.
Acoustica Basic Edition
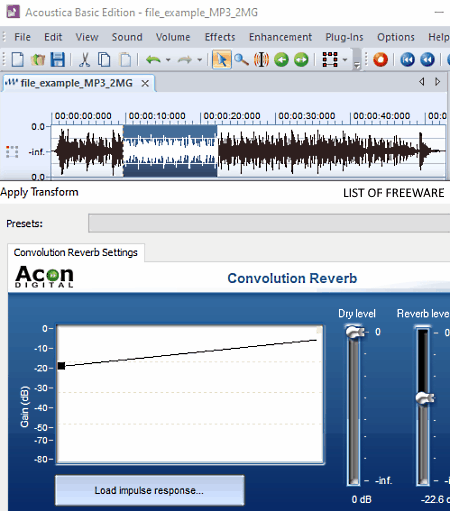
Acoustica Basic Edition is yet another free software to add reverb to audio for Windows. Like other similar software, it is also primarily an audio editing software that lets you add a reverb effect to audio. Apart from reverb, it can also be used to add Echo and Reverse effects to an input audio file. Plus, multiple audio editing tools to cut, join, and mix audio files are also present in it. Another good thing about this software is its ability to support audio files of various formats such as WAV, AIFF, WMA, AU, FLAC, RAW, MP3, and more. It also comes with the multi-tab interface that lets you work on multiple audio files at a time. In general, it is another capable software to edit and add the reverb effect over audio files.
How to add reverb to audio using Acoustica Basic Edition:
- Open the interface of this software and click on the Open option to load an audio file.
- After that, select a part of the audio or the entire audio length through mouse over which you can want to add the reverb effect.
- Now, go to the Effects tab and open up the Convolution Reverb window.
- After that, adjust reverb gain, dry level, and reverb level to manually specify the reverb behavior and then preview the audio with added reverb effect through the Preview option.
- Now, you can choose to make further enhancements to audio through available editing tools and effects.
- In the end, use the Save as option and choose one of many available output formats such as WAV, OGG, WMA, MP3, AU, and more.
Additional Features:
- Record: Through this feature, you can record voice, speeches, music, etc., by capturing the microphone feed.
- Scrub Mode: It lets you listen to the real-time audio while scrubbing through the timeline of an audio file.
Final Thoughts:
It is another decent audio editing software through which you can add reverb to audio and make other necessary enhancement to audio files of various formats.
Expstudio Audio Editor
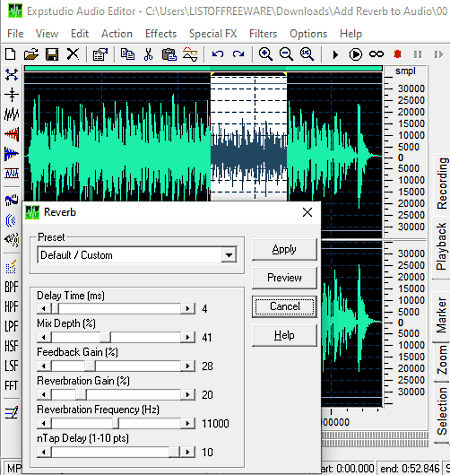
Expstudio Audio Editor is another free audio editing software that lets you add reverb to audio. Through this software, you can add many other effects to audio such as Fade In, Fade out, Amplify, Normalize, Delay, Chorus, Phaser, Reverb, Compressor, Expander, Invert, Reverse, and more. Plus, it also offers a good set of audio editing tools (Cut, Copy, Mix Paste, Mix From File, Silence, etc.) through which you can make desired changes to audio files of different formats. After editing and adding reverb effects to audio, you can export it in MP3, WAV, OGG, VOX, RAW, WMA, etc., audio formats.
How to add reverb to audio using Expstudio Audio Converter:
- Launch this software and click on the Open option to load an audio file.
- After that, use your mouse to select a part of the audio over which you want to add the reverb effect.
- Now, move to the Effects tab and click on the Reverb option to open up the reverb settings panel.
- From the reverb panel, manually adjust reverb parameters like delay time, mix depth, feedback gain, reverberation gain, etc. You can also choose one of many reverb presets to adjust reverb behavior such as Cellar, Metal Flanger, Room Left Channel, Room Right Channel, etc.
- At last, preview the audio and then save it in one of the supported audio formats using Save as option.
Additional Features:
- Filters: This software offers many audio filters (Notch, Band Pass, High Pass, FFT, etc.) that you can use to filter out a certain range of audio frequencies.
- Special FX: It provides many voice changing features through which you can convert female voice to male voice, male voice to female voice, voice to chipmunk voice, etc.
Final Thoughts:
It is a simple and straightforward audio editing software through which you can easily add the reverb effect to an audio file.
Eart Audio Editor
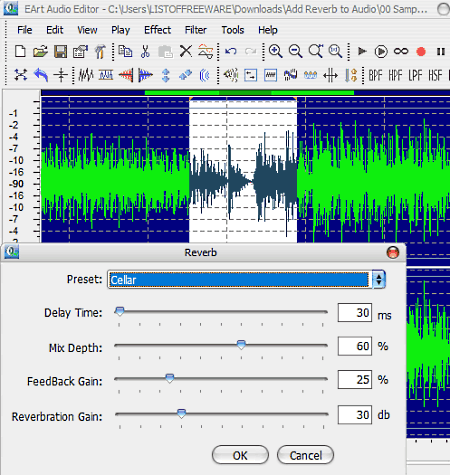
Eart Audio Editor is yet another free software to add reverb to audio for Windows. As its name implies, it is primarily an audio editing software through which you can also add the reverb effect to audio files of various formats. Apart from reverb, you can use it to add delay, phaser, pitch shift, flanger, silence, etc., effects to audio files. Through this editor, you can also perform basic audio editing operations like split audio, join audio, mix audio, remove the portion of audio, etc.
This software supports audio files of WAV, WMA, MP3, MP2, RAW, CDA, etc., formats. Now, check out the below steps to add reverb to audio.
How to add reverb to audio using Eart Audio Editor:
- Start this software and click on the Open option to load an audio file.
- After that, use your mouse to select the portion of audio over which you want to apply the reverb effect. You can also select the entire audio timeline to add the reverb effect over the whole audio.
- Now, move to the Effect tab and click on the reverb option to open up the reverb panel.
- Next, specify the behavior of the reverb effect by manually adjusting the reverb parameters namely Delay Time, Mix Depth, Feedback Gain, and Reverberation Gain. It also offers some reverb presets (Metal, Cellar, Room Left Channel, etc.) to quickly adjust the reverb behavior.
- In the end, preview the audio on its internal audio player and then use the Save as option to save the final audio.
Additional Features:
- Frequency Analyzer: Using it, you can view and analyze the intensity of the audio at different frequency ranges.
- Recorder: It is a simple audio recording feature that can capture and record microphone feed that you can later edit within this software.
Final Thoughts:
It is another decent software to add reverb to audio and to edit audio through various available audio editing tools and effects.
ocenaudio
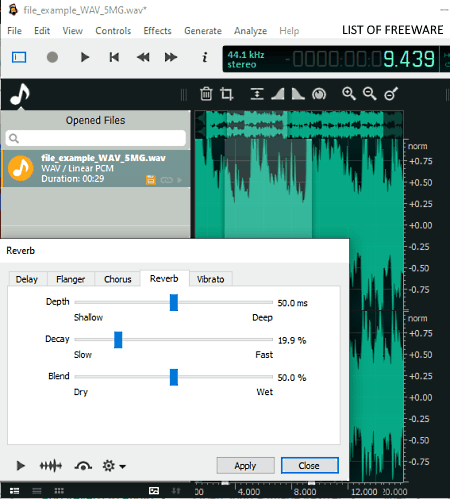
ocenaudio is the next free software to add reverb to audio for Windows. It is a beautifully designed software through which you can also edit audio files. To edit audio, it offers audio timeline editor, cut, trim, swap channels, delete selection, split audio, etc., audio editing tools. Besides this, it also offers various audio effects (silence, reverse, invert, smooth, reverb, normalize, etc.) that you can quickly apply to an audio file. After making desired changes to audio, you can use its internal audio player to preview audio before exporting it to WAV, RAW, OGG, FLAC, etc., audio formats. Now, check out the steps to add reverb to audio through this software.
How to add reverb to audio using ocenaudio:
- Launch this software and go to File > Open option to load an audio file.
- After that, select a portion of the audio from its interface over which you want to add the reverb effect.
- Now, open up the Effect menu and go to Delay > Reverb option and adjust reverb parameters (Depth, Decay, and Blend) to define its behavior.
- After that, you can choose to make further modifications to audio through other available audio effects and editing tools.
- Lastly, preview the final audio and use the Export option to save the final audio with the added reverb effect.
Additional Features:
- Generate: Through this feature, you can generate custom Tones, DTMF Tones, and Noise sounds.
- FFT Analysis: Use it to analyze the intensity of audio at different frequencies in real-time.
Final Thoughts:
It is another standard audio editing software through which you can quickly add the reverb effect to an audio file.
Naturpic Audio Editor
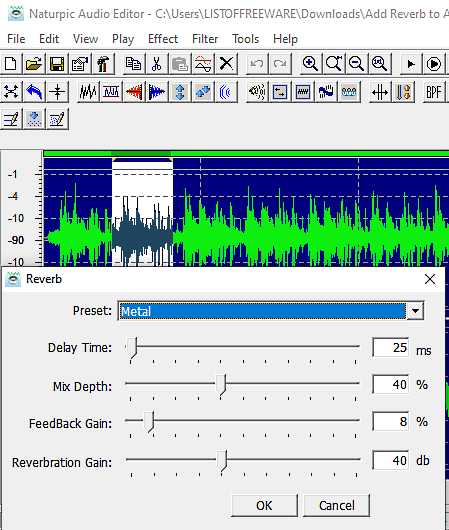
Naturpic Audio Editor is another free software to add reverb to audio for Windows. According to its name, it is mainly an audio editing software. Using it, you can cut audio, mix audio, delete a part of audio, and add various audio effects over an audio file. One of its audio effects named reverb can be used to add the reverb effect to audio files of various formats like WAV, MP2, MP3, WMA, OGG, etc. Apart from reverb, it offers other audio effects like pitch shift, time stretch, delay, fade, reverse, silence, etc.
How to add reverb to audio using Naturpic Audio Editor:
- Start this software and click on the Open option to load an audio file of a supported format.
- After that, select the entire audio or a part of the audio through mouse over which you want to add the reverb effect.
- Now, go to the Effect menu and select the Reverb option to open up the reverb panel.
- From the Reverb panel, adjust the delay time, mix depth, feedback gain, and reverberation gain values to specify the reverb effect behavior.
- Lastly, preview the audio through its internal audio player and then use the Save as option to save the final audio in WAV, MP3, MP2, etc., audio formats.
Additional Features:
- Record: It is a standard audio recording feature through which you can record microphone feed.
- Frequency Analyzer: It shows the intensity of audio at different frequency levels in real-time.
Final Thoughts:
It is another simple audio editing software that you can use to add the reverb effect to the audio.
Leapic Audio Editor
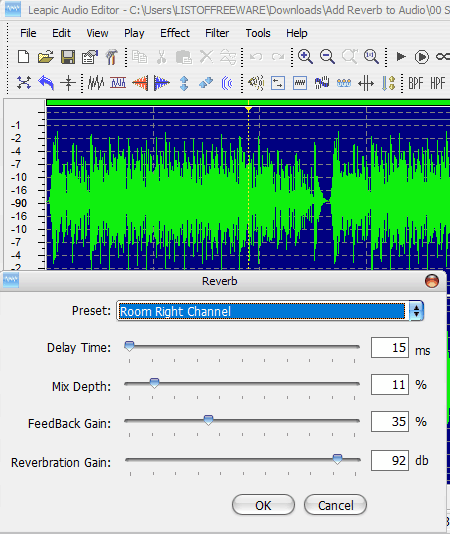
Leapic Audio Editor is another free audio editor software that can also be used to add reverb to audio. It works on Windows. Through this editor, you can perform many audio editing operations. To perform editing operations, it offers editing tool sections like editing tools (cut, paste, delete selection, mix paste, mix from the file, etc.), predefined audio effects (reverb, chorus, flanger, reverse, and more), etc. After editing and adding effects to audio, you can use the internal audio player of this software to listen to the edited audio. It also offers a zoom feature to closely analyze the waveform of the input audio file. Now, follow the below steps to add reverb to audio.
How to add reverb to audio using Leapic Audio Editor:
- Open the interface of this software and click on the Open option to load an audio file in which you want to add the reverb effect.
- After that, select the entire audio or a part of the audio over which you want to add the reverb effect.
- Next, move to the Effect menu and open up the reverb panel.
- From the reverb panel, adjust the reverberation gain, delay time, mix depth, and feedback gain values to specify the reverb effect behavior.
- Lastly, preview the audio and then save the final audio in MP2, WAV, OGG, VOX, etc., audio formats.
Final Thoughts:
It is another straightforward audio editing software through which you can quickly edit and add reverb to audio.
Naveen Kushwaha
Passionate about tech and science, always look for new tech solutions that can help me and others.
About Us
We are the team behind some of the most popular tech blogs, like: I LoveFree Software and Windows 8 Freeware.
More About UsArchives
- May 2024
- April 2024
- March 2024
- February 2024
- January 2024
- December 2023
- November 2023
- October 2023
- September 2023
- August 2023
- July 2023
- June 2023
- May 2023
- April 2023
- March 2023
- February 2023
- January 2023
- December 2022
- November 2022
- October 2022
- September 2022
- August 2022
- July 2022
- June 2022
- May 2022
- April 2022
- March 2022
- February 2022
- January 2022
- December 2021
- November 2021
- October 2021
- September 2021
- August 2021
- July 2021
- June 2021
- May 2021
- April 2021
- March 2021
- February 2021
- January 2021
- December 2020
- November 2020
- October 2020
- September 2020
- August 2020
- July 2020
- June 2020
- May 2020
- April 2020
- March 2020
- February 2020
- January 2020
- December 2019
- November 2019
- October 2019
- September 2019
- August 2019
- July 2019
- June 2019
- May 2019
- April 2019
- March 2019
- February 2019
- January 2019
- December 2018
- November 2018
- October 2018
- September 2018
- August 2018
- July 2018
- June 2018
- May 2018
- April 2018
- March 2018
- February 2018
- January 2018
- December 2017
- November 2017
- October 2017
- September 2017
- August 2017
- July 2017
- June 2017
- May 2017
- April 2017
- March 2017
- February 2017
- January 2017
- December 2016
- November 2016
- October 2016
- September 2016
- August 2016
- July 2016
- June 2016
- May 2016
- April 2016
- March 2016
- February 2016
- January 2016
- December 2015
- November 2015
- October 2015
- September 2015
- August 2015
- July 2015
- June 2015
- May 2015
- April 2015
- March 2015
- February 2015
- January 2015
- December 2014
- November 2014
- October 2014
- September 2014
- August 2014
- July 2014
- June 2014
- May 2014
- April 2014
- March 2014
