6 Best Free Video Broadcasting Software For Windows
Here is the list of Best Free Video Broadcasting Software for Windows. You can use these broadcasting software to broadcast live videos right from your computer. These software let you broadcast your Computer’s live screen activity, Webcam, and Videos. Some of these also let you integrate a set of videos, text, images, and audio to run as a single video to be broadcasted. The websites to which these software can broadcast live videos are: YouTube, Twitch, DailyMotion, Hitbox.tv, Beam.pro, Facebook Live, Vaughnlive.tv, Instagib.tv, etc. Some of these software even let you broadcast videos to multiple websites at a time. You can also record and save the broadcasted videos locally on your PC.
Before broadcasting a video, these video broadcasting software let you define certain parameters to control video quality. You can set Video resolution, Frame rate, Audio/Video bitrate, Audio/Video format, etc. Preview option gives you the freedom to play a video and checkout the output before broadcasting it.
To start streaming, you are first required to login to the broadcasting service with their respective IDs. Some of these software let you directly start broadcasting right after login, but some require you to get the Stream URL and Server in order to establish a connection and begin broadcasting video.
Go through the list to know more about the listed video broadcasting software. You will also know how to broadcast videos using these software.
My Favorite Video Broadcasting Software:
I like Open Broadcast Software the most, as it provides tonnes of features to create and broadcast videos across multiple video streaming services for free. You can add multiple videos to a scene from various sources, such as: media from computer, screen capture, webcam, video card, etc. Setting up a streaming account is pretty simple to get hold of. Keep reading to know more about it and others.
You can also checkout the list of best free Video Streaming Software, Video Stabilizer Software, and Software To Watermark Videos.
Open Broadcaster Software
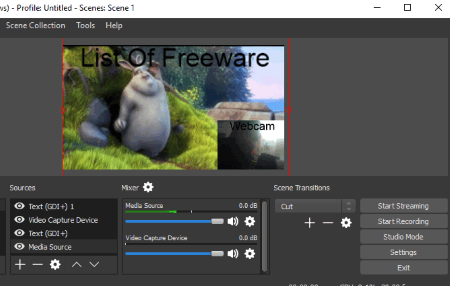
Open Broadcaster Software, also known as OBS is a free video broadcasting software, which you can use to broadcast videos on some of the famous video sharing websites. Videos can be broadcasted on the following websites: YouTube, Facebook Live, Twitch, DailyMotion, Hitbox.tv, Beam.pro, and a bunch of other video streaming websites. This freeware not only lets you broadcast videos saved on your computer, but also live video recording from webcam, computer screen, game screen, online video, and video from video cards. You can add image, slideshow, text, or external audio to the video to be streamed.
Its a full fledged video broadcaster software, and has tonnes of features that can help you broadcast customized videos. Here you can add multiple videos from multiple sources, and also add images along with audio.
This software gives you the freedom to broadcast multiple videos on a single scene, in a layered manner. You can also broadcast multiple video scenes one by one in a sequence. Audio from the loaded videos and audio input can be controlled as well.
How To Broadcast Video using Open Broadcaster Software:
- Run the software, and go to the Scenes panel on the interface. Click + to add a new scene. A scene is nothing but a blank video template. In a scene, you can add a video or multiple videos to play in a single frame.
- Now, go to Sources panel to add video(s) to a scene. Click on the + button to select from a list of media sources. You can add a video stored on PC, screen recording, game recording, online video, image, image slideshow, webcam recording, videos from video card, PC’s audio output, audio input from mic, and much more. You can also add text to a scene. If you select a video from your PC, it gets added to the Scene and is displayed on preview screen. Now you can drag and place the video anywhere on the screen, and also resize it.
- Follow the same procedure to add another video, audio, or text. If you are adding another video, it will appear as a layer on the same screen; it can be resized and placed anywhere on the screen. If you are adding an audio source, you can view and manage multiple audio volume levels in the Mixer panel. Adding a text will make the text float over the video at a desired position and in desired size; text font can be customized as well.
- To add another video scene, go back to step 1 and repeat till step 3. If you want to broadcast just 1 scene, you can proceed to Settings menu to setup the broadcasting parameters.
- Go to the Settings option to define video/audio output parameters, setup stream, and some advanced settings (if required).
- In the Settings window, go to the Output section to set video Encoder type, Video rescale output, Bitrate, etc. Under the Audio and Video sections, you can change audio output quality and video output quality.
- Setting up the Stream is most important, as this is the final step for broadcasting a video. In the Stream section in Settings window, select the Stream type as Streaming services. Now select the Service from the options: Twitch, YouTube, DailyMotion, Facebook Live, beam.pro, etc. Click on the Show all services option to view a long list of streaming services supported. Select a server type, then enter your Stream Key. Stream Key is a personal key provided by the streaming services for broadcasting videos. Each channel has different Stream keys, which can be found on the service’s website when you login from your account. A simple Google search regarding finding Stream Key can help.
- After everything is set, click on Start Streaming option to begin broadcasting.
To view the broadcasted video, one must go to the respective channel on the website where it is being broadcasted.
You can record and save the video that is being broadcasted to view it later in mp4, mkv, mov, flv, ts, and m3u formats.
FFsplit

FFsplit is a lightweight and free live encoder, which you can use for video broadcasting. It comes with an easy to use interface and supports live broadcaster for Twitch, Ustream, YouTube, Livestream, Vaughnlive.tv, Instagib.tv, and Hitbox.tv.
Before you begin broadcasting a video, you have to select a broadcasting medium. In output section, you can set up output type to Twitch or any other supported streaming services. After selecting the server, you need to enter the stream key, which can be found on your stream channel. You may also have to enter your channel’s name for some broadcasting services.
Add the video that you want to broadcast using this software. You can use a Mic as well as PC’s audio output to add audio to the video being broadcasted. Both the audio inputs can be muted separately if required.
Encoder section lets you define video output parameters. You can leave the settings to default or adjust options manually to change Output resolution, Frame rate, Bitrate mode, Video bitrate, Audio format, and Audio bitrate.
When all set, broadcast your video. You can record and save the video to your PC as well. For ease of access, you can also define hotkeys.
Note: For broadcasting videos on YouTube, set output to Custom and then enter Server and Stream key.
How To Broadcast Video Using FFsplit
- After the software loads, you are required to configure stream settings beforehand. You can add multiple sessions for broadcasting on multiple output streams i.e. you can broadcast on YouTube as well as Twitch at the same time.
- Go to Output section. Select the Output, enter the Server and Stream key of the streaming service. Streaming services supported are: YouTube, Livestream, Instagib.tv, Dailymotion, Ustream, Hitbox, etc.
- In Encoder section, you can create a new encoding profile. You can enter desired Bitrate mode, Video resolution, Frame rate, Video bitrate, Audio formats, and Audio bitrate.
- For the current Encoder, you can alter or choose different capture options such as: Delay, Playback device, Push-to-talk, etc.
- To add content, you can add canvas (similar to adding scenes in OBS). Each canvas can have its own set of layers (similar to Source on OBS). Sources can be: Screen, Text, Image, and Video Capture Device.
- You can define Position, Height, Width, and Alpha of media selected. Also, it allows you to hide or lock a source.
- After having everything set, click on start to broadcast your content live.
To view the broadcasted video, go to the website where its been broadcasted and open your channel to view it live.
GameShow
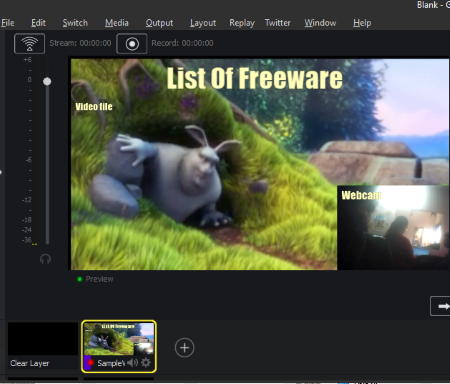
GameShow is a comprehensive broadcasting software for video broadcasting, dedicated to gamers. It’s a bit complex program and supports live video encoding only for YouTube, Twitch, and Hitbox. Its very popular among gamers who broadcast live games and tutorials. It is pretty easy to use and far more featured than OBS.
It is generally used for streaming games to popular video sharing websites such as Twitch or YouTube Gaming; however, you can also broadcast other videos, rather than a game. It has encoding setting options related to output resolution at different stream rates.
It does not includes any option to enter stream key or server, instead it directly lets you login to your account for accessing permission to broadcast live video.
GameShow allows you to add as many shots (scenes) as you want, where you can put different sources like Text, Audio files, Video files (mp4 files are not supported), Webcam, Screen capture, etc. as layers or in queue, then play them in the preview panel. Whatever you add doesn’t directly goes online, but first is played on the preview panel. Items on the preview panel can then be streamed simply by passing them off to the live panel.
You can save the broadcasted content on your computer.
PS: The free version has a little restriction. It shows a watermark if you are streaming at a resolution of more than 720p at 1750kbps.
How To Broadcast Video Using GameShow
- After you start this free broadcasting software, you can either signup for GameShow or simply skip the step.
- You can start streaming with a blank canvas, game canvas, or game + cam canvas. It has various templates to choose from too, if you want to have a fancy background instead of a blank one.
- Select your Stream service out of YouTube, Twitch, or HitBox. Enter your Game title, set your encoder and its related settings, and server.
- Next one is the most important step. You need to enter your login credentials of the account corresponding to the streaming service that you chose to broadcast on.
- You can now start with adding media from sources. This is somewhat similar to adding scenes with different sources. You can add a video file or various other media sources such as: Capture devices, Screen capture, Chat, Solid color, Text, Media file, Twitter feed, etc.
- You can select a layer from a scene and change its Position, Scaling, Opacity, Crop it, Rotate it, etc. You can also apply Chroma Key Properties, if you have a webcam or any other video input source.
- When all set, click on the streaming icon at the upper left corner of the software’s interface to start broadcasting your video. You can also record while broadcasting your content live.
XSplit
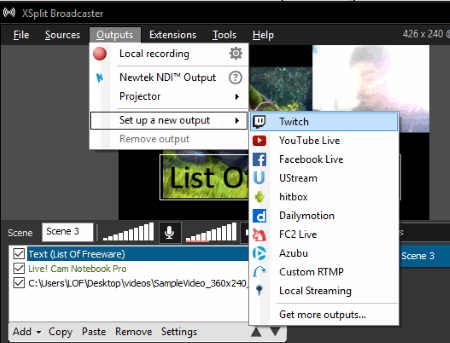
XSplit is another good live streaming and recording software for video broadcasting. It is very easy to use and supports different video sharing portals, including Twitch, YouTube, Facebook Live, Ustream, Dailymotion, etc.
Interface is somewhat similar to Open Broadcast Software in terms of its functions. For broadcasting, it gives you the freedom to add as many scenes you want. You can add Desktop screen capture video, Game capture videos, saved audio or video files, add Text, Webcam video, Mic audio input, Computer audio output, etc.
Like GameShow, it directly allows you to login to the desired account for authorization. It also lets you share your video broadcast on Facebook or Twitter.
It has a plugin store to enhance its support for Video Sources, Video and Audio formats, and Output file attributes. You can save your recording in mp4 or flv formats.
PS: You need to login on XSplit to download the application. Signing up involves no cost.
How To Broadcast Video Using Xsplit
- First of all, you need to sign in. You can sign in using your Xsplit, Facebook, or Twitter account.
- Just like other broadcasting software, you need to add sources, i.e. your content such as: Screen capture, Camera capture, Media file, Webcam, Audio device, Text, etc. Screen capture lets you select any particular area of your choice and you can broadcast it. Also, you can add plugins to have more source options.
- Set output video resolution from upper right corner. You can leave it to default; however, if you have a slow connection for some reasons, you can set it to low resolution or other resolution options.
- Now go to general settings from the menu bar. Here you can change different settings related to: Video, Audio, Profile, Streaming Accounts, Hotkeys, etc.
- Next, you need to choose an output streaming service from Outputs option from the menu bar, which can be: YouTube, Twitch, Facebook live, Ustream, Hitbox, etc. It also has a plugin store where you can add additional plugins to support more streaming services.
- After selecting the output, you need to authorize with that streaming service. You can web authenticate your ID directly on this broadcasting software. Select the account after adding and begin broadcasting a video as soon as you add an account.
Adobe Flash Media Live Encoder
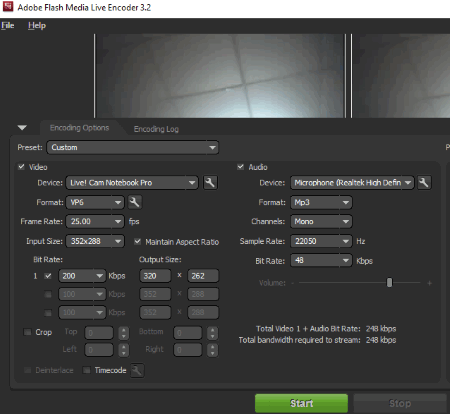
Adobe Flash Media Live Encoder is another very simple to use video broadcasting software only for webcams. It has a simple interface with no complexity involved for video broadcasting.
It supports live encoding for almost any streaming service available, such as YouTube, Twitch, DailyMotion, etc.
To get started with it, you first need to select a video recording device connected to your computer. You cannot add other media files, text, screen capture, photos, etc. to a video; only webcam capture is encoded while broadcasting to streaming websites.
It allows you to select Video format, change Frame rate, Input size, Bitrate, and you can also Crop the output video.
In order to broadcast video, you will need to enter Server URL and Stream key of your broadcasting account. You can also enter a backup URL, in case you loose connection with the primary one. It allows you to record and save your streaming content locally.
One of the problems with this video broadcasting software is that it stops responding for a moment when you start broadcasting; however, it starts working eventually.
LiveStream Producer
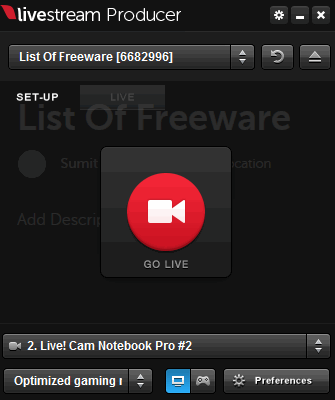
LiveStream Producer is an exclusive live video broadcasting software for the very popular livestream.com. It doesn’t support live encoding for other than livestream.com. This is a free version and is restricted to Webcam and Desktop capture input while broadcasting video on LiveStream.
It is very easy to use and requires you to sign up with LiveStream beforehand. Once login completes, you are just a click away to go live on LiveStream. Simply select the device (or source) and choose the output quality you wish to put on for live video broadcasting.
It allows you to set output resolution, aspect ratio, frame rate, bit rate, keyframe intervals, and general settings related to screen capture.
To view a video on LiveStream, the viewer will have to login and search for the video/subscriber on livestream.com.


About Us

We are the team behind some of the most popular tech blogs, like: I LoveFree Software and Windows 8 Freeware.
More About UsArchives
- May 2024
- April 2024
- March 2024
- February 2024
- January 2024
- December 2023
- November 2023
- October 2023
- September 2023
- August 2023
- July 2023
- June 2023
- May 2023
- April 2023
- March 2023
- February 2023
- January 2023
- December 2022
- November 2022
- October 2022
- September 2022
- August 2022
- July 2022
- June 2022
- May 2022
- April 2022
- March 2022
- February 2022
- January 2022
- December 2021
- November 2021
- October 2021
- September 2021
- August 2021
- July 2021
- June 2021
- May 2021
- April 2021
- March 2021
- February 2021
- January 2021
- December 2020
- November 2020
- October 2020
- September 2020
- August 2020
- July 2020
- June 2020
- May 2020
- April 2020
- March 2020
- February 2020
- January 2020
- December 2019
- November 2019
- October 2019
- September 2019
- August 2019
- July 2019
- June 2019
- May 2019
- April 2019
- March 2019
- February 2019
- January 2019
- December 2018
- November 2018
- October 2018
- September 2018
- August 2018
- July 2018
- June 2018
- May 2018
- April 2018
- March 2018
- February 2018
- January 2018
- December 2017
- November 2017
- October 2017
- September 2017
- August 2017
- July 2017
- June 2017
- May 2017
- April 2017
- March 2017
- February 2017
- January 2017
- December 2016
- November 2016
- October 2016
- September 2016
- August 2016
- July 2016
- June 2016
- May 2016
- April 2016
- March 2016
- February 2016
- January 2016
- December 2015
- November 2015
- October 2015
- September 2015
- August 2015
- July 2015
- June 2015
- May 2015
- April 2015
- March 2015
- February 2015
- January 2015
- December 2014
- November 2014
- October 2014
- September 2014
- August 2014
- July 2014
- June 2014
- May 2014
- April 2014
- March 2014
