8 Best Free Tilt Shift Software To Apply Tilt Shift Effect
Here is the list of Best Free Software To Add Tilt Shift Effect on photos to create Miniature Effect. These software let you set parameters to focus a desired area on photos and blur out the rest of the photo; this creates an effect which fakes miniature effect. Using these free software, you can apply Radial, Horizontal, as well as Vertical Tilt Shift. Horizontal tilt shift effect is the most used effect by photographers to apply miniature effect to landscape photographs, and can be applied using any of the mentioned tilt shift software. Radial tilt shift and Vertical tilt shift effects are not very common, and only a few software in this list can apply these effects.
There are various tilt shift parameters that these software let you change to apply tilt shift effect. After selecting the type of tilt shift, from radial, horizontal, or vertical, you can set Blur intensity, area to be focused, focus area width, angle of horizontal blur area, color options, contrast options, etc. Focus markers are displayed for you to set the width of focus area for tilt shift effect.
In the following list of software to add Tilt Shift effect, you will find dedicated tilt shift software, image editors with tilt shift tool, and tilt shift plugins. Go through the list to know more about these software, and also know how to apply tilt shift effect using these software.
My Favorite Tilt Shift Software:
I would prefer fotor to carry out tilt shift effect, if I already have fotor installed on my PC. The tilt shift tool is easy to use, but the overall package is too heavy, and I would not download it just to apply tilt shift effect. TiltShiftEasy is a dedicated and easy to use miniature effect software, and I would recommend it, if you just want to apply tilt shift effect.
You can also checkout the list of best free Focus Stacking Software, Panorama Software, and Image Editors.
fotor
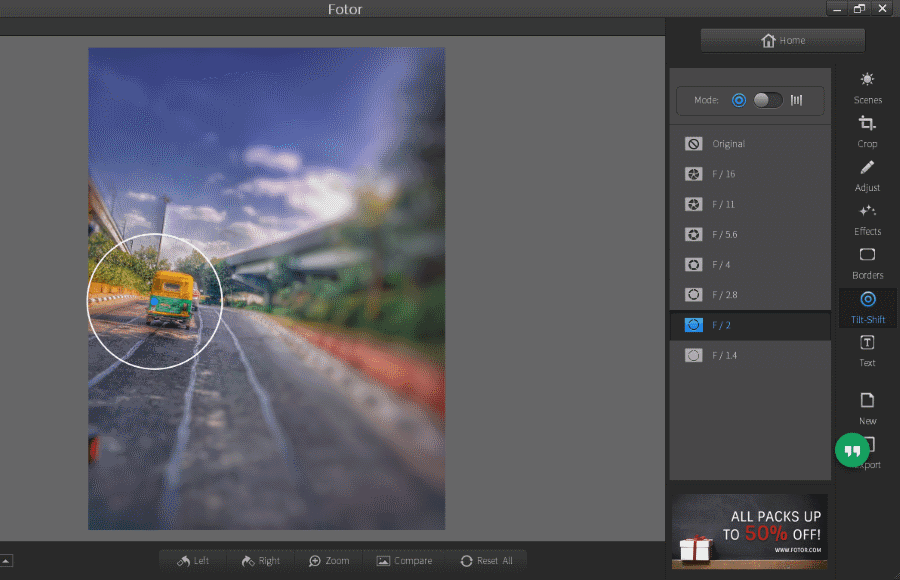
fotor is a famous photo editing tool that provides numerous image retouch options, and can also be used as a free Tilt Shift Software. Other options let you add Scene effects, Filter effects, Adjust Tone/Details/White Balance/Vignette, Add Text, Add Borders, and do much more. All the options are arranged in an easily accessible and user friendly manner.
Talking about the Tilt Shift tool, it provides 2 modes: Circular tilt shift and Linear tilt shift. Circular tilt shift focuses a circular area and blurs the rest of the picture. Linear tilt shift focuses a rectangular area; the alignment angle of this area can be set freely. For both tilt shift modes, advanced tilt shift options are available.
A professional photographer and a newbie, both can understand and use this tool easily. You can begin with selecting Circular or Linear Tilt shift mode. Circular tilt shift is subject oriented, hence in this mode, you can place the focus point on the subject you want to highlight. The area of the circular focus can be changed depending upon the size of the subject; rest of the photo blurs out. Rectangular tilt shift is used for landscapes, thus in this mode, you can place the rectangular focus on an area you want to highlight. You can drag and change the area of landscape you want to focus on. This creates a miniature effect on your photo.
The blur options for both tilt shift effect modes are same. The blur intensity increases as you go down the list of blur options. The blur intensity is lowest for F/16, and increases till F/1.4.
You can rotate your photo from within this tool; you do not need to rotate a photo separately. Click and hold the Compare option, and it will display the original image for the time its being held.
Export your image after applying tilt shift effect or changes that are required. You can select the image quality, output folder, or even share photo directly to Social media platforms, such as: Facebook, Flickr, or Twitter.
This free image editing software also has a collage maker and batch processor. The batch processor does not have Batch Tilt Shift option, because tilt shift needs to be applied manually on each photo, depending upon the area to be focused.
Easy Photo Effects
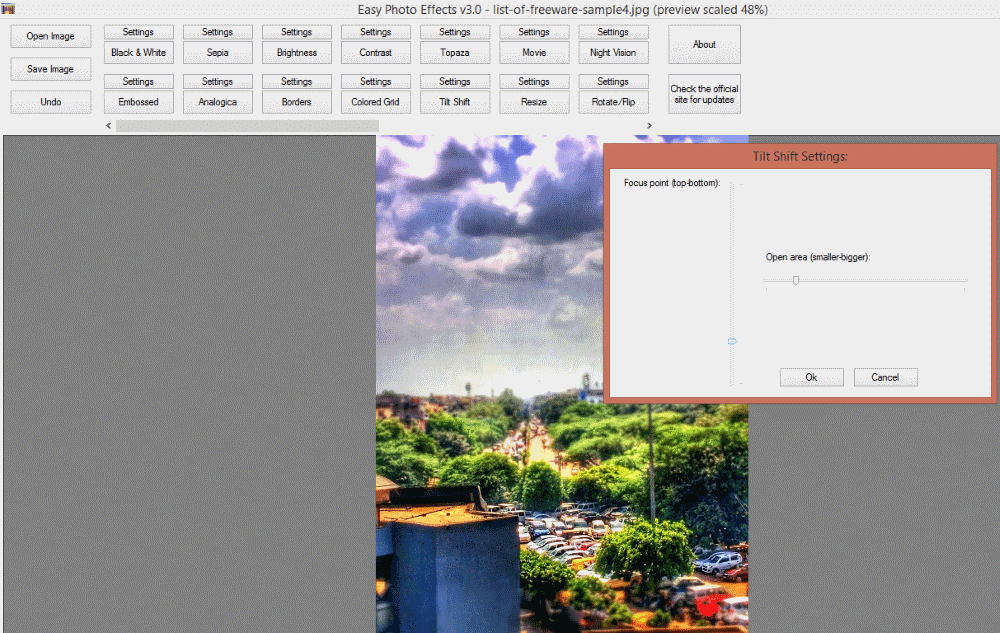
Easy Photo Effects is another multi purpose image editor software which lets you apply miniature effect on photos using its Tilt Shift tool. You can only apply linear tilt shift to give landscape photos a miniature effect. Focus point and focus area can be set manually to get desired result. While you apply tilt shift effect on a photo, contrast of the picture is automatically enhanced a bit.
How to add Tilt Shift Effect on photos using Easy Photo Effects:
- Open a photo. Click on Settings option above Tilt Shift button.
- A new window opens where you have to set Focus point and the area to focus.
- The Focus Point slider lets you set the position of focus marker on the photo. This slider is placed vertically, so the position of focus point changes as you move the slider from top to bottom.
- The Open Area slider lets you set the width of focused area.
- Hit Ok after the tilt shift parameters have been set, and exit the Tilt Shift Setting window.
- Now click on Tilt Shift option on the main interface to instantly apply tilt shift effect on desired photos. Save photo.
One thing that you may not like about this software is that real time preview option is not available. You have to set slider positions for Focus Point and Open Area based on Trial and Error basis.
Other effects that you can apply to your photos here are: Black & White, Emboss, Sepia, Borders, Night Vision, Rotate, Flip, etc. Remember that for each option, there are dedicated setting options, and they have to be set beforehand.
Unlike most of the image editors, the tools on the interface are arranged in a slightly different but easily accessible manner. With a single click, effects can be applied to a photo, therefore you will have to set effect parameters beforehand. For every effect, including tilt shift effect, a respective Settings option is available, right above the effect key.
TiltShiftEasy
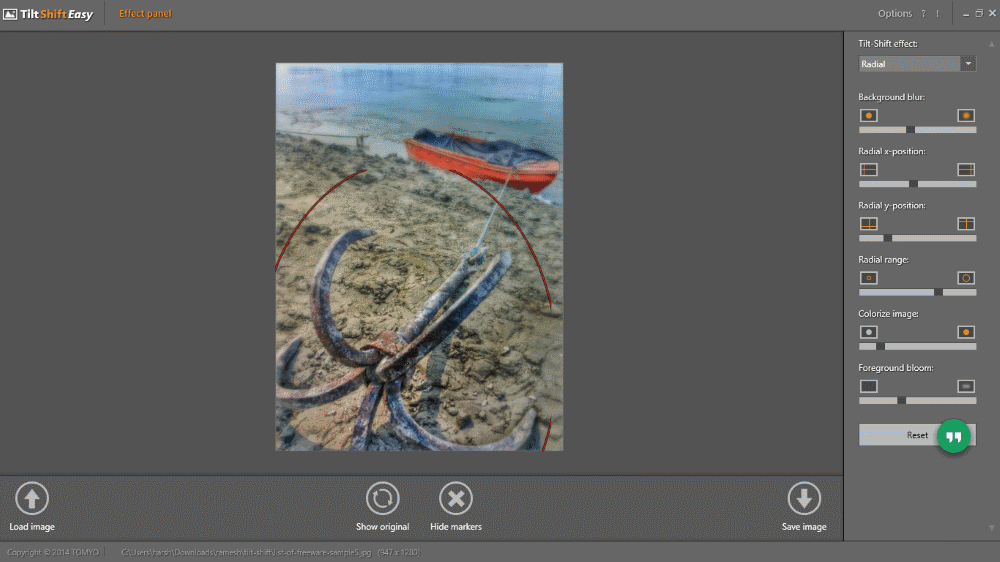
TiltShiftEasy is a dedicated free tilt shift software, with 3 different tilt shift modes: Horizontal, Vertical, and Radial. Here you can define a plenty of tilt shift parameters, such as: focus area position, range of focus area, amount of blur, image colorization, and foreground bloom. Setting up some of these parameters differ in horizontal, vertical, and radial mode, while most of the parameters are same for all three modes. Lets checkout all three modes of tilt shift, and how they work.
I have mentioned earlier in the review of fotor about circular and linear tilt shift. Radial tilt shift is the same as Circular tilt shift, where a particular subject is to be focused in a circular area; rest of the areas are blurred out. Linear tilt shift mode used in fotor is divided here into two modes, Horizontal and Vertical. Its easy to understand that Horizontal tilt shift focuses a horizontal area, while Vertical tilt shift focuses a vertical area.
Circular Tilt Shift:
In this mode, you have to set the position of circular focus area with the help of sliders. There are separate sliders to move the position of focus areas horizontally and vertically; these are Radial x-position and Radial y-position, respectively. The Radial range slider lets you increase or decrease the size of radial area to be focused. There are markers on the preview panel, which display the area being focused. The markers help you easily adjust focus position and area. You can hide these markers if you want.
The Background blur option lets you increase or decrease blur intensity. You can also enhance or reduce Image color intensity and Foreground bloom with their respective sliders.
Horizontal Tilt Shift/Vertical Tilt Shift:
Both of these modes are almost same and have similar tilt shift options that you have to adjust here. For Horizontal tilt shift, you have to set Horizontal focus area and Horizontal focus range, and for Vertical tilt shift, you have to set vertical focus area and focus range. The position of focus area and focus range can be set by Horizontal position slider and Horizontal range slider in Horizontal mode, and Vertical position slider and Vertical range slider in Vertical mode. Another feature lets you change the angle of blur area. If your photo is tilted, then you can adjust the angle of rectangular area accordingly with sliders; its available for both Horizontal and Vertical modes. Markers are available for these modes as well.
Other options to adjust Background blur, Colorize image, and Foreground bloom are the same as in Radial mode in this tilt shift software.
Once done with adding tilt shift effect to your image, you can save it in bmp, jpeg, png, or tiff formats.
TR's Tilt Shift Plugin For Paint.Net
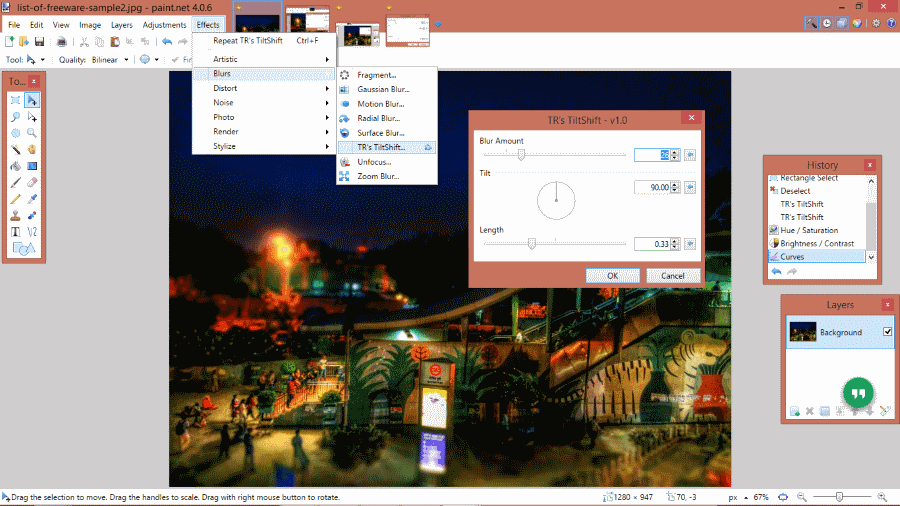
TR’s Tilt Shift Plugin For Paint.Net lets you easily apply tilt shift effect in Paint.Net. Paint.Net is an excellent photo manipulation and editing tool, with a bunch of tools, effects, and filters to apply. Tilt Shift tool is not available by default here; however, by installing this plugin, you can apply tilt shift or miniature effect in few simple steps.
Lets me first tell you how to install TR’s Tilt Shift Plugin in Paint.Net, then I will tell you how to apply tilt shift in Paint.Net using this plugin. Remember, you can only add liner tilt shift effect with this plugin.
How To Install TR’s Tilt Shift Plugin for Paint.Net:
Download and unzip the Plugin to get the TRsTiltSift.dll file. Copy the dll file. Open the file location of Paint.Net executable file. Its usually under C:/Program Files/paint.net.
Once you are in the Paint.Net folder, open the Effects folder, and paste the copied dll file there. Now open Paint.Net, or restart if already open. TR’s Tilt Shift Plugin will be installed.
How To Apply Tilt Shift in Paint.Net using TR’s Tilt Shift Plugin:
- Open the photo in Paint.Net on which you want to apply tilt shift effect.
- Go to Effects>Blurs>TR’s Tilt Shift. The TR’s Tilt Shift window will open.
- This process will be carried in 2 steps. For the image I used for testing, I applied Horizontal tilt shift effect. So the steps given below are relevant for Horizontal tilt shift. You can also apply vertical tilt shift with the same process, but a little bit changes. You will get to know about the details later.
- For the first step, blur the top portion. Change the Tilt angle to -90 degrees; this blurs the top portion of the image. If your image is not straight, you can adjust the tilt angle accordingly. Set the length of blurred area by using the Length slider. A real time preview displays the area being blurred.
- Once you are satisfied with the blur area, set the Blur Amount. Click Ok to apply the effect.
- Now for the second step, repeat the same process for bottom area, only this time you have to keep the tilt angle to +90 degrees. When done, click Ok, and save the image.
- If you want to add vertical tilt shift, you can follow the same steps as above. The only change you have to do is, set the Tilt angle for left side as zero degrees and for right side as 180 degrees.
If you like using paint.Net, then this is the best tool you can use to apply miniature Effect to your photos. More information and tutorial about this Tilt Shift plugin for Paint.Net is available on its Homepage.
nomacs Image Lounge
nomacs Image Lounge is an open source and multi-platform image viewer, that can also be used to apply tilt shift or miniature effect on photos. This is not very popular image viewer; however, the Tilt Shift tool that it provides is one of the best.
It is primarily an image viewer, not a Tilt Shift software; the Tilt Shift tool comes as a plugin. While installing this software, do remember to select the Plugin option, or you will have to download and install the Plugin separately. To add the plugin separately, simply visit the Plugin Manager tool in the software.
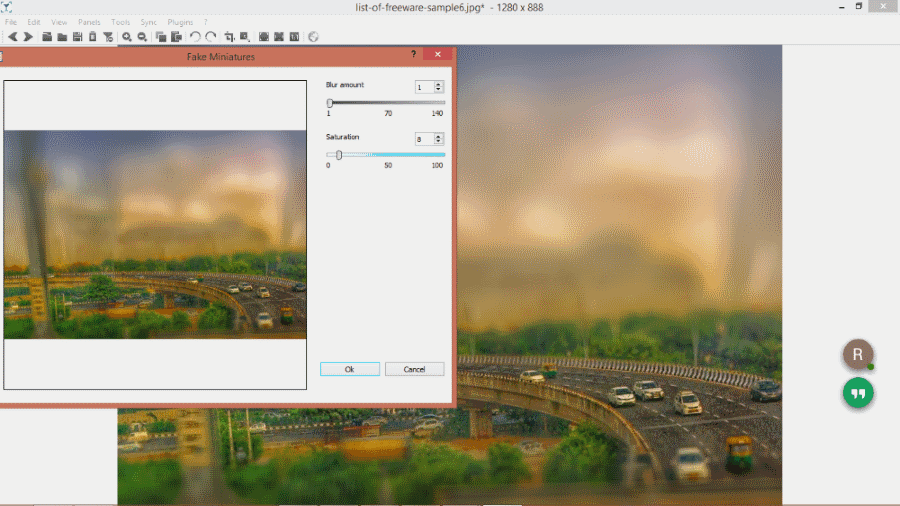
Getting back to Tilt Shift Tool, all you have to do is open an image, then go to Plugins > Fake Miniatures. This opens a new window with the image, where you can manually select the area to be blurred, simply by dragging the cursor across that area. Set the blur amount with its slider, and you can also change the saturation of the image. Real time preview is displayed right on that window, while you make changes. Click Ok to apply changes to image, then save the image.
PhotoScape
PhotoScape is free versatile image editor which can can create tilt shift effect pretty easily. The tilt shift tool available here lets you apply miniature effect to landscape photos only, as it has linear tilt shift option, but no circular tilt shift option.
You can place the focus marker on the area you want to focus. The amount of blur you want to add can be adjusted with the help of a slider. You can also adjust contrast of a picture with this tool.
You cannot set the width of the field to focus to create miniature effect. This may upset you, as the area width is predefined.
The Tilt Shift tool is good for beginners; however, if you are a professional, you may not prefer it
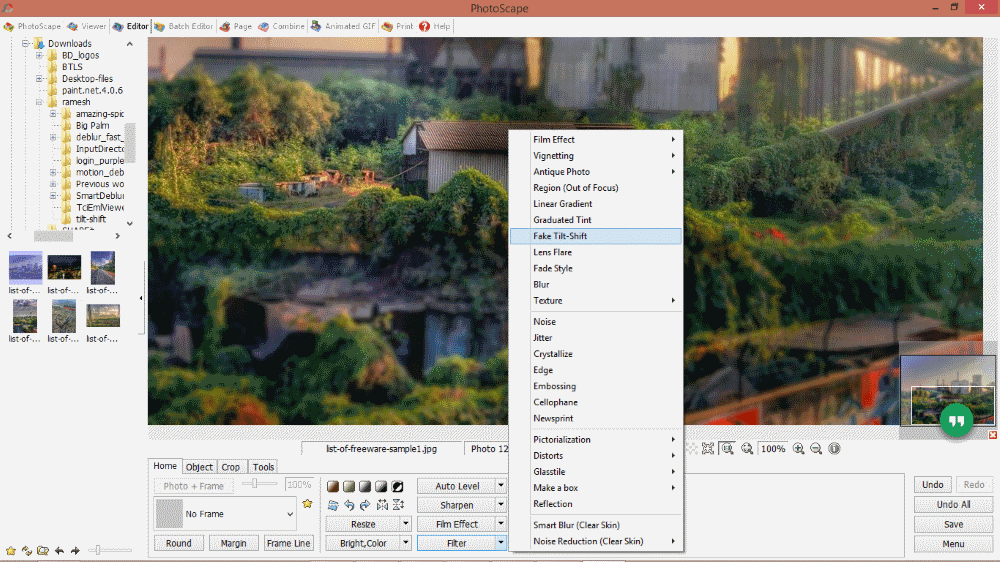
How to apply Tilt Shift using PhotoScape:
As you open PhotoScape, go to the Editor. Browse and open the image you want to apply tilt shift effect on. Look for Filter dropdown, then go to the Fake Tilt Shift option. A new window opens with the tilt-shift tool. Here the blur intensity and contrast sliders are available with a real time preview of image to edit. On the preview, you can drag and place the focus marker on the area to be focused. You can also select Image modes from Normal, Bright, or Deep Modes.
All the changes being made are reflected on the preview panel.
PhotoScape is one of the ultimate destinations for budding photographers and artists, as it has tonnes of image editing options. I personally like and recommend this tool, because before I moved to Photoshop and GIMP, I used to carry out photo editing here. Its pretty easy to use and you can apply various artistic effects on your images. Brightness, Contrast, Sharpness, Color Curve, White Balance, Auto Level, Film Effects, and various Filters are some of the options that this image editor provides. It also lets you draw and add objects, remove red eye, use clone stamp, and do much more.
Tilt Shift Plugin For GIMP: Toy
Toy is a tilt shift plugin for GIMP. It lets you apply miniature effect or tilt shift effect on images for free.
Toy plugin was originally created for Linux on GIMP Plugin Registry (Toy Plugin for Linux); however, someone did a great job and compiled the same Plugin for Windows as well. The link to download this tilt shift plugin for GIMP is available on a GIMP Chat thread. The link to the chat thread has been provided below.
Let me inform you that you can only carry out horizontal and vertical tilt shift here.
Lets see how to install and use Toy plugin for GIMP.
How To Install Toy Tilt Shift Plugin for GIMP:
Download the Toy Plugin, and copy it from the download folder. Now open the GIMP plugin folder; the path to the plugin folder usually is: C:\Program Files\GIMP\lib\gimp\2.0\plug-ins. Here 2.0 is the version of GIMP being used; it can be different, depending upon the version of GIMP you are using. Paste the Toy Plugin file in this folder. Start GIMP or restart if already open, to install Toy.
How To Apply Tilt Shift Effect in GIMP using Toy plugin:
- Open the image in GIMP to apply tilt shift.
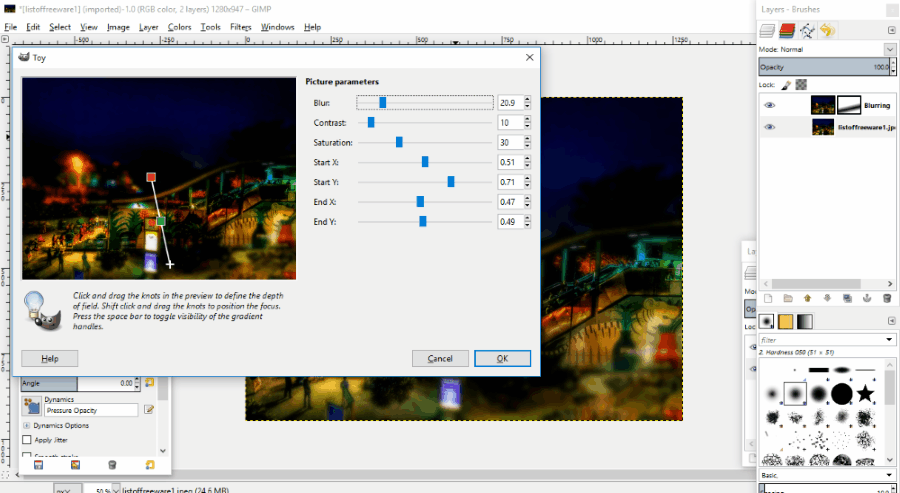
- Go to Filters>Blur>Toy. A new window will open with various adjustable options.
- On the preview panel, you will find 2 knots (pointers), which will help you set the Focus Point and the width of Focus range.
- Keep the green pointer where you want the center of focus to be. Now drag and place the Red pointer to set the width of focus range. For testing, I have applied horizontal blur, so after placing the Green pointer on the area I had to focus, I placed the Red pointer to the top of the Green one, then extended the Red pointer to set the width of focus range. This plugin automatically extends the focus range below the green pointer as the mirror of Red pointer. These parameters to set focus area can be set with the help of sliders, but that process might get a bit tricky.
- Now set the blur amount, contrast amount, and saturation amount with their respective sliders, and preview the image as you make changes. Click OK.
- The image with tilt shift effect added to it appears as a new layer. Save your image in desired format and location.
- For vertical tilt shift, the process is same, but after placing the Green pointer, you have to place the Red pointer in such a position that it focuses vertical area. Keeping the Red pointer to right side or left side of the Green pointer is the way to do it.
A small help note is available on the Toy plugin window, which can help you with with setting up parameters and focus area for miniature effect.
Tilt Shift Effect Using Layers
In case you are familiar with free photo editors with layer support, you can use them to apply Tilt Shift effect manually. The process is easy and straightforward; you do not have to be a pro to apply miniature effect manually. The final result from this process turns out to be as good as a tilt shift software. You can use free Layer supported image editors to carry out this process, such as Paint.Net or GIMP.
How To add Tilt Shift Effect using Layers in a Photo Editor:
I used Paint.Net to carry out the process for testing. You can opt for GIMP, or any other image editor with layer support. The process remains the same for every photo editor.
- Open the image on which you want to apply tilt shift effect.
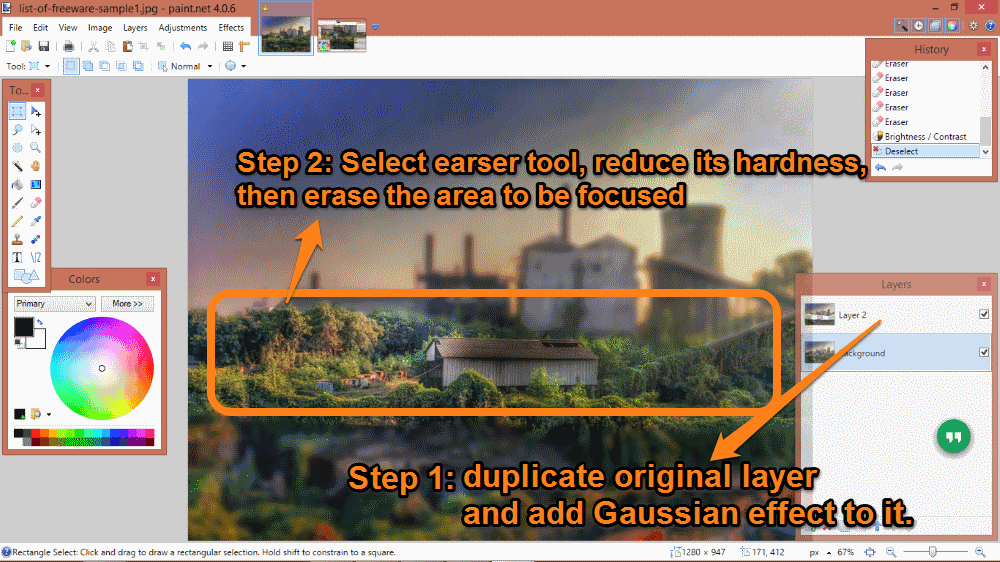
- Go to the Layers panel, then duplicate the original layer.
- Select the new layer. Go to Effects>Blur>Gaussian Blur. Here you need to set the amount of blur you want on your photo. The blur applies totally on the new duplicate layer.
- Now from the toolbar, select the Eraser tool. Set the Eraser brush width according to the area that is to be focused. You will also have to set the Hardness of the Eraser brush to a low value, say 11-15%; this makes sure that the area you erased off, blends with the blur area.
- Now erase off the area that you want to focus, and you are done.
- You can also bump up the brightness, saturation, and contrast of your image to give it a good miniature effect.
- Save your photo in a desired image format.


Harshwardhan Gupta
https://padangtoto-online.s3.wasabisys.com/index.html https://padangtoto.s3.us-west-004.backblazeb2.com/index.html
About Us

We are the team behind some of the most popular tech blogs, like: I LoveFree Software and Windows 8 Freeware.
More About UsArchives
- May 2024
- April 2024
- March 2024
- February 2024
- January 2024
- December 2023
- November 2023
- October 2023
- September 2023
- August 2023
- July 2023
- June 2023
- May 2023
- April 2023
- March 2023
- February 2023
- January 2023
- December 2022
- November 2022
- October 2022
- September 2022
- August 2022
- July 2022
- June 2022
- May 2022
- April 2022
- March 2022
- February 2022
- January 2022
- December 2021
- November 2021
- October 2021
- September 2021
- August 2021
- July 2021
- June 2021
- May 2021
- April 2021
- March 2021
- February 2021
- January 2021
- December 2020
- November 2020
- October 2020
- September 2020
- August 2020
- July 2020
- June 2020
- May 2020
- April 2020
- March 2020
- February 2020
- January 2020
- December 2019
- November 2019
- October 2019
- September 2019
- August 2019
- July 2019
- June 2019
- May 2019
- April 2019
- March 2019
- February 2019
- January 2019
- December 2018
- November 2018
- October 2018
- September 2018
- August 2018
- July 2018
- June 2018
- May 2018
- April 2018
- March 2018
- February 2018
- January 2018
- December 2017
- November 2017
- October 2017
- September 2017
- August 2017
- July 2017
- June 2017
- May 2017
- April 2017
- March 2017
- February 2017
- January 2017
- December 2016
- November 2016
- October 2016
- September 2016
- August 2016
- July 2016
- June 2016
- May 2016
- April 2016
- March 2016
- February 2016
- January 2016
- December 2015
- November 2015
- October 2015
- September 2015
- August 2015
- July 2015
- June 2015
- May 2015
- April 2015
- March 2015
- February 2015
- January 2015
- December 2014
- November 2014
- October 2014
- September 2014
- August 2014
- July 2014
- June 2014
- May 2014
- April 2014
- March 2014
