13 Best Free Software to Change Image Opacity For Windows
Here is a list of best free software to change image opacity for Windows. By changing image opacity, you can either make an image slightly transparent or completely transparent. In most cases, image opacity is varied to show objects present in background layers. These software come with a simple opacity slider tool through which you can adjust the image opacity. Most of these software are originally image editing software which offer many image editing and paint tools. Paint and image editing tools like brush, color picker, shapes, color palette, image filters, brightness adjuster, layers, etc., are provided by these software.
The process of adjusting the image opacity is quite simple in all software. Still, I have included the entire process to change image opacity in the description of each software. The good thing about these software is that you can further edit the image after changing image opacity. Many of these editors also let you work on multiple images at a time, because they offer multi-window or multi-tab interface. I also like their ability to support multiple image formats like PNG, JPG, BMP, TIFF, PCX, ICO, PPM, JPC, etc.
In these editors, you can also find many additional tools like Watermark, Animation, 3D Model, etc. You can easily operate these software without much hassle. Go through the list to know more about these software.
My Favorite Sofware to Change Image Opacity for Windows:
GIMP is my favorite software because it lets you quickly change image opacity. Plus, it offers almost all the necessary image editing tools through which you can further edit an image. Its another advantage is that it supports a lot of image formats. You can even create animated GIFs in it.
You can also check out lists of best free Image Map Generator, Batch Image Optimizer, and Image Silhouette Maker software for Windows.
GIMP
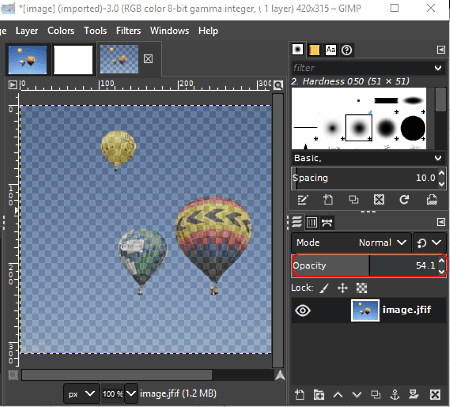
GIMP is a free open source software to change image opacity for Windows, Linux, and MacOS. It is a full-fledged image editor software that supports almost all image formats such as PNG, EXR, ORA, ICO, JPG, DDS, and more. In it, you can find almost all the tools which you need to edit and enhance input images. Most tools of this software are present in tool menus like Colors, Tools, Layers, Filters, Image, etc. It also provides a lot of tools on its interface such as Drawing Tools, Gradient Tools, Shape Tools, etc. The primary opacity feature of this software is also present on its interface under the Layers section.
How to change image opacity using GIMP:
- Open the interface of this software and go to File > Open option to load an image.
- After that, use the Opacity slider that you can view on the right side of the interface to change the image opacity.
- To make further changes to the image, you can add more layers and use available image editing tools.
- After making all required changes, save the final image in supported image formats using its Save or Save as feature.
Additional Features:
- Swap Colors: Using this tool, you can select a color from the image and replace it with a new custom color.
- Color Picker: Using it, you can find out the accurate RGB value of any color present on the image.
- Measure: It is an advanced tool that enables you to measure the distance and angle between any two objects present on an image.
- Plugins: This software also supports plugins through which you can add more features to this software.
Final Thoughts:
It is a feature packed image editing software through which you can easily change image opacity without much hassle.
Paint.NET
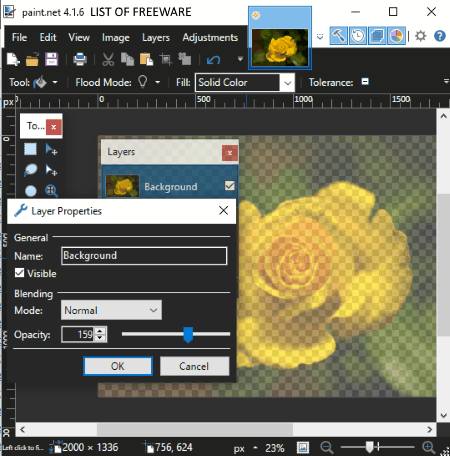
Paint.NET is a free image editing software through which you can also change image opacity. This software only works on Windows operating system. Using this software, you can easily change image opacity of images of different formats such as PNG, JPG, BMP, TIFF, etc. As it is primarily an image editing software, thus you get many image editing tools in it. Editing tools like Effects (Distort, Blur, Noise, etc.), Adjustments (hue, saturation, curves, etc.), Layers, Drawing, etc., are present in it. From various available tools, you only need its Layers tool to change image opacity.
How to change image opacity using Paint.NET:
- Launch this software and load an image using its Open option.
- After that, go to Layers menu and select the Layers Properties.
- In the Layers Properties, you get an Opacity slider using which you can easily vary the opacity of a loaded image.
- Now, you can use other image editing tools to make further adjustments to the loaded image.
- Lastly, use the Save or Save as option to save the final image in JPG, BMP, TGA, TIFF, and other supported formats.
Additional Features:
- Plugins Support: You can find a lot of plugins for this software which you can use to improve the feature set of this software.
- Image Orientation: This software provides some handy image orientation tools through which you can rotate images, flip images, resize images, and flatten images in case of multiple layers.
Final Thoughts:
It is a simple yet powerful image editing software that allows you to change image opacity without putting much effort.
RealWorld Paint
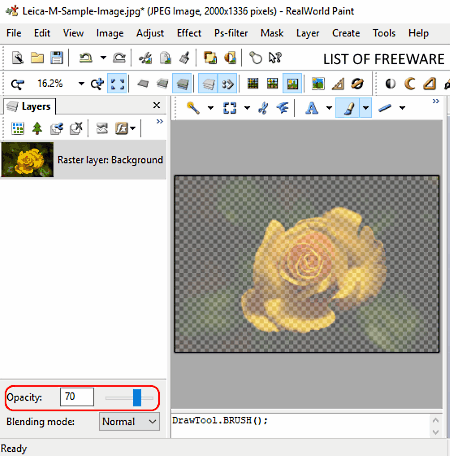
RealWorld Paint is yet another free software to change image opacity for Windows. As its name suggests, it is mainly a paint software through which you can draw designs and shapes. In it, you can also add images and draw over them. A good amount of images formats are also supported by it such as BMP, GIF, JPEG, PNG, WebP, etc. As it is a paint software, thus various drawing tools like color palette, brush, pencil, shapes, etc., are also present in it. Besides this, it also provides some more image editing tools and features such as Layers, Image Effects, Mask, etc.
How to change image opacity using RealWorld Paint:
- Launch this software and click on the Open button to load an image of a supported format.
- After that, use the Opacity tool present under the Layer section on the left part of the interface. You can also access this Opacity tool from the Adjust > Transparency section.
- Now, to make further changes to the image, you can use other available paint and image editing tools.
- Lastly, use the Save and Save As options to save the image in the original format or in some other supported image format.
Additional Features:
- Create Animation: Using it, you can create a running animation from multiple image frames. You can save the animation in animated PNG, animated WebP, and GIF file formats.
- Watermark: Using it, you can add a watermark picture or text over any image.
- Retarget: It is a unique feature that allows you to change the aspect ratio of a selected part of an image.
Final Thoughts:
It is a feature-rich software through which you can easily change image opacity and draw over images.
Photobie
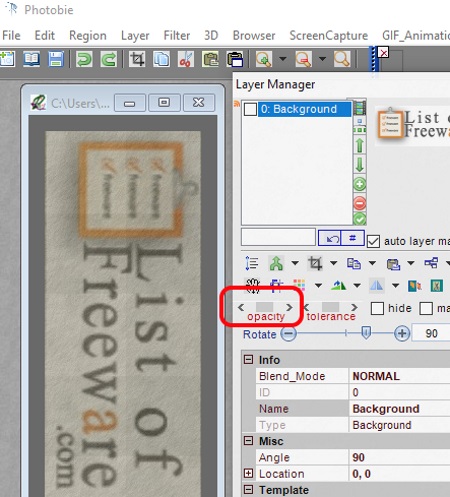
Photobie is another free software to change image opacity for Windows. Apart from image opacity, you can also use it to perform tasks like adjust image colors, apply image filters, merge layers, draw shapes over images, etc. All the primary tools of this software including the image opacity tool are present on its interface. The good thing about this software is that it comes with a multi-window interface that allows you to work on multiple images at a time.
How to change image opacity using Photobie:
- Open the interface of this software and go to its Layer Manager floating window.
- In the Layer Manager window, you get an opacity slider through which you can adjust image opacity.
- Now, to further edit an image, use editing tools present in Filter, Color Setup, Layer, Region, and other menus.
- Once the image gets completed, use the save as option to save the image in JPG, GIF, PNG, TIF, PDF, or any other supported format.
Additional Features:
- GIF Animation: This tool allows you to create a GIF animation using multiple images.
- 3D: It is an advanced tool through which you can create a 3D model using multiple layers of an image.
Final Thoughts:
It is another decent and easy to use software to change image opacity.
PicPick
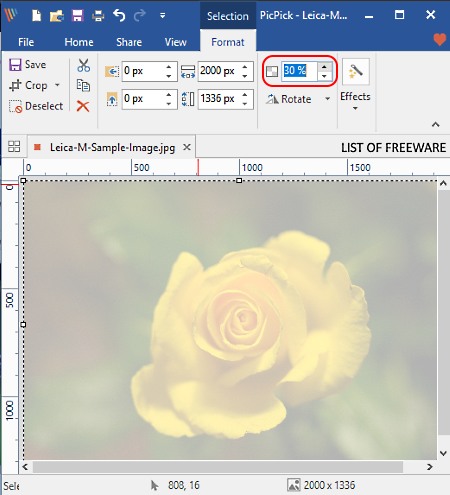
PicPick is a simple design tool through which you can edit images and change image opacity. This software is available only on the Windows platform. Using it, you can easily edit images, annotate images, and add effects on images. In it, you can also work on multiple images at a time due to its multi-tab interface. Along with these features, it also supports a good set of image formats such as BMP, TIFF, ICO, PNG, JPG, GIF, etc.
How to change image opacity using PicPick:
- Open the interface of this software and click on the Open button to load an image.
- After that, select the entire image using the ctrl+a hotkey and go to Format tab.
- In the Format tab, you can view a Select the opacity option through which you can adjust the image opacity.
- After changing the image opacity, you can save the image in the same format or in another supported input image formats.
Additional Features:
- Share: Using this feature, you can directly share images to Imgur, Twitter, Facebook, and other services.
- Screen Capture: Using it, you can take a screenshot of any part of your screen and quickly edit it within this software.
- Graphics Accessories: A good set of graphics accessories are provided by this software like color palette, color picker, whiteboard, crosshair, etc.
Limitation:
This software is only free non-commercial use.
Final Thoughts:
It is a beautifully designed software through which you can easily edit images and change image opacity with ease.
PixBuilder Studio
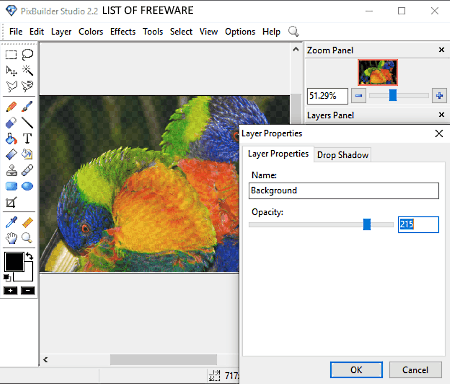
PixBuilder Studio is the next free image editing software that can also be used to change image opacity. It works only on the Windows platform. Through this software, you can change image opacity as well as edit images. Plus, it comes with a multi-window interface that allows you to work on multiple images at a time. I also like its ability to support multiple image formats such as JPEG, GIF, PNG, BMP, PCX, TGA, ICO, and more.
To change image opacity, it comes with an Opacity slider that lets you manually adjust intensity of opacity that you want to set in an image. Apart from adjusting the opacity, you can adjust color range, draw over image, change the color profile of an image, and adjust image size.
How to change image opacity using PixBuilder Studio:
- Initiate this software and go to the File menu and select the open option to load one or more images to its interface.
- After that, go to the Layer menu and select the Layer properties option.
- In the Layer properties window, you get an Opacity slider that you can slide around to vary the image opacity. Apart from image opacity, you can also adjust image shadow and shadow opacity from the Layer properties.
- According to your requirements, you can use other image editing tools of this software to make further enhancement to the image.
After making all the adjustments, you can save the image in one of the supported image formats.
Final Thoughts:
It is another good image editing software that offers multiple image opacity adjustment tools to change image opacity.
Hornil StylePix
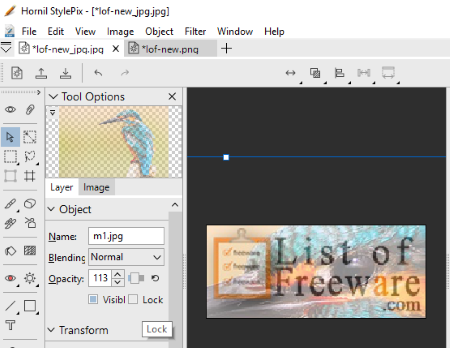
Hornil StylePix is a free and lightweight image editor software that can also be used to change image opacity. It is available for Windows platform. In this editor, you can find all essential image editing tools through which you can enhance input images like photo filters, paint tools, blending, brightness controller, color controller, etc. Besides this, you get a Tool Options panel on its interface that provides the opacity slider to adjust the amount of opacity you want. This editor also offers a multitab interface that allows you to work on multiple images at a time. I also like its ability to support images of different formats such as PPM, PGX, PCX, JPC, TGA, BMP, PMG, JPG, and more.
How to change image opacity using Hornil StylePix:
- Launch this software and load an image by going to File > Open option.
- After that, go to the Tool Options panel and click on the Layer tab to access the Opacity slider.
- Now. move the opacity slider accordingly to adjust image opacity.
- You can use other image editing tools to make further changes to the image.
- After changing the image opacity, you can save the image in the formats supported by this software
Final Thoughts:
It is simple and easy to use software to change image opacity that anyone can use without much hassle.
Photo Pos Pro
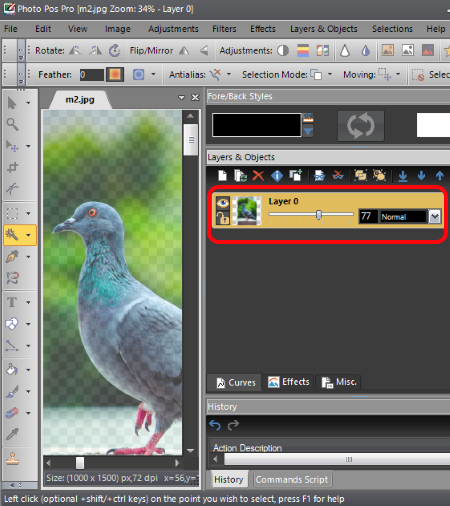
Photo Pos Pro is yet another image editor software that also lets you the change image opacity. It is available for Windows operating system. It is a full-fledged image editor software in which you get a lot of image editing and enhancement tools. Most of its tools include Effects, Filters, Adjustments, Image, and more. However, the primary image opacity changer tool is present on its main interface under the Layers & Objects section. Using this tool, you can also change image opacity of different layers with ease. It also supports most of the popular image formats like JPG, PNG, BMP, TIFF, ICO, EMF, etc.
How to change image opacity using Photo Pos Pro:
- Start this software and click on the open icon to load an image.
- After that, go to the Layers & Object side panel and move the Layer opacity slider to vary the opacity of the loaded image.
- You can also add more layers and add multiple images on each layer and change their opacity with ease. To edit and enhance images, use available image editing tools.
- At last, go to the File menu and choose Save or Save as option to save the image in the native format or in some other supported image format.
Final Thoughts:
It is a feature-rich image editor software that offers an easy to use image opacity changer feature.
DrawPad
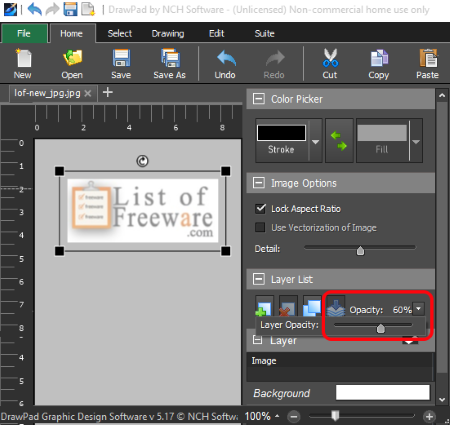
DrawPad is yet another free image editor with the feature to change image opacity. This software works on Windows and MacOS operating systems. It is a simple and straightforward image editing software that offers some really good image editing tools. Using it, you cannot only edit and enhance images but also manually draw over images as it offers drawing tools like brush, pencil, marker, spray paint, etc. Unlike other image editing software, this editor supports a limited set of image formats namely SVG, GIF, JPG, BMP, ICO, PNG, and TIFF.
How to change image opacity using DrawPad:
- Open the interface of this software and create a new project and give it a name.
- After that, click on the Open button to load an image. You can also load multiple images to it, as it comes with a multi-tab interface that allows you to edit multiple images at a time.
- Now, go to the Layer List panel which is present on the right side of its interface.
- In the Layer List panel, you get an Opacity slider that you can use to adjust the image opacity.
- To make additional modifications to the image, use editing and paint tools present in Select, Draw, and Home tabs.
After making all necessary changes to the image, you can save it in the same or another supported image format.
Limitation:
This software is only free for personal use.
Final Thoughts:
It is another capable image editor through which you can change image opacity and edit images with ease.
AltarSoft Photo Editor
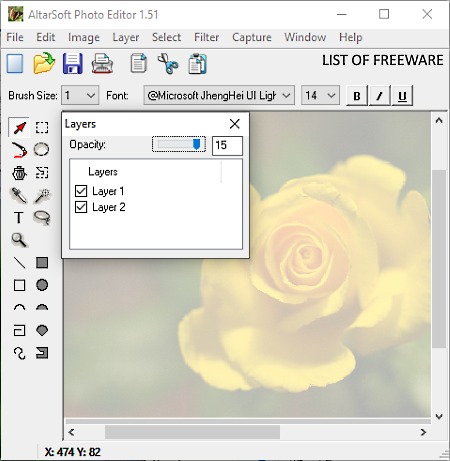
AltarSoft Photo Editor is the next free image editor that can change image opacity. It works on Windows OS. This software is primarily used to edit images and to take screenshots. In it, you can edit images of selected formats namely BMP, JPG, PNG, GIF, and ICO. To edit images, it primarily provides Paint Tools (draw, fill, color, shapes, etc.) and Image Filters (blur, sharpen, emboss, etc.). In order to change image opacity, it provides an opacity slider inside the Layers floating window.
How to change image opacity using AltarSoft Photo Editor:
- Launch this software and click on the folder icon to load an image.
- After that, go to the Floating Layers window and move the Opacity slider to vary the image opacity.
- Now, to edit images, use Filter and Paint tools.
- Once all the image gets completed, you can save it in its native image format or in any other supported image format.
Final Thoughts:
It is basic image editing and drawing software that lets you edit images and change image opacity.
LazPaint
LazPaint is a free open source paint software through which you can also change image opacity. This software works on Windows, Linux, and MacOS. As it is a paint software, thus it offers various paint tools such as color palette, brush, floodfill, shapes, and more. A good set of image editing tools are also offered by it such as Image Filters (motion blur, sharpen, smooth, etc.), Colors (colorize, shift colors, grayscale, etc.), Image Transformation (flip, rotate, resample, zoom, etc.), etc. The main image opacity changer tool is present in its layers floating window. Apart from having various features, it also supports many common and uncommon image formats such as LZP, ORA, BMP, GIF, ICO, etc.
How to change image opacity using LazPaint:
- Open the interface of this software and load an image by using its Open option.
- After loading the image, go to the layers floating window and move the opacity slider to adjust the image opacity.
- Now, you can use other available editing tools to make further changes.
- After making all the required changes, you can save the image in JPG, BMP, ORA, and other formats.
Additional Features:
- Render: Using it, you can render various effects like snow print, wood, marble, stone, etc., over any image.
- 3D Object: This tool allows you to import 3D objects and add them to your images.
Final Thoughts:
It is another impressive paint tool that anyone can use to change image opacity and for general image editing.
Fotografix
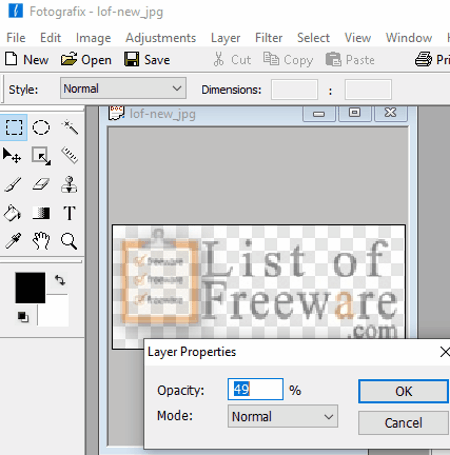
Fotografix is a basic image editing software with the added ability to change image opacity. It only works on the Windows platform. To change the image opacity, this software provides an Opacity slider in the Layers properties. And to edit the image, it offers multiple tool menus like Adjustments (to change brightness, color balance, gradient, etc.), Filter (to add filters like blur, sharpen, emboss, etc.), Image (to transform the image by cropping it, and resizing it), etc. Plus, it offers a multi-tab interface that enables you to work on multiple images. It also supports multiple image formats like RAW, ICO, PCX, GIF, PNG, BMP, etc.
How to change image opacity using Fotografix:
- Initiate this software and load an image using the open option.
- After that, go to the Layers menu and open the Layers Properties window.
- Now, move the opacity slider present in the Layer Properties to change image opacity.
- You can also use other available tools to make further changes on the image.
- Lastly, save the image in one of the supported image formats.
Final Thoughts:
It is a simple and easy to use image editor that you can use to quickly change image opacity.
FireAlpaca
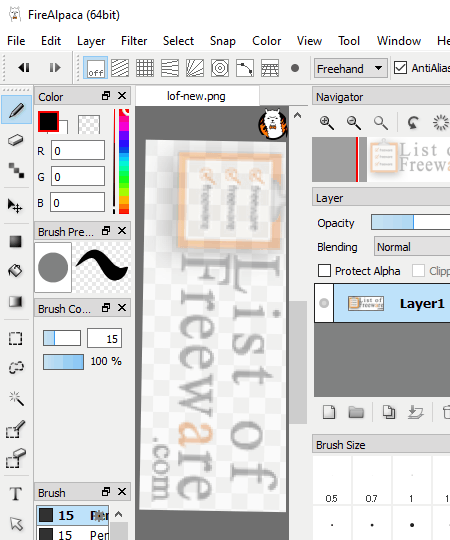
FireAlpaca is a free paint tool for Windows and MacOS. You can also use this software to change image opacity. On its interface, you can find a lot of paint tools to manually draw over images. Paint tools like color palette, brush, paint bucket, color picker, etc., are available on its interface. Along with paint tools, you can also find the Layer section on its main interface containing the opacity slider. You can access other image editing tools from toolbar menus like Filter, Color, View, Edit, etc. This software allows you to edit or change image opacity of six image formats namely MDP, PNG, JPG, BMP, GIF, and PSD.
How to change image opacity using FireAlpaca:
- Launch this software, go to File menu and click on the Open option to load an image of a supported format.
- After that, go to the Layers panel and manually move the Opacity slider to increase or decrease the image opacity.
- To make further changes, use available paint and editing tools.
- At last, use the Save As option to save the image in one of the supported image formats.
Additional Tool:
- 3D Perspective: This tool lets you add a 3D perspective over an image that enables you to add 3D objects to an image.
Final Thoughts:
It is a good image editing and paint software that offers an easy to use image opacity changer tool through which you can quickly change image opacity.


Naveen Kushwaha
Passionate about tech and science, always look for new tech solutions that can help me and others.
About Us

We are the team behind some of the most popular tech blogs, like: I LoveFree Software and Windows 8 Freeware.
More About UsArchives
- May 2024
- April 2024
- March 2024
- February 2024
- January 2024
- December 2023
- November 2023
- October 2023
- September 2023
- August 2023
- July 2023
- June 2023
- May 2023
- April 2023
- March 2023
- February 2023
- January 2023
- December 2022
- November 2022
- October 2022
- September 2022
- August 2022
- July 2022
- June 2022
- May 2022
- April 2022
- March 2022
- February 2022
- January 2022
- December 2021
- November 2021
- October 2021
- September 2021
- August 2021
- July 2021
- June 2021
- May 2021
- April 2021
- March 2021
- February 2021
- January 2021
- December 2020
- November 2020
- October 2020
- September 2020
- August 2020
- July 2020
- June 2020
- May 2020
- April 2020
- March 2020
- February 2020
- January 2020
- December 2019
- November 2019
- October 2019
- September 2019
- August 2019
- July 2019
- June 2019
- May 2019
- April 2019
- March 2019
- February 2019
- January 2019
- December 2018
- November 2018
- October 2018
- September 2018
- August 2018
- July 2018
- June 2018
- May 2018
- April 2018
- March 2018
- February 2018
- January 2018
- December 2017
- November 2017
- October 2017
- September 2017
- August 2017
- July 2017
- June 2017
- May 2017
- April 2017
- March 2017
- February 2017
- January 2017
- December 2016
- November 2016
- October 2016
- September 2016
- August 2016
- July 2016
- June 2016
- May 2016
- April 2016
- March 2016
- February 2016
- January 2016
- December 2015
- November 2015
- October 2015
- September 2015
- August 2015
- July 2015
- June 2015
- May 2015
- April 2015
- March 2015
- February 2015
- January 2015
- December 2014
- November 2014
- October 2014
- September 2014
- August 2014
- July 2014
- June 2014
- May 2014
- April 2014
- March 2014
