4 Best Free Lightweight Streaming Software For Windows
Here is a list of best free lightweight streaming software for Windows. These are very lightweight software that help you live stream content on the web. All these software come under 50MB installer package.
Through these software, you can live stream or broadcast your media content, screen feed, webcam feed, and other content over the internet. To broadcast content over the internet, these software use online streaming services like Twitch, YouTube, Facebook, Daily-motion, etc. In some software, you also get various templates to arrange video, webcam, and screen feeds in one window. You can also arrange the content manually that you want to live stream. In addition to that, you can also switch between media content feed to show/ hide a selected content during the live stream. Before starting the stream, you can also adjust the media and webcam parameters like video resolution, aspect ratio, frame rate, audio sample rate, etc. After adjusting all the parameters, you can start the live stream.
In some of these software, you can only perform the live stream over a local network. The process to conduct a live stream is not very difficult in any of the streaming software. Still, to help you out, I have included the necessary steps to conduct live stream in the description of each software. In addition to primary features, you also get many additional tools in them like chat, stream capture, media converter, etc. Go through the list to know more about these software.
My Favorite Lightweight Streaming Software For Windows:
GOM Studio is my favorite software because it supports all the popular streaming services like YouTube, Facebook, Dailymotion, etc. Plus, it is one of the simplest and intuitive software to start live stream over the internet.
You can also check out lists of best free Audio Streaming, Open Source Video Streaming, and Open Source Broadcasting software for Windows.
GOM Studio
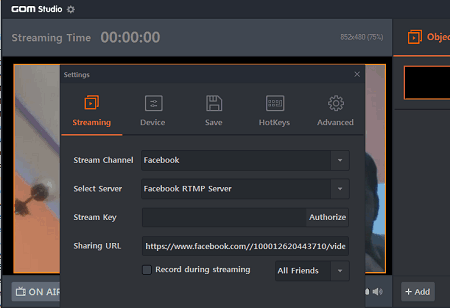
GOM Studio is a free lightweight streaming software for Windows. Through this software, you can live stream or broadcast your screen, webcam feed, audio feed, and media files over various popular video streaming platforms. Some of the popular video platforms that it supports are Facebook, Youtube, Twitch, and Dailymotion. A total of 12 streaming platforms are supported by it. A handy Softcam feature is also present in it that lets you insert text, images, video, etc., in your live stream. Now, follow the below steps to conduct live stream using GOM Studio.
How to live stream content using this lightweight streaming software: GOM Studio
- Start this software and go to its Streaming/ Recording section.
- After that, go to Settings > Streaming section and select a streaming provider from available ones (Youtube, Facebook, Dailymotion, etc.) and enter the streaming key of the selected service in the Stream Key field.
- Now, go to the Device section to configure the webcam, audio, etc., feeds, and press the OK button to save changes.
- Now, add all the content (webcam feed, media, audio, etc.) that you want to live stream using its Object section. You can view all the added content on the main interface of this software.
- Lastly, press the ON AIR button to start the live stream.
Additional Features:
- Recording: Use it to record your stream that you can locally save in MP4 and FLV video formats.
- Logo: Using it, you can add a text and image logo to your stream.
- Real-Time Video Editing: This software also lets you edit (video background, video resolution, brightness, opacity, saturation, etc,) of the video stream during the live stream.
Final Thoughts:
It is one of the best free lightweight streaming software because it lets you conduct live stream over many popular streaming platforms and supports visual modifications to output stream video during the live stream.
Twitch Studio
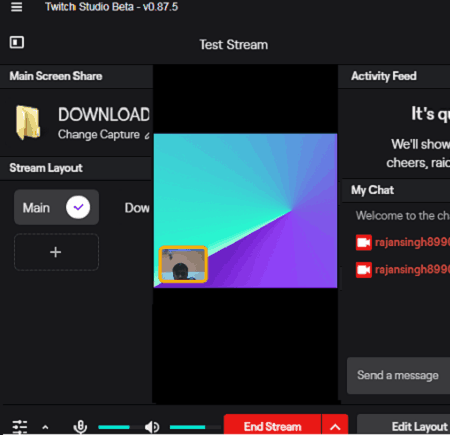
Twitch Studio is another free lightweight streaming software for Windows. Through this software, you can broadcast or live-stream your content over Twitch. In your live stream, you can include webcam video feed, microphone audio feed, and system screen feed. It also lets you broadcast gameplay over Twitch to reach a large audience. In it, you also get multiple layouts that let you quickly switch between webcam and system screen feeds. It also offers an internal chat feature through which you can chat with your viewers. Now, follow the below steps to perform live stream using Twitch Studio.
How to live stream on Twitch using Twitch Studio:
- Launch this software and login to it using the Twitch login credentials.
- After that, set up the microphone and webcam feed.
- Next, select a stream layout from three available ones Main (primary screen for gameplay), Be Right Back (multi-purpose away screen), and Downtime (multi-purpose stream for discussion).
- Lastly, press the Start Stream button to initiate the live streaming. During the live stream, you can use My Chat feature to communicate with your viewers.
Additional Features:
- Record Video: Using it, you can record your stream and save it locally in your system.
- Layout Editor: Through this feature, you manually specify the size of gameplay, video feed, and screen feed windows. Plus, it also offers multiple color filters that you can apply over your stream.
Final Thoughts:
It is an easy to use lightweight streaming software through which you can quickly broadcast your stream over the Twitch platform.
VLC Media Player
VLC media player is yet another free lightweight streaming software for Windows, Linux, macOS, Android, and iOS. According to its name, it is primarily a media player software that also possesses streaming and broadcasting features. Through this software, you can live stream or broadcast webcam feed, video, and audio content. However, it is not very ideal for streaming over the internet as it required you to manually forward the port selected in VLC by going to the Router settings. Still, it can be used to conduct the live stream over a local network. Follow the below steps to stream content using VLC media player.
How to live stream content using VLC media player:
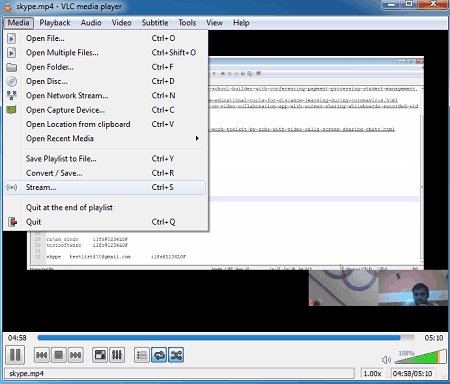
- Launch this software and go to the Media > Stream option to open up the Open Media window.
- Now, go to the File tab to select a video or audio file that you want to broadcast over a network. To add a webcam feed, go to the Capture Device tab and select the webcam feed from the video device name menu.
- After that, go to the Advanced options to adjust video aspect ratio, video frame rate, audio sample rate, audio bit rate, etc., parameters.
- Now, press the Stream button and then press the Next button to move to the Destination Setup window.
- Next, you need to select the HTTP from the New destination menu and click on the Add button to view the existing port number that you can change if necessary.
- Now, press the Next button to specify the streaming parameters like video codec, audio codec, video formats, etc.
- Lastly, press the Stream button to initiate the live stream.
Additional Features:
- Through this software, you can also capture and record the video and audio streams.
- A media converter feature is also present in it through which you can change the format of both video and audio files.
Final Thoughts:
It is a decent lightweight streaming software through which you can live stream content over a local network.
Sigma media player
Sigma media player is the next free lightweight streaming software for Windows. It is similar to the VLC media player through which you can broadcast or live stream content over the local network. However, unlike VLC media player, it cannot broadcast webcam feed. Besides webcam feed, you can still broadcast video and audio feed over the network through this software. Now, follow the below steps to live stream media content using this software.
How to live stream content using Sigma media player:
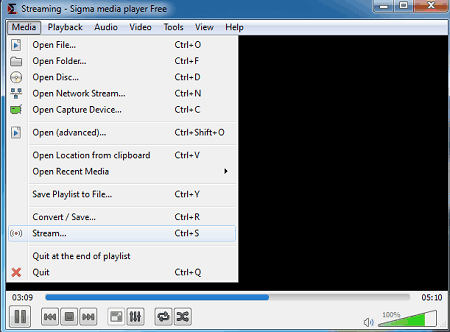
- Launch this software and go to Media > Stream >File tab and press the Add button to select media files that you want to live stream.
- After that, press the Stream button to open up the Stream output window and select HTTP from the New destination menu.
- Now, press the Next button and active transcoding if you want and adjust some media parameters like video codec, video resolution, audio bitrate, audio channel, etc. After that, press the Save button to save all the media parameter changes.
- After that, move to Options Setup window by pressing the Next button and initiate the live stream by clicking on the Stream button.
Additional Features:
- Open Network Stream: In it, you can enter the URL of the local stream or online stream to view and record the stream.
- Convert/ Save: Through this feature, you can change the formats of both audio and video files.
Final Thoughts:
It is another lightweight streaming software through which you can stream video and audio content over the local network.


Naveen Kushwaha
Passionate about tech and science, always look for new tech solutions that can help me and others.
About Us

We are the team behind some of the most popular tech blogs, like: I LoveFree Software and Windows 8 Freeware.
More About UsArchives
- May 2024
- April 2024
- March 2024
- February 2024
- January 2024
- December 2023
- November 2023
- October 2023
- September 2023
- August 2023
- July 2023
- June 2023
- May 2023
- April 2023
- March 2023
- February 2023
- January 2023
- December 2022
- November 2022
- October 2022
- September 2022
- August 2022
- July 2022
- June 2022
- May 2022
- April 2022
- March 2022
- February 2022
- January 2022
- December 2021
- November 2021
- October 2021
- September 2021
- August 2021
- July 2021
- June 2021
- May 2021
- April 2021
- March 2021
- February 2021
- January 2021
- December 2020
- November 2020
- October 2020
- September 2020
- August 2020
- July 2020
- June 2020
- May 2020
- April 2020
- March 2020
- February 2020
- January 2020
- December 2019
- November 2019
- October 2019
- September 2019
- August 2019
- July 2019
- June 2019
- May 2019
- April 2019
- March 2019
- February 2019
- January 2019
- December 2018
- November 2018
- October 2018
- September 2018
- August 2018
- July 2018
- June 2018
- May 2018
- April 2018
- March 2018
- February 2018
- January 2018
- December 2017
- November 2017
- October 2017
- September 2017
- August 2017
- July 2017
- June 2017
- May 2017
- April 2017
- March 2017
- February 2017
- January 2017
- December 2016
- November 2016
- October 2016
- September 2016
- August 2016
- July 2016
- June 2016
- May 2016
- April 2016
- March 2016
- February 2016
- January 2016
- December 2015
- November 2015
- October 2015
- September 2015
- August 2015
- July 2015
- June 2015
- May 2015
- April 2015
- March 2015
- February 2015
- January 2015
- December 2014
- November 2014
- October 2014
- September 2014
- August 2014
- July 2014
- June 2014
- May 2014
- April 2014
- March 2014
