20 Best Free Screen Recorder With Audio For Windows
Here is a list of best free screen recorder with audio software for Windows. Through these screen recorders, you cannot only record screen feed but also record external microphone feed with it. Some of these recorders also let you record internal system audio along with the screen feed. Apart from screen and audio recording, you can also find features to record webcam feed in some of these screen recorders. The process to record screen with audio is quite simple in all these screen recorders. Still, to help you out, I have included the necessary steps to record screen with audio in the description of each software.
In a few listed screen recorders, you also get tools to adjust various recording video parameters like video quality, video framerate, video encoder, etc. Similarly, tools to adjust audio parameters like audio intensity, audio sample rate, etc., are also present in many. After recording screen with audio, you can save the recordings in MP4, AVI, MOV, etc., formats. Although, the output recording format varies from software to software. Some screen recorders offer additional tools through which you can stream video, edit recordings, take snapshots, etc. Go through the list to know more about these screen recorder with audio for PC.
My Favorite Screen Recorder With Audio for PC:
OBS Studio is my favorite software because it lets you record both system and external audio with the screen feed at the same time. It also lets you adjust the intensity of audio and screen orientation during the recording process.
CamStudio is another good software that can record a screen with both system and external microphone audio.
You can also check out lists of best free GIF Screen Recorder, Portable Screen Recorder, and Screen Recorder And Editor software for Windows.
OBS Studio
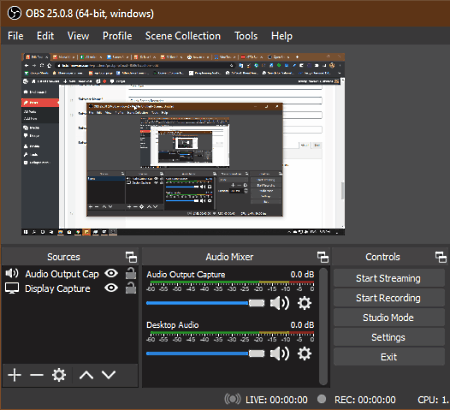
OBS Studio is a free open source screen recorder with audio for Windows, macOS, and Linux. Using it, you can record multiple microphones feed along with the system audio feed at a time. It also lets you maintain multiple Scenes (setups) consisting of different combinations of webcam and microphone devices between which you can quickly switch. Another good thing about this software is its ability to save the screen recording in various video formats namely MKV, MP4, MOV, FLV, and TS. It also offers tools to adjust video framerate, video resolution, video encoder, etc., before initiating the recording process. Now, follow the below steps to record screen with audio using this software.
How to record screen with audio in OBS Studio:
- Start this software and go to Sources and add Display Capture option to record the screen.
- After that, add Audio Output Capture option to record the system audio and add Audio Input capture option to record the microphone feed.
- If you are using both the system and microphone audio, then you can use its Audio Mixer to adjust the intensity of audio from both sources during the recording process.
- Now, move to Settings to adjust various audio and video parameters according to your requirements.
- Lastly, click on the Start Recording button to initiate the screen recording with audio process.
Additional Features:
- Streaming: Using it, you can stream your content to various online video platforms like Youtube, Twitch, Facebook, etc.
- Transform: Through this feature, you can rotate and flip the screen during the recording process.
Final Thoughts:
It is one of the best free screen recorder with audio software because it can record both the system and external microphone audio at the same time.
CamStudio
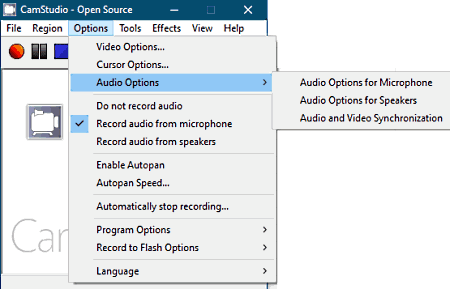
CamStudio is a free screen recorder with audio for Windows. Using this screen recorder, you can record any part of the screen along with internal (system audio) and microphone audio feeds. Before starting the recording process, you can also adjust the output video quality and frame rate by going to the Video options. You can also choose one of three available screen recording formats (AVI, SWF, and MP4 ) before initiating the recording process. Now, follow the below steps to record screen with audio using this screen recorder software.
How to record screen with audio using CamStudio:
- Start this software and go to the Options menu and either select Record audio from microphone (to record external audio) or Record audio from speakers (to record internal system audio) option.
- After that, move to Video options to specify the recording video quality and framerate.
- Now, use the Region tab to select a specific part of the screen or the entire screen for recording.
- Lastly, press the Record button to initiate the recording.
Additional Features:
- Annotation: Through this feature, you can add captions, watermarks, and timestamps to screen recording.
- SWF Producer: Using it, you can convert AVI screen recordings to SWF format.
Final Thoughts:
It is a really good free screen recorder with audio software as it can record both the internal and external audio along with the screen feed.
ShareX
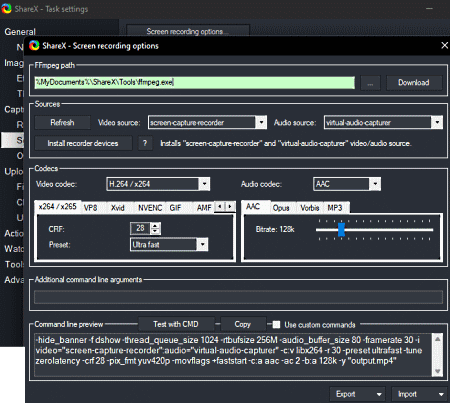
ShareX is a free open source screen recorder with audio for Windows. Using this software, users can record any part of the screen with system audio. By default, this software saves the screen recording in the MP4 video format. Although, it also gives options to record the screen in GIF image format. A handy Screen Recording Options panel is also provided by it that allows users to change the recording video codec, audio codec, video source, etc. It can also automatically upload the recorded screen feed to the cloud using its URL. I also like its screenshot capability which allows users to take screenshots of any part of the screen that can be saved in various image formats. Now, follow the below steps.
How to record screen with audio using ShareX:
- Launch this software and go to Screen Recording Options to specify the video codec, audio codec, save location, etc.
- After that, go to the Capture menu and select the Screen Recording option.
- Next, choose the part of the screen that you want to record to start the recording process.
- Lastly, click on the Stop button to locally save the recording.
Additional Features:
- OCR: This feature allows users to extract text information from images and documents.
- After Capture Tasks: It is a handy tool that helps users automate after-capture tasks like uploading video to the cloud, launching certain applications, activating OCR, and more.
Final Thoughts:
It is another good screen recorder with audio for Windows through which users can record any part of the screen with audio with ease.
SockPlayer
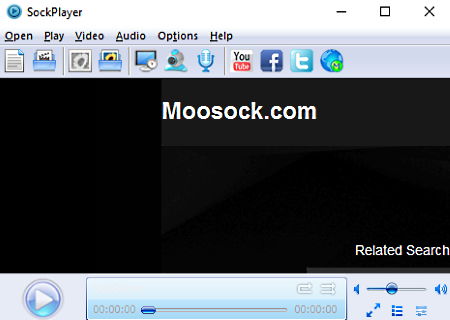
SockPlayer is a free media player software that can also be used as a screen recorder with audio for PC. In this software, you get a dedicated Screen Recorder feature that lets you record any part of the screen along with external microphone audio. Plus, it also offers tools to adjust recording frame rate, maximum recording duration, recording volume, audio sample frequency, audio delay, etc., parameters. After the completion of screen recording, this software automatically saves the recording in both AVI and MP4 video formats. Now, check out the below steps to record screen with audio through this software.
How to record screen with audio using SockPlayer:
- Launch this media player and click on the Record Screen Video option to launch the New Recording Task window.
- After that, go to Audio Settings and enable Record Audio option, if not enabled by default.
- Now, you can adjust both video and audio recording parameters according to your requirements.
- Next, move to the General tab to select either the Full Desktop or Desktop Region (to record a specific area of the screen) option.
- Lastly, press the OK button to start the screen recording process.
Additional Features:
- Record Sound: Using it, you can only record the microphone feed.
- Capture Camera Video: Through this feature, you can record webcam feed along with the microphone feed.
Final Thoughts:
It is a feature-rich screen recorder with audio software that lets you record webcam feed and play videos of various formats.
Flashback Express
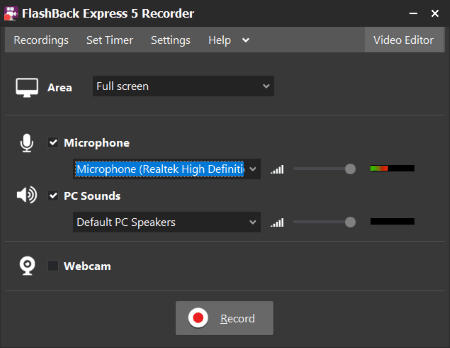
Flashback Express is yet another free screen recorder with internal audio for PC. Using this software, you can capture any part of the screen with both system and external microphone audio at a time. In addition to that, you can also record webcam feed with this software. It also lets you adjust various video and audio parameters such as recording volume, audio sample rate, video frame rate, video encoder, etc. After adjusting the parameters, you can initiate the recording process. Now, check out the below steps.
How to record screen with audio using Flashback Express:
- Start this screen recorder and enable microphone and PC sound options to record audio.
- After that, select the screen area using the Area menu.
- Next, move to Settings to adjust various recording video and audio parameters.
- Lastly, press the Record button to initiate the recording process.
After recording the screen with audio, you can save the recording in Flashback Movie Files Format (FBR).
Additional Feature:
- Set Timer: Using it, you can schedule your recording for any later date and time.
Final Thoughts:
It is a nicely designed screen recorder with audio through which you can also capture webcam feed with audio.
Free Cam

Free Cam is the next free screen recorder with audio for Windows. Through this screen recorder, you can record any part of the screen along with system and external microphone audio. Now, follow the below steps to record screen with audio through this software.
How to record screen with audio using Free Cam:
- Start this screen recorder and click on the New Recording button to specify the screen area that you want to record.
- After that, go to Settings to enable microphone audio or system sound options according to your requirements.
- In the end, press the Start button to start the recording process.
After recording the screen and audio, you can save it in WMV video format.
Additional Features:
- Editor: This software also offers an inbuilt video editor through which you can remove recording noise, trim a part of the recording, add fade in/ out effects to audio, etc.
- Highlight Mouse: Use it to enable mouse highlighter to easily view the mouse movements in the recorded video.
Final Thoughts:
It is another easy to use screen recorder with audio software through which anyone can easily record any part of the screen along with audio.
Quick Screen Recorder
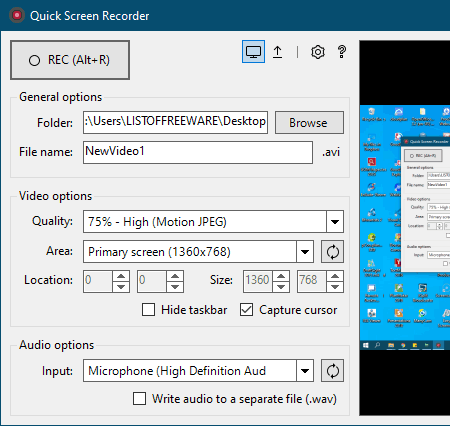
Quick Screen Recorder is a free open source screen recorder with audio for Windows. It is a beautifully designed screen recorder that lets you record any area of the screen. Plus, it can also record both the system audio and external microphone audio. Although, at a time, you can only record audio from one source. In it, you also get tools to adjust the recording video quality and resolution before starting the recording process. Now, follow the below steps.
How to record screen with audio using Quick Screen Recorder:
- Start this software and use the Area menu to specify the screen area for the recording.
- After that, select either Sound Card (to record system audio) or Microphone (to record external device audio) from the Audio Options.
- Now, adjust the recording video properties and then specify the destination location path in the Folder field.
- In the end, press the REC button to initiate the recording process.
This software saves the screen recording in AVI video format. If you want to separately save the video and audio part of the screen recording, then you need to enable the Write audio to separate file option. The separate audio recording will save in WAV audio format.
Final Thoughts:
It is a simple yet very capable software to record screen with audio.
Screen2AVI
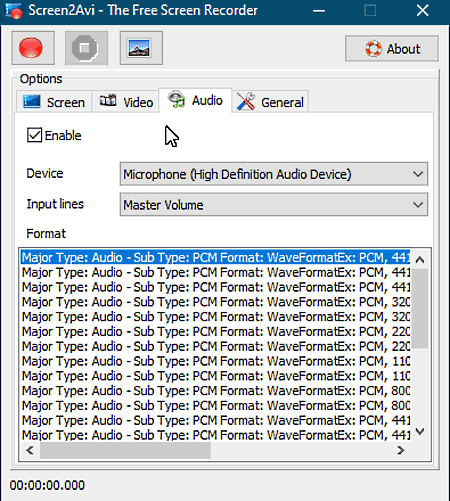
Screen2AVI is a free screen recorder with audio for Windows. Through this software, you can record a custom area of the screen along with external microphone audio. To simplify the screen recording process, it offers multiple hotkeys to perform actions like start, pause, and stop recording. Before starting the screen recording process, you can adjust the frame rate and compression settings of the recording. Now, follow the below steps to record screen with audio using this software.
How to record screen with audio using Screen2AVI:
- Launch this software and go to the Screen tab to specify the screen recording dimensions.
- After that, go to the Video tab to adjust frame rate and compression methods.
- Now, connect an external microphone and choose the connected audio device from the Audio tab and tick the Enable checkbox.
- Next, go to the general tab and specify the destination location path.
- In the end, click on the Record button to initiate the recording of screen with audio.
Additional Feature:
- Snapshot: Through this feature, you can capture the frames of recording and save them the form of an image.
Final Thoughts:
It is another good screen recorder with audio that allows you to record external audio with the screen recording.
Easy Screencast Recorder
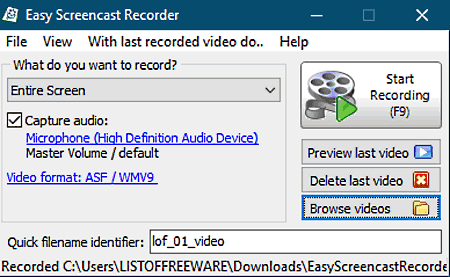
Easy Screencast Recorder is another free screen recorder with audio for Windows. Through this screen recorder, you can record external microphone audio during screen recording. Although, it doesn’t let you record system or internal audio. The good thing about this software is its ability to record a specific window, entire screen, or custom screen area. Plus, it also supports various video formats in which you can save the recording such as MKV, WEBM, MPEG, ASF, FLV, and more. Now, check out the below steps to easily record your screen video along with audio.
How to record screen with audio using Easy Screencast Reorder:
- Start this screen recorder and go to View > Options and Preference to specify the video format, video codec engine, compression quality, etc.
- After that, select screen area using Selected region, selected window object, and entire screen options.
- Next, connect a microphone with your system and tick the Capture Audio checkbox.
- In the end, press the Start Recording button to initiate the recording process.
Additional Feature:
- Preview Player: Using it, you can playback recorded video files.
Final Thoughts:
It is another decent screen recorder with audio through which you can easily capture external audio with the screen recording.
Screencast-O-Matic
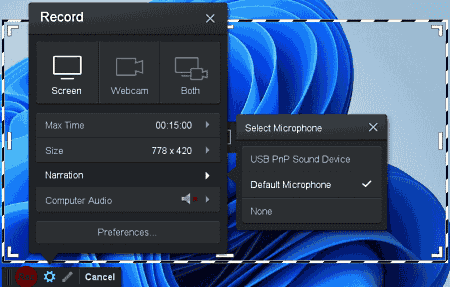
Screencast-O-Matic is another free screen recorder with internal audio for PC. It is another good screen recording software through which users can record screens with audio and webcam feed. It can also record both system and external microphone sound. A handy tool to highlight the cursor while recording is also present in it. Another good feature is its annotation tool that lets users write, draw, and add shapes over the screen while recording. After recording the screen with audio, users can save it in MP4, AVI, and FLV file format. Users can also upload recorded files to Youtube and Google Drive directly from its interface. Now, follow the below steps.
How to record screen with audio using Screencast-O-Matic:
- Launch this Software and choose the area that you want to record.
- After that, choose the Screen option and enable Computer Audio and Narration (to record microphone audio).
- Now, hit the Record button to start the recording process.
- Next, finish recording and preview it on its preview player.
- Now, users can annotate the screen using available tools and save the recording.
Limitation:
- Some features of this software are locked in its free version like Stock Library, Secure Backup, etc.
Final Thoughts:
It is another capable screen recorder with audio for Windows through which users can record screen, system audio, external audio, and webcam feed.
xvideocapture
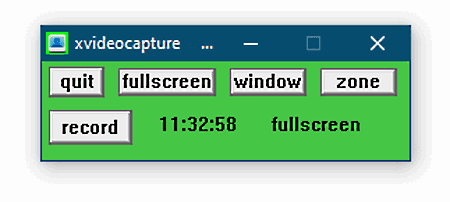
xvideocapture is a free open source screen recorder with audio software for Windows. It is one of the simplest screen recorder software through which you can select and record any area of the screen. Plus, it also lets you connect and record microphone feed. Although, it doesn’t record internal audio. After the completion of the screen recording, the recorded video will automatically be saved in the AVI video format.
How to record screen with audio using xvideocapture:
- First, connect an audio device like a microphone with your system.
- After that, start this software and select fullscreen (to select the entire screen), window (to select any specific window), or zone (to specify custom area) option to specify the screen recording area.
- In the end, press the record button to initiate the recording.
Final Thoughts:
It is simple to use screen recorder with audio software through which you can quickly record any area of the screen.
SCREEN RECORDER

SCREEN RECORDER is another free screen recorder with internal audio for PC. This software is capable of recording screen, webcam feed, and audio at the same time. A picture in picture mode to record multiple windows separately is also provided by it. It also lets users choose any part of the screen that they want to record. In addition to that, it also lets users manually adjust the frame rate and desktop bitrate according to their requirements. Now, follow the below steps to record the screen with audio using this software.
How to record screen with audio using SCREEN RECORDER:
- Visit this website and go to its Desktop Zone.
- After that, select the area that you want to record and the resolution of the recording.
- Next, specify the recording frame rate and bitrate.
- Lastly, hit the Start Record button to start the recording process.
Limitation:
- The free version of this software adds a watermark to the recorded video.
Final Thoughts:
It is another simple screen recorder with audio software that can easily record screen, webcam feed with audio.
Acala Screen Recorder
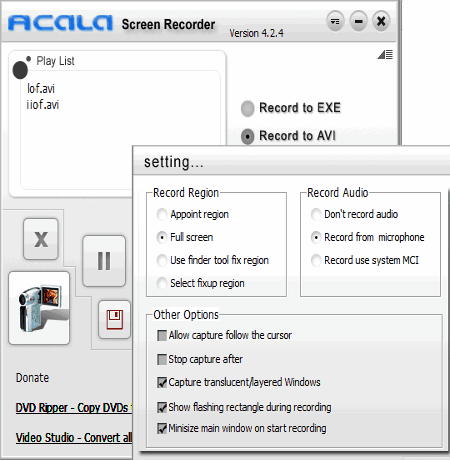
Acala Screen Recorder is another one of free screen recorder with audio for PC. Through this software, you can record internal system audio while recording the screen. Plus, it let you select any part of the screen that you want to record. It also offers various hotkeys to further simplify the recording process such as F2 to start/ pause recording, F3 to stop/ save video, F4 to cancel the recording. Now, check out the below steps to record screen with audio.
How to record screen with audio using Acala Screen Recorder:
- Start this software and select one of the two available recording formats namely EXE and AVI.
- After that, click on the Record button and specify the area over the screen using the cursor to start recording.
- Now, to stop the recording press the Stop button. As soon as you stop the recording, you will get a window asking you to specify the location where you want to save the recording.
Final Thoughts:
It is another simple to use screen recorder with audio software that anyone can use with ease.
Basic Screen Recorder
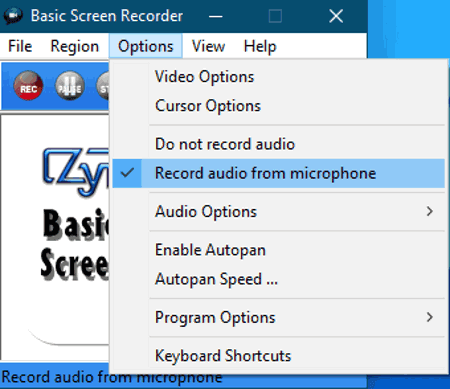
Basic Screen Recorder is another free screen recorder with audio for Windows. Using it, you can easily record both the screen and microphone audio at the same time. Plus, similar to other recorders, it also lets you select a custom area of the screen for the recording. Before starting the recording, you can manually adjust the recording video frame rate and compression codec. After recording the screen with audio, you can locally save it in AVI video format. Now, follow the below steps.
How to record screen with audio using Basic Screen Recorder:
- Start this screen recorder and go to the Region tab to select the custom area of the screen or the entire screen.
- After that, go to Options and enable Record audio with microphone option.
- Now, you can adjust video parameters (video compression codec, video framerate, etc.) by going to Video options.
- In the end, press the Rec button to start the screen recording with audio.
Final Thoughts:
It is another capable screen recorder with audio software that records screen and microphone feed in good quality.
Webinaria
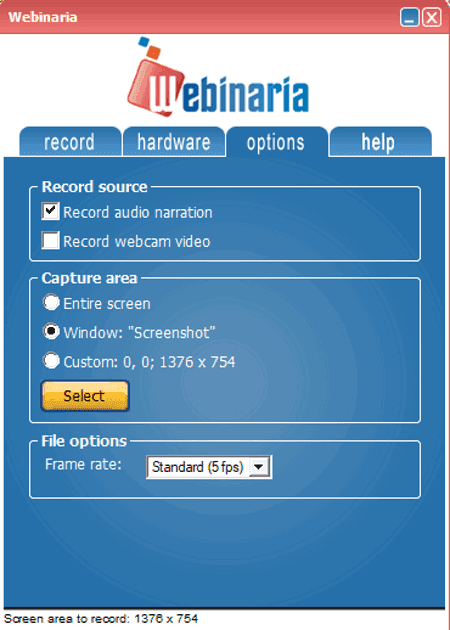
Webinaria is another free screen recorder with audio for Windows. Along with screen and audio, it can also be used to record webcam feed. Like most other similar screen recorders, it records external microphone feed. Plus, options to select the desired screen area for the recording is also present in it. Before starting the screen recording, you can also select one of three available recording frame rates namely 5, 10, and 15 FPS. Now, follow the below steps to record screen with audio.
How to record screen with audio using Webinaria:
- Launch the interface of this screen recorder and then move to the hardware tab.
- Now, select the microphone device from the Sound Device menu.
- Next, move to Options tab and enable Record audio narration option
- After that, specify the screen area that you want to record and then press the Record button to initiate the screen recording.
This software saves the final recording in AVI video format.
Final Thoughts:
It is another straightforward screen recording with audio software that anyone can use with ease.
Krut Computer Recorder
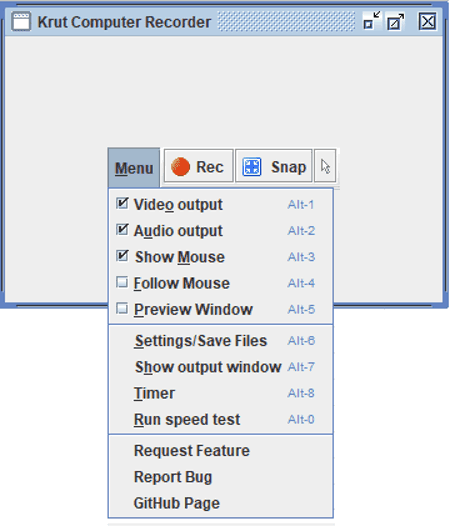
Krut Computer Recorder is a free open source screen recorder with audio for Windows. Through this screen recorder, you can record custom screen area along with external microphone audio. Another good property of this screen recorder is its ability to record area around the mouse cursor that enables users to record different parts of the screen by moving the cursor. Plus, options to adjust recording parameters like recording frame rate, record audio, and video encoding quality are also present in it. Now, follow the below steps to record screen with audio using this software.
How to record screen with audio using Krut Computer Recorder:
- Start this software and go to Menu to enable Audio and Video output options.
- Next, go to Settings to adjust video recording parameters according to your requirements.
- After that, go to its main interface and select the cursor icon to manually select the screen area that you want to record.
- Now, press the Rec button to initiate the screen recording.
This software saves the final recording in the MOV video format.
Final Thoughts:
It is a straightforward screen recorder with audio software through which you can easily record screen with external audio.
SRecorder
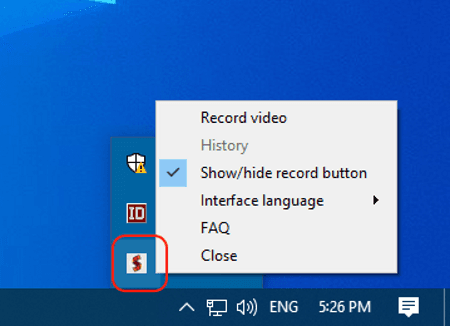
SRecorder is one more free screen recorder with audio for Windows. Using this software, you can easily record screen with or without audio. It is also quite easy to use as you can quickly pull up this software from the side of the screen. Like other similar screen recorders, it also lets you select and record any area of the screen. After recording the screen, you can save it in the MP4 video format. Now, check out the below steps to record screen with audio using this software.
How to record screen with audio using SReorder:
- Start this screen recorder and pull up its icon from the side of the screen.
- After that, select an area over the screen that you want to record.
- Now, tick the Record with Sound checkbox to enable audio recording.
- Lastly, press the Record button to start the screen recording with audio.
Limitation:
- This software does not offer options to adjust the recording parameters.
Final Thoughts:
It is one of the simplest screen recorders with audio software that anyone can use without much hassle.
Screenrec
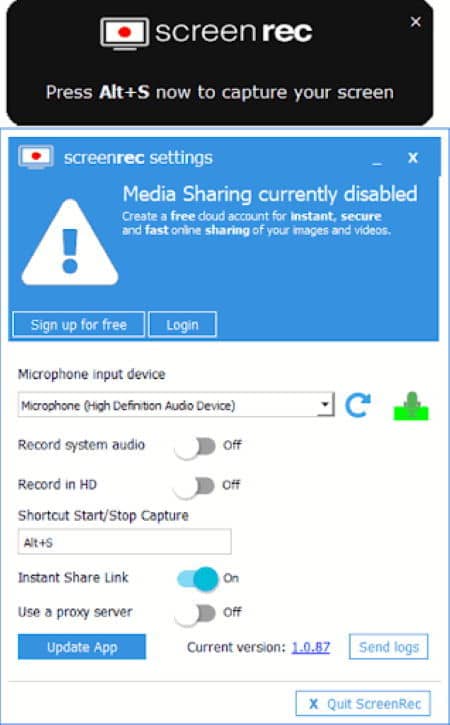
Screenrec is a free screen recorder with audio for Windows, Linux, and macOS. Through this software, you can record screen, record webcam feed, and take snapshots of the screen. Plus, it also lets you record both the system audio and external microphone audio at the same time. Although, you can also choose to record either system or external audio at a time. Unlike other similar screen recorders, it does not let you adjust any video or audio parameter which is the only drawback of this software. Now, follow the below steps.
How to record screen with audio using Screenrec:
- Start this software and go to Settings and enable Record system audio options. If you disable this option, then this software will automatically record Microphone feed if connected.
- After that, click on the Record Screen icon and then specify the area that you want to record using the cursor.
- As soon as you finish specifying the screen recording area, the screen recording with audio will automatically start.
After finishing the screen recording, you can save it in MP4 video format.
Additional Features:
- This software comes with its own video player in which you can preview recorded video.
- It also offers features to share the recording with other users using the Screenrec cloud. To share the recording, you need to create a Screenrec account.
Final Thoughts:
It is a handy screen recorder with audio software that allows you to record both system and microphone feed with the screen recording process.
Easy Screen Recorder
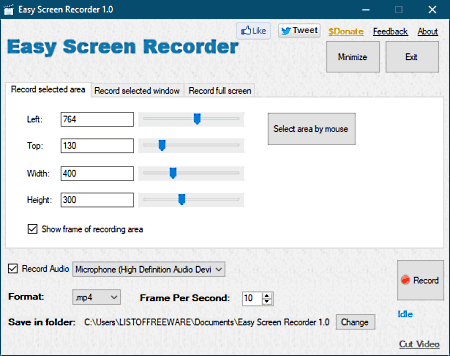
Easy Screen Recorder is the next free screen recorder with audio for Windows. It is a simple and beautifully designed screen recorder that lets you record any custom area of the screen. Along with screen feed, it can also record microphone audio. Although, it cannot record system audio. Before initiating the recording process, you can easily specify the recording frame rates along with output recording format from three available ones namely MP4, SWF, and GIF. Now follow the below steps to record screen with audio through this software.
How to record screen with audio using Easy Screen recorder:
- Start this screen recorder and specify the recording area using recording selected area, record selected window, etc., options.
- Now, enable the Record Audio option and select the microphone device name.
- Next, specify the output recording format and frame rate.
- Lastly, hit the Record button to start the recording process.
Final Thoughts:
It is another standard screen recorder with audio software that anyone can use to record screen and audio at the same time.
Free Screen Recorder

Free Screen Recorder is another free screen recorder with audio for Windows. It is simple to use screen recorder that can record microphone audio with the screen feed. It also offers a set of hotkeys to start, pause, and stop recording. It also lets you select any specific area of the screen that you want to record. Plus, tools to adjust the recording video quality and frame rate are also present in it. Now, follow the below steps.
How to record screen with audio using Free Screen Recorder:
- Start this software and go to General Options to select the area of the screen for the recording.
- After that, go to Options and enable Record Audio option.
- Now, move to Audio Options and select the microphone device and recording frequency.
- Lastly, hit the Record button to initiate the screen recording with audio.
This software saves the screen recording in AVI video format.
Additional Feature:
- Cursor Options: Using it, you can change the default cursor design and highlight cursor so that you can easily view cursor in the recording.
Final Thoughts:
It is one of the simplest screen recorder with audio that anyone can use without any problem.


Naveen Kushwaha
Passionate about tech and science, always look for new tech solutions that can help me and others.
About Us

We are the team behind some of the most popular tech blogs, like: I LoveFree Software and Windows 8 Freeware.
More About UsArchives
- May 2024
- April 2024
- March 2024
- February 2024
- January 2024
- December 2023
- November 2023
- October 2023
- September 2023
- August 2023
- July 2023
- June 2023
- May 2023
- April 2023
- March 2023
- February 2023
- January 2023
- December 2022
- November 2022
- October 2022
- September 2022
- August 2022
- July 2022
- June 2022
- May 2022
- April 2022
- March 2022
- February 2022
- January 2022
- December 2021
- November 2021
- October 2021
- September 2021
- August 2021
- July 2021
- June 2021
- May 2021
- April 2021
- March 2021
- February 2021
- January 2021
- December 2020
- November 2020
- October 2020
- September 2020
- August 2020
- July 2020
- June 2020
- May 2020
- April 2020
- March 2020
- February 2020
- January 2020
- December 2019
- November 2019
- October 2019
- September 2019
- August 2019
- July 2019
- June 2019
- May 2019
- April 2019
- March 2019
- February 2019
- January 2019
- December 2018
- November 2018
- October 2018
- September 2018
- August 2018
- July 2018
- June 2018
- May 2018
- April 2018
- March 2018
- February 2018
- January 2018
- December 2017
- November 2017
- October 2017
- September 2017
- August 2017
- July 2017
- June 2017
- May 2017
- April 2017
- March 2017
- February 2017
- January 2017
- December 2016
- November 2016
- October 2016
- September 2016
- August 2016
- July 2016
- June 2016
- May 2016
- April 2016
- March 2016
- February 2016
- January 2016
- December 2015
- November 2015
- October 2015
- September 2015
- August 2015
- July 2015
- June 2015
- May 2015
- April 2015
- March 2015
- February 2015
- January 2015
- December 2014
- November 2014
- October 2014
- September 2014
- August 2014
- July 2014
- June 2014
- May 2014
- April 2014
- March 2014
