8 Best Free Video Highlight Maker Software For Windows
Here is a list of best free video highlight maker software for Windows. Using these software, you can make videos by including some important highlights of a game or sport. In most of these video highlight makers, you can find two common elements namely Text and Slowmotion Effect to slow down an important shot or moment of the game.
Using these software, you will be able to add text and decrease the speed of the video to emphasize on a specific moment. Plus, a lot of video editing tools like Merge, Split, Video Cutter, Duplicate, Resolution Changer, etc., are also available. Besides this, you can also find various video enhancing features like Video Effects, Video Filters, Color Grading, etc. Some of these software can be slightly hard to operate due to various tools and features. However, I have provided all the necessary steps to create a standard highlight video through these software.
These software are also quite versatile and support multiple video formats. Some of these supported video formats are MP4, AVI, MPG, MOV, WMV, and more.
My Favorite Video Highlight Maker Software For Windows:
HITFILM EXPRESS is my favorite because it provides all essential features to make a great highlight video. I also like its clean and simple interface that makes the video making process relatively easy.
You can also check out lists of best free Video Analysis, Video Mixing, and Video Quality Converter software for Windows.
HITFILM EXPRESS
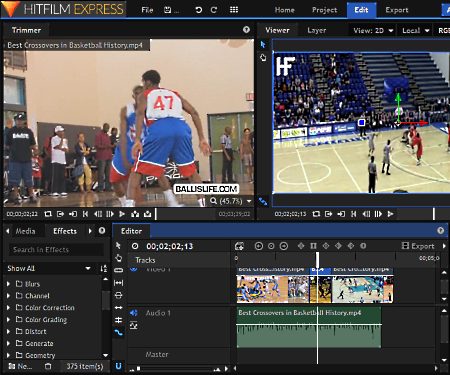
HITFILM EXPRESS is a free video highlight maker software for Windows. It is a great video editing software that can also be used to make video highlights. Using it, you can create a few minutes highlights using the video of an entire game. Plus, it also lets you add text and slow down a part of the video to make a highlight video.
Apart from creating a video highlight, you can also use it to create game videos, movies, vlogs, etc. Plus, various important editing features like Video Cutter, Splitter, Merger, Video Filters, Video Effects, Color Balance Changer, and more are also available in it.
How to make highlighted video using HITFILM EXPRESS:
- Launch HITFILM and click on the New Button.
- A project settings page will open up from where you can set video resolution, frame rate, audio sample rate, antialiasing, etc. After setting these parameters and press Start Editing button.
- Now, an Edit Tab will open up that contains three subsections named tools, editor, and viewer. Select the tools section and import one or more videos by pressing the Import button.
- Imported videos thumbnail will add to the tools section. Drag and drop all clips or videos over the timeline of the editor section.
- Now, use the Slice Tool and cut important clips from the various videos and delete all the trivial parts of the video.
- After that, select the Rate Stretch Tool and select important parts of the video that you want to slow down to emphasize.
- Lastly, hold and drag one side of the selected part over the timeline to slow down the video. Similarly, you can select and slow down other important parts of the video.
- Now to add text, first, create a new Composite Shot by going to New option.
- After that, you can view a Text icon on the editor interface; click on it and add a text that you want to show. The newly created composite shot will automatically add on the media section
- Now, go to the Editor section again and drag and drop the composite shot layer to the timeline to add text on the video.
After completing the video, preview it and then go to the Export tab and export the video in MPEG, AVI, MP4, etc. video formats.
Note: To use this software freely, you need to have a fxhome.com account.
Shotcut
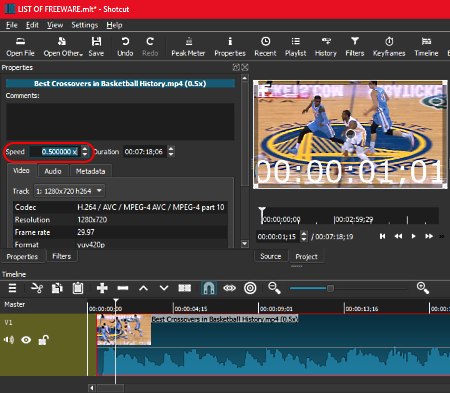
Shotcut is a free open source video highlight maker software for Windows. Using this software, you can easily add text and slow down important parts of the video with ease. In it, you can also find a lot of handy filters, video effects, editing tools, etc., to make various types of videos. On its interface, you also get a Preview player to view all the changes in the real-time. This software also supports various video formats such as MP4, MOV, AVI, MPEG, WebM, etc.
Now, let’s take a look at the process of adding text on the video. To do that, first, import one or more part of the video to this software. After that, go to the Filters section and add a text filter. Immediately, you can view some text on the video. Now, first, select a part of the video on which you want the text and then write the text on the text field to add text on video.
Similar to adding text, the process of slowing down the video is also pretty simple.
- First, import one or more videos to this software.
- After that, select and cut parts of the video that you want to slow down using the Split At Playhead tool.
- Now, go to the Properties section and decrease the playback speed by reducing the values of Speed Field.
- Lastly, arrange all the clips in the correct order and preview it in its inbuilt Preview player.
After completing the video, go to Export section and export video in MPEG, WMV, WebM, HECV, etc. formats.
Lightworks
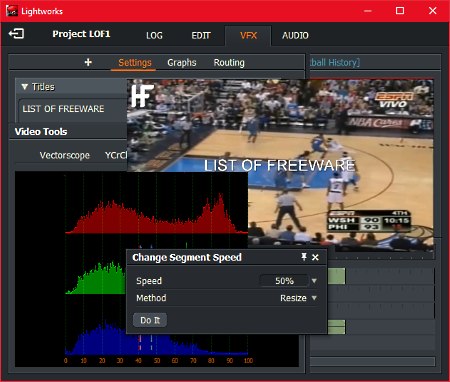
Lightworks is another free video highlight maker software for Windows. It is also quite popular among professionals for video editing. Many popular movies are edited through this software. Lightworks is suitable for small YouTube, Facebook videos as well as for big 4K movie project. Its ability to handle videos of different video formats (MP4, MKV, AVI, WMV, MOV, etc.) is another advantage of this software. Using this software, you can add text on the video and also slow down certain parts of the video to make a good video highlights.
How to make video highlights using Lightworks:
- Launch this software and create a new project. It then asks you to set the frame rate and the name of the project. Do that and press OK.
- After that, add video folder, select videos, and drop a video file to the timeline.
- Now, cut or slice a part of the video on which you want to add text or decrease its playback speed using the mark and slice tools.
- To add text, go to VFX Section and press the Add New Effects button and select the Titles Effect.
- Enter the text that you want on the selected part of the video.
- Now, to slow down a part of video, right-click over the timeline and select Speed Tool and decrease the value from 100% to 75%, 50%, or 25%.
- After creating the highlight video, you can view it in the Preview Player. To export video, right-click on the preview player and select Export option.
Overall, it is a very good video highlight maker software, but this free version has a major limitation that it only exports videos in MP4 format.
DaVinci Resolve
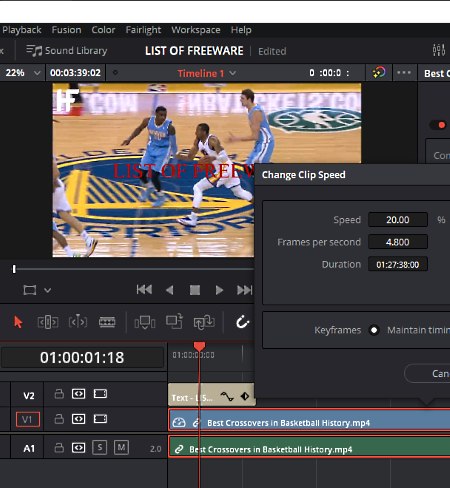
DaVinci Resolve is a free and popular video editing software for Windows. Using this video editor, you can create quite impressive video highlights. Along with video highlights, you can also edit vlogs, game videos, short movies, clips, etc. with this software. It is also quite popular for its Color Grading capabilities which is as good as many paid video editing software. The number of features you get in this software is really impressive. Still, its interface is quite usable and simple to understand. The process of making a video highlight is also quite simple in this software. Let’s see how.
How to make video highlights in DaVinci Resolve:
- The first step is to create a Project and define important parameters like Resolution, Frame Rate, etc.
- After that, add videos to this software.
- Now, move to its Editor Section and drop the added video from the side panel to its Timeline.
- Now, to add text, go to Effects Library > Titles menu and drag and drop the Text option over the timeline.
- Now, enter text that you want to show on the right side text panel. After that, adjust the text slide over the timeline to set the time period and position of the text.
- After adding the text, you can slow down the video. But, first, clip the video part using its Blade Edit Tool.
- Now, right click on the video track present on the timeline and open the Change Clip speed option and manually enter a value less than 100 to slow down the video.
After making the standard video highlight, you can now add filters, effects, or color grade the video using various available tools. Lastly, preview the highlight video and export it as MP4, AVI, MPEG, etc. video formats.
Note: In this free version, some of the filters and image processing features are not available. Plus, you are also restricted in terms of frame rates as you can export a video that can have a frame rate up to 60 FPS.
VideoPad
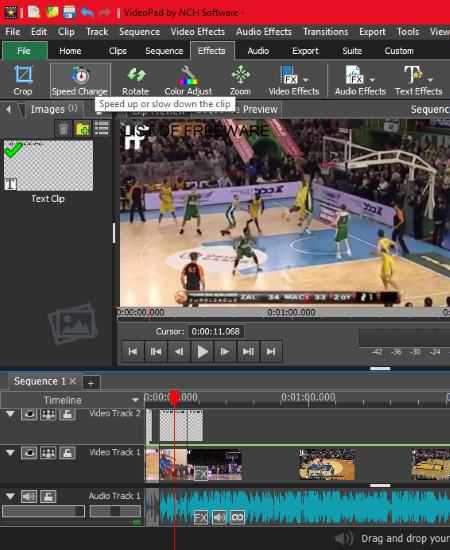
VideoPad is a yet another free video highlight maker software for Windows. Using it, you can add text, filters, effects, etc. on the video with ease. Plus, it is also quite easy to slow down important parts of a video through this software, which is an essential aspect of making a video highlight.
In this software, you also get many video effects, such as motion & transform, blending, color correction, artistic, etc. Plus, all necessary editing tools and features are also present in it. Its interface also looks like a typical video editor where you get a timeline at the bottom, a preview window, a file section to add audio and videos, and tools and sections at the top toolbar. Another good property of this software is its ability to support multiple video formats such as MP4, AVI, MOV, WMV, MPEG, and more.
How to create video highlight using VideoPad:
- Add videos by going to File > Add Files option. All added videos will appear in the video file section.
- Drop videos to the timeline.
- Now, select a part of the video and press the Split Tool option to make a split. Similarly, select other part and make another split.
- Now, you can add text as well as slow down video parts that you split.
- To add text, go to Effects > Text Effects and select a style of text from various available ones and enter the text of your choice that you want to show on the video.
- In the Effects tab, you also get a Speed Change tool through which you can manually set speed of the video to slow down the video.
- You can now arrange all parts of the video using the Timeline to complete highlight video.
- In the end, preview the video and export it using the Export tab in formats like MP4, ASF, MPG, OGV, SWF, etc.
Note: This software is only free for non-commercial use.
Easy Video Maker
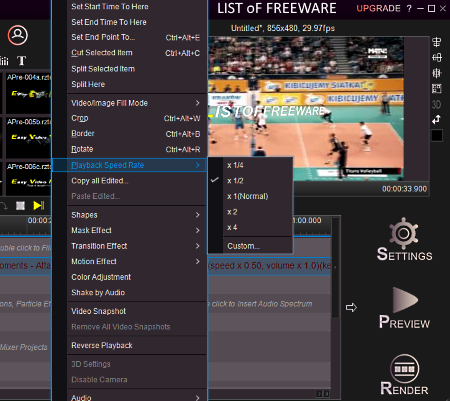
Easy Video Maker is yet another free video highlight maker software for Windows. It is a good video editing software to create highlight video. Using it, you can edit recorded video and also directly record editing process performed on this software. Plus, all video editing features like multi overlay timeline, effects (transition effects, motion effects, filters), preview window, merge, split, rotate, inbuilt shapes, etc., are also available in it.
In order to make video highlights, it lets you add text over the video and lets you decrease the speed of a part of the video to highlight some important action.
How to make video highlight using Easy Video Maker:
- Launch this software and add video clips to this software.
- All added clips can be accessed from the Video Section. Drop the video clips from video section to Tracks.
- Now, drop a text template from text effects template menu to the Text Track and enter the text which you want to show.
- After that, grab the text template from the track and move it across the timeline to position it at the desired section of video.
- Now, to decrease the video speed, first, split a video part from the rest of the video.
- After that, right click over the clip and go to the Playback Speed Rate option to decrease the playback speed of that video.
- Lastly, just arrange all the clips in the right sequence and preview it.
After reviewing the video, render that video in MP4, MPEG, AVI, etc. video formats.
Note: In this free version of this software, you will face some limitations. By purchasing the paid version of this software, you can remove all its limitations.
VSDC Free Video Editor
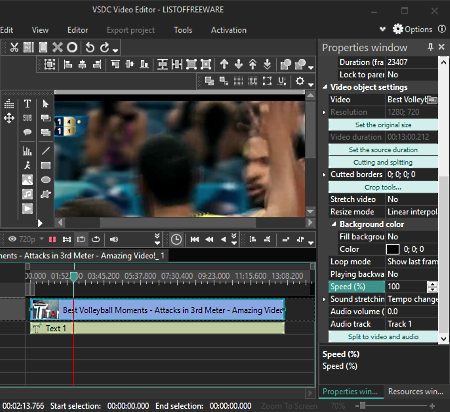
VSDC Free Video Editor is the next free video highlight maker software for Windows. It is primarily a video editing software through which you can also edit vlogs, short movies, etc. In it, you can find all standard video editing features like MultiTrack Timeline, Video Splitting Tool, Video Merging Tools, Video Effects, Video Filters, and more. Its interface is also quite helpful as it provides a clutter-free environment that makes editing easier.
In order to make a video highlight, you required two elements in your video namely Text and Slow Motion (to highlight important moments). To add text and slow motion elements, follow the below steps:
- Load one or more video clips to this software.
- After that, drop the added videos to the timeline.
- Now, go to Editor > Add Object section and select Text option to add text track on the timeline.
- Click on the added text track and add the text and set its font, size, etc. and place the text track at any time position where you want the text to appear.
- To slow down a part of the video, first, right click on the video track and select the cutting and splitting tool to cut a part of the video.
- Now, select the split video part to enable the properties section on the right side of the interface.
- In the Properties section, you can find a Speed option and by decreasing the speed value, you will be able to slow down an important part of the video.
- In the end, place all the video clips in the correct order over the timeline to complete the video.
After completing the video, press the Play Button to preview the video. To export the video, go to the Export Project tab and select WMV, MPG, AVI, MKV, etc. formats.
OpenShot
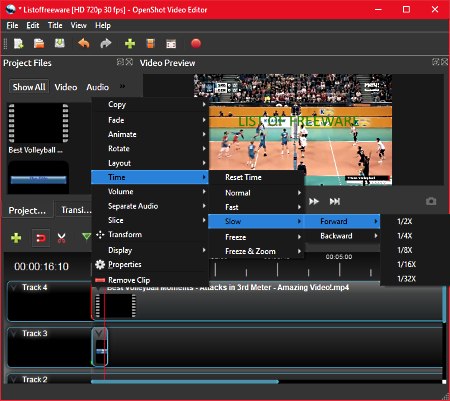
OpenShot is a free open source video editing software that you can also use as video highlight maker software. It is quite simple to use than other listed software. It provides basic video editing tools along with the support of various popular video formats. Some of the video formats that it supports are MP4, AVI, WMV, MOV, etc.
Through this video editor, you can add filters to video, add effects, split video, merge video, etc. Two important video highlight making operations namely make video slow and add text to video can also be performed in it.
How to make video highlights using OpenShot:
- Launch this software and add one or more video clips to this software.
- After that, drop all the videos from Project Files section to different tracks.
- Now, go to the Title tab and select a type of text that you want to add to the video.
- After selecting the text, drop that text on an empty track and move it over the timeline to place it at the exact time where you want to show the text.
- Now, to slow down video, first, split the clip using the Razor Tool. After that, right click on the clip and go to Time > Slow option, to slow the video speed.
- Lastly, position all the clips over the timeline in the right order and preview video in the inbuilt Video Preview Player.
Once the highlight video gets completed, you can export it in MP4, MOV, MPEG, OGG, etc. video formats.
Naveen Kushwaha
Passionate about tech and science, always look for new tech solutions that can help me and others.
About Us
We are the team behind some of the most popular tech blogs, like: I LoveFree Software and Windows 8 Freeware.
More About UsArchives
- May 2024
- April 2024
- March 2024
- February 2024
- January 2024
- December 2023
- November 2023
- October 2023
- September 2023
- August 2023
- July 2023
- June 2023
- May 2023
- April 2023
- March 2023
- February 2023
- January 2023
- December 2022
- November 2022
- October 2022
- September 2022
- August 2022
- July 2022
- June 2022
- May 2022
- April 2022
- March 2022
- February 2022
- January 2022
- December 2021
- November 2021
- October 2021
- September 2021
- August 2021
- July 2021
- June 2021
- May 2021
- April 2021
- March 2021
- February 2021
- January 2021
- December 2020
- November 2020
- October 2020
- September 2020
- August 2020
- July 2020
- June 2020
- May 2020
- April 2020
- March 2020
- February 2020
- January 2020
- December 2019
- November 2019
- October 2019
- September 2019
- August 2019
- July 2019
- June 2019
- May 2019
- April 2019
- March 2019
- February 2019
- January 2019
- December 2018
- November 2018
- October 2018
- September 2018
- August 2018
- July 2018
- June 2018
- May 2018
- April 2018
- March 2018
- February 2018
- January 2018
- December 2017
- November 2017
- October 2017
- September 2017
- August 2017
- July 2017
- June 2017
- May 2017
- April 2017
- March 2017
- February 2017
- January 2017
- December 2016
- November 2016
- October 2016
- September 2016
- August 2016
- July 2016
- June 2016
- May 2016
- April 2016
- March 2016
- February 2016
- January 2016
- December 2015
- November 2015
- October 2015
- September 2015
- August 2015
- July 2015
- June 2015
- May 2015
- April 2015
- March 2015
- February 2015
- January 2015
- December 2014
- November 2014
- October 2014
- September 2014
- August 2014
- July 2014
- June 2014
- May 2014
- April 2014
- March 2014
