5 Best Free Photogrammetry Software For Windows
Here is a list of best free photogrammetry software for Windows. Photogrammetry is a process of extracting measurements from one or more images to find out accurate surface points positions. It is used for many purposes like creating 3D objects from multiple images, to create complex 2D and 3D motion fields for remote sensing, to measure relative 3D motion, etc.
However, these photogrammetry software are mainly used to generate realistic models using multiple images. In most software, you need to input 50 and more images of an object taken from different angles to generate a good result. As these software process multiple images, hence time consumed to process images and create a model is also quite high. Still, these software also support GPU and hence, work much faster in systems with a GPU. But, for a few of these, GPU card is mandatory to run properly.
JPG is the most common supported image format among these software. Although, some software also support other image formats like PNG, TIFF, etc. After loading images to these software, you can follow the steps which I have included in the description of each article to generate a 3D model. Besides generating a 3D model, you can also simply rotate and view generated model from all angles. Plus, tools to enhance the look of a model by changing colors, lighting, etc., are also present in some software. After generating and making changes on the 3D model, you can save it in OBJ, PLY, NVM, or any other supported format.
My Favorite Photogrammetry Software For Windows:
Meshroom is my favorite software because it can generate a realistic looking 3D model from images. Plus, it also lets you view the live 3D model generation process.
You can also check out lists of best free Image Map Generator, Forensic Photo Enhancement, and Photo Date Stamper software for Windows.
Meshroom
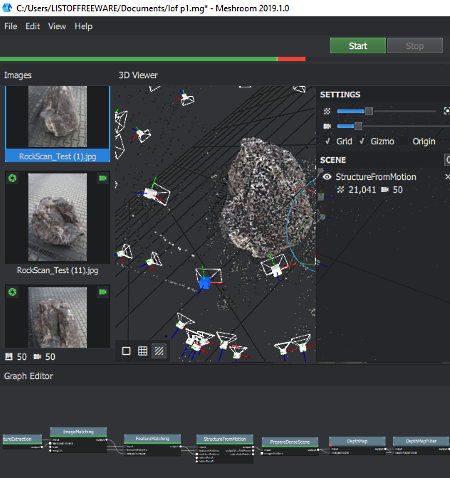
Meshroom is a free open source photogrammetry software for Windows and Linux. Through this software, you can generate a 3D model using a lot of images of an object taken from all possible angles. It basically calculates the distance between surface points by analyzing all the images using various photogrammetric algorithms. This software can produce a good quality 3D model of an object. The process of generating a 3D model through this software is quite simple.
How to generate a 3D model using this photogrammetry software:
- Open the interface of this software and go to File > New option to create a new project.
- After that, select and drop all the JPG images of an object to its Images section.
- Now, you can view all your images on the left side and various graph editor nodes, just below the main editing section. The default positions of the graph editor nodes are fine, so you do not need to manually change it.
- After that, just press the Start button to start the reconstruction process. This process takes around 15 to 20 minutes to finish.
- Once the reconstruction process gets completed, you can view the created 3D model. You can easily move around the generated 3D model through your mouse to view it from all angles.
After generating the model, this software automatically saves it in OBJ format. You can find the output OBJ file in the created Project folder. You can also further enhance the model using various tools present in the graph editor nodes like Depthmap, PrepareDenseScene, FeatureMatching, ImageMatching, etc.
Additional Features:
- Live Reconstruction: It allows you to view the reconstruction of the 3D model at the time of processing.
- 3D Viewer: It lets you view the 3D model that you can also easily move around to view it from all directions.
- FullScreen: This feature allows this software to take the entire screen.
Final Thoughts:
This software provides all essential tools through which you can create a very realistic 3D model from images with ease.
VisualSFM
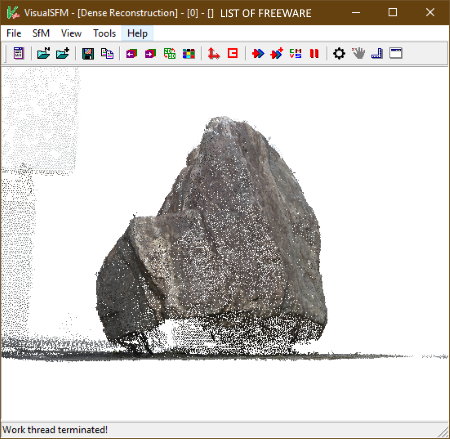
VisualSFM is a free photogrammetry software for Windows, MacOS, and Linux. Using this software, you can create a 3D model using multiple photos of an object taken from multiple angles. To create a realistic looking 3D model mesh, it is necessary to have at least 40 to 50 images. To create a high-quality 3D model or mesh, you can also use around 100 images. As it needs a lot of images to create a 3D mesh, hence this software takes some time to process all images.
This software works much better if you have a GPU in your system as it can use GPU to increase the processing speed. By default, this software shows error most of the times and does not process images. To remove error during the processing, it is necessary to first download CMVS PMVS package. After that, extract CMVS PMVS package and go to CMVS PMVS > binariesWin-Linux > Win64-VS2010 folder and copy all of its content. Now, open the VisualSFM folder and paste all the copied files. Now, you are ready to create a 3D mesh using multiple images with this photogrammetry software.
How to create a 3D model using this free photogrammetry software:
- Launch this software and press the open images button to load all the JPG images of an object.
- After that, press the compute missing matches button to start the computational process of identifying the object. This process can take from 20 minutes to an hour depending on your system performance and on the number of input photos.
- Once the computational process gets completed, you can start the reconstructing 3D or sparse points process. To do that, go to SfM menu and select Reconstruct Sparse option to start reconstruction of sparse points in real time. Once sparse points construction gets finished, you can view a structure consisting of a lot of dots (sparse points) on the interface.
- Now, to create a real looking 3D structure, use the Reconstruct Dense option which is also present in the SfM menu. After that, specify the destination folder where you want to save the final 3D object. The process of reconstructing a dense or real like object also take some time to finish.
Once the reconstruct dense process gets completed, you can view the final 3D design file in the destination folder with .nvm extension. In order to view the model present in the .nvm file, you can use the Meshlab software.
Additional Features:
- Enable GPU: You can enable this feature if you have a GPU in your system to increase the processing speed.
- Switch between 2D and 3D: This feature lets you view generated computational points or sparse points model in both 2D and 3D view.
- Randomize colors: It assigns the random colors to sparse points.
Limitations:
This software is only free for private and non-profit use.
Final Thoughts:
It is a powerful photogrammetry software through which you can turn multiple images of an object to a 3D model by fetching and calculating measurements of an object from photos.
3DF Zephyr Free
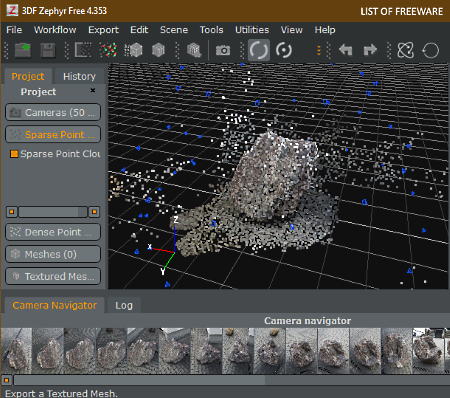
3DF Zephyr Free is another free photogrammetry software for Windows. With the use of this software, you can create a realistic looking 3D model by using multiple images of an object that you want to digitally reconstruct. As it is a photogrammetry software, hence it uses various algorithms to take the right measurements from multiple photos to determine the right texture, shape, light intensity, and other parameters. This software needs around 40 to 50 images to create a high-quality 3D model.
How to create a 3D model using this photogrammetry software:
- Launch this software and go to the Workflow menu and create a New Project.
- A project wizard will open up in which you need to input all your images by pressing the plus button.
- After that, press the next button and select one of the presets from settings menu namely presets, advanced, and custom (customized settings) and again press the next button to view the summary of previously selected options.
- Once again, press the next button to start the 3D mesh creation process which can take some time to finish.
- When the process gets completed, you can view a lot of dots or points representing the structure of the model.
- Now, to create a realistic looking 3D model, use the Dense point cloud generation option that you can access from the workflow menu.
- From this menu, select a category according to your models like close range, aerial, human body, and urban. You can also select fast and high details preset from this menu.
- Lastly, press the Next button and then the Run button to start the dense point cloud generation process to create a 3D model.
Once the 3D model gets generated, you can export it to OBJ file by using the Textured map export option. Before exporting the model, you can use the pivot camera and orbit camera options to view the model from all directions.
Additional Features:
- Scene: Using it, you can adjust the camera position, light position, enable/disable uniform coloring, and more features.
- Mesh Filters: Using it, you can fill holes, update colors, and smooth model surface.
- Screenshot: You can use it take a screenshot of the created model.
- Quick Measurements: It lets you measure the distance between any two points over the model.
Limitations:
This software is only free for personal use.
Final Thoughts:
It is one of the best photogrammetry software because it generates one of the most realistic looking 3D modes using images.
COLMAP
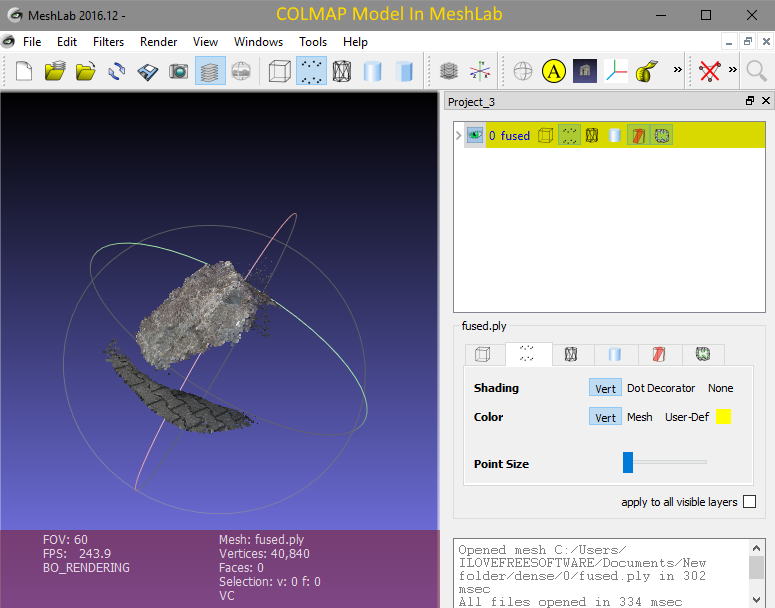
COLMAP is a free open source photogrammetry software for Windows, Linux, and MacOS. Using this software, you can create a 3D dense structure of an object using multiple images of PNG and JPG formats. In order to generate a high-quality model, you need to input at least 50 images. To reconstruct a model using images, it uses Structure From Motion (SFM) and Multi-View Stereo (MVS) photogrammetric techniques. In order to properly generate a dense 3D model through this software, your system needs to have an Nvidia GPU.
How to generate a 3D model using this photogrammetry software:
- Open the interface of this software and go to the File menu to create a new project.
- After that, go to Reconstruction menu and select the automatic reconstruction option to open up an automatic reconstruction floating panel.
- Now, in the floating panel, you need to specify the path of the Workspace Folder (output folder) and Image Folder (input images folder). Leave all other options of this floating panel in their original state.
- Next, press the Run button to start the reconstruction process. This process will take some time to finish, so be patient.
- Immediately after finishing the reconstruction, you can view the structure consists of various points and dots on its interface. A PLY model file is also generated by this software that you can access from Workspace folder > Dense > () folder.
- You can open the generated PLY file in MeshLab or in another CAD software to view the actual dense 3D structure. I have included the screenshot of the MeshLab software showing the final 3D model.
Additional Features:
- Model Statistics: Using it, you can view various statistics about the generated model like the number of location points, number of images used, color profile, etc.
- Render Options: It lets you change projection, background color, image frame, image colormap, and other parameters.
- Extract Colors: Using it, you can extract any color that you want from the 3D model.
- Undistortion: It lets you reduce noise or distortion from the model.
Limitations:
- This software does not work properly on systems which lack Nvidia GPU.
Final Thoughts:
It is another very capable photogrammetry software through which you can create a high-quality 3D model using multiple images.
Regard 3D
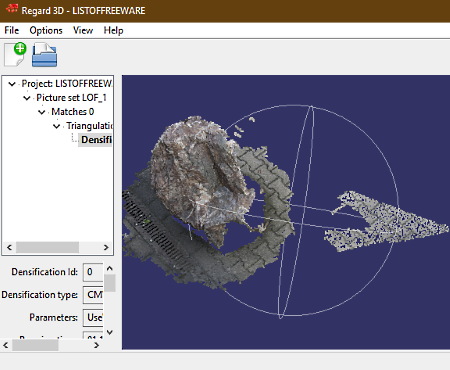
Regard 3D is another free open source photogrammetry software for Windows, Linux, and MacOS. Like other similar software, it is used to generate a 3D model using a lot of photos of an object. In it, you can enter both JPG and PNG images to generate a model. Besides creating a model, you can also use this software to make adjustments on the output model. The interface of this software is pretty simple and straightforward and you can access and use all of its features with ease.
How to create a 3D model using this photogrammetry software:
- Launch this software and create a new project by specifying the project name and project path.
- After that, click on the Add picture set button to load all the images of an object to this software.
- Now, click on the Compute matches button and set keypoint matches and keypoint sensitivity parameters and then press OK. This process can easily take around 15 to 20 minutes to finish.
- Next, click on the Triangulation button to open the triangulation settings and then press OK without changing any default settings. Triangulation process just takes a few minutes to finish, after which you can view the point cloud object structure on the interface.
- To create a realistic looking model, use the create dense cloud option. This option opens up a Densification menu from where you can set threshold, filter width, cell size, and more parameters.
- After setting up the densification parameters, press the OK button to generate the 3D model.
To further enhance the model, you can use show texture, enable lighting, polygon mode, shading, and more tools. You can also export the final 3D model in Meshlab compatible format by pressing the Export Scene to MeshLab button. To save the model in PLY format, press the Export Point Cloud button.
Additional Features:
- Console Output: Using it, you can view various information about the model generation process like track length, 2D-3D matches, points use for resection, robust resection of camera index, and more.
- Edit User Camera DB: It lets you add and edit information about your camera like camera model, sensor width, aperture, etc.
Final Thoughts:
It is one of the simplest photogrammetry software to operate and it offers only essential features.


Naveen Kushwaha
Passionate about tech and science, always look for new tech solutions that can help me and others.
About Us

We are the team behind some of the most popular tech blogs, like: I LoveFree Software and Windows 8 Freeware.
More About UsArchives
- May 2024
- April 2024
- March 2024
- February 2024
- January 2024
- December 2023
- November 2023
- October 2023
- September 2023
- August 2023
- July 2023
- June 2023
- May 2023
- April 2023
- March 2023
- February 2023
- January 2023
- December 2022
- November 2022
- October 2022
- September 2022
- August 2022
- July 2022
- June 2022
- May 2022
- April 2022
- March 2022
- February 2022
- January 2022
- December 2021
- November 2021
- October 2021
- September 2021
- August 2021
- July 2021
- June 2021
- May 2021
- April 2021
- March 2021
- February 2021
- January 2021
- December 2020
- November 2020
- October 2020
- September 2020
- August 2020
- July 2020
- June 2020
- May 2020
- April 2020
- March 2020
- February 2020
- January 2020
- December 2019
- November 2019
- October 2019
- September 2019
- August 2019
- July 2019
- June 2019
- May 2019
- April 2019
- March 2019
- February 2019
- January 2019
- December 2018
- November 2018
- October 2018
- September 2018
- August 2018
- July 2018
- June 2018
- May 2018
- April 2018
- March 2018
- February 2018
- January 2018
- December 2017
- November 2017
- October 2017
- September 2017
- August 2017
- July 2017
- June 2017
- May 2017
- April 2017
- March 2017
- February 2017
- January 2017
- December 2016
- November 2016
- October 2016
- September 2016
- August 2016
- July 2016
- June 2016
- May 2016
- April 2016
- March 2016
- February 2016
- January 2016
- December 2015
- November 2015
- October 2015
- September 2015
- August 2015
- July 2015
- June 2015
- May 2015
- April 2015
- March 2015
- February 2015
- January 2015
- December 2014
- November 2014
- October 2014
- September 2014
- August 2014
- July 2014
- June 2014
- May 2014
- April 2014
- March 2014
