8 Best Free Open Source Backup Software For Windows
Here is a list of best free open source backup software for Windows. Using these software, you can take the backup of your important data. All of these software come with an open source license. Hence, you can inspect or modify the source code of respective software.
In some of these, you can also backup registry data along with normal data. Most backup software can save the backup in local storage or in a portable storage device. However, some of these also provide flexibility to backup data online. Apart from backup, you can also restore data through these software.
Many open source backup software use various synchronization methods to take data backup. Some of the popular methods are Left to Right (Incremental), Mirror A-> B or vice versa, Synchronize A<-> B, etc. These synchronization methods first compare data of source and destination folder. After that, these methods add, delete, and modify data in one or both locations.
My Favorite Open Source Backup Software For Windows:
Duplicati is my favorite backup software because it can save data backup in local storage, external storage, and over to various cloud services. It also lets you password protect your backup, unlike other similar software. Plus, at any time you can restore data back to the original location by using its Restore feature.
You can also check out lists of best free Bookmark Backup, Gmail Backup, and System Backup software for Windows.
Duplicati
Duplicati is a free open source backup software for Windows. It is a web-based software through which you can make online backup as well as local backup. The online backup can be made either by using Standard Protocols (FTP, Swift, SFTP, WebDAV) or Proprietary Services (Amazon Cloud, Dropbox, Google Drive, Mega, Microsoft One Drive, etc.). As for local backup, you can backup your data in any folder, directory, or even in a portable storage device. This software also provides the option to password protect your backup so that only authorized person can access it. Besides backup, you can also restore all the data back when required.
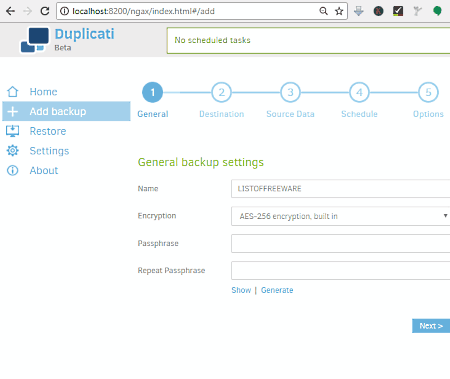
How to backup data using this open source backup software:
- After launching this software, go to the Add backup section and select the Configure a new backup option and press next.
- Now, a General field will open up in which, you need to give a name and password to your backup. Plus, the type of Encryption (no encryption, AES-256 encryption, and GNU privacy guard) can also be selected from here. Press next to visit Destination field.
- From the Destination field, select the Storage Type (Local Folder or Drive, FTP, WebDAV, Google Drive, Dropbox, etc.). In case of local storage, select the destination folder or directory but for online storage, you need to fill options like Bucket Name, Storage class, Folder Path, etc.
- Now, the next stage is Storage Data. In this stage, select the folder, file, or data that you want to backup and press next to open the Schedule field.
- Using the Schedule field, you can set a time interval for which it automatically backs up the data from the same source location.
- The last field is Options filed from where, you can set the upload volume size along with backup retention (keep all backups, delete backup that is older than a certain time, keep a specific number of backups, etc.). Lastly, press the Save button to start the backup process.
Similar to the backup process, you can also restore all your backup data using the Restore Section of this software.
Grsync
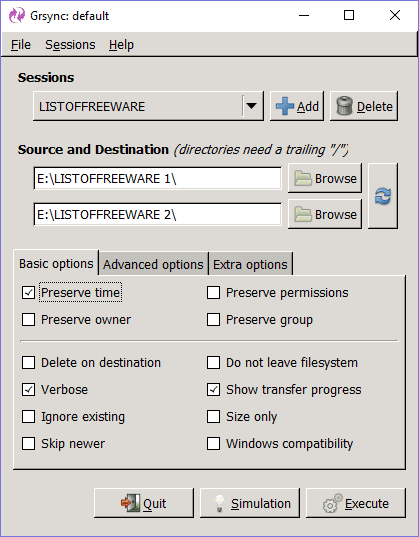
Grsync is yet another open source backup software for Windows. This software mainly acts as a GUI of a popular command line file synchronization and backup software named as rsync. The main advantage of this PC backup software is that it provides a lot of backup settings that you can modify according to the task. On its interface, you get three menus which contain different categories of changeable backup options named Basic Options, Advanced Options, and Extra Options.
In basic options, you get options like Preserve time (to save file modification time), Delete on destination (delete files from destination if it is not present on the source), Ignore Existing (to skip updating files that are already present on the destination), etc. The Advanced Option provides settings like Compress File Data, Always Checkum, Keep Partially Transferred Files or Not, etc. In Extra Options, you can manually enter a command that you want to execute before the backup process.
How to backup data using Grsync:
- First, create a session by pressing the ADD button.
- After that, select the appropriate backup options from three available Options menu.
- Enter the source and destination folder or directory path in the respective fields. Now, you can either press the Simulation button (it shows what would have been done, but it actually does nothing) or press the Execute button to actually start the backup process.
The whole backup session can also be exported or saved in .grsync format that you can import later to repeat the same process.
DirSync Pro
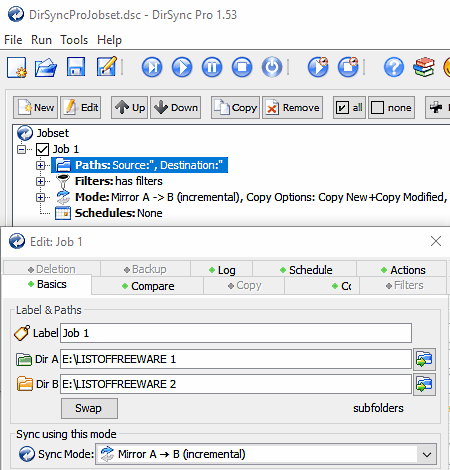
DirSync Pro is a completely free open source backup software for Windows. This software is mainly used to synchronize data between folders and directories. Its synchronization functionality also helps you backup your data in local storage or on an external storage device. Among various sync modes, a dedicated backup mode is also available in this software.
Let’s take a brief look at various Sync modes through which you can sync as well as backup all of your data:
- Mirror A-> B or B -> A (Incremental): This mode synchronizes data only in one direction i.e. either from A to B or B to A. It only copies new or modified data from source to the destination folder.
- Synchronize A <-> B: It is a bi-directional synchronization mode that copies new or modified data to both locations.
- Backup A-> B: This mode simply copies all files of source folder to the destination folder.
- Restore B-> A: It works exactly opposite of Backup mode and restores all data from Destination folder to Source folder.
- Contribute A->B: It only copies the new data from source to destination location.
In order to backup the data, first, create a new job set and then expand that job set by pressing the + button. Now, select the Paths: Source, Destination menu. In this menu, you need to submit the patch of the source and destination in the Dir A and Dir B fields respectively. After that, select one of the sync modes and press OK to come out from the menu. Lastly, press the Synchronize button from the main interface to start back up or synchronization process.
In this software, you can also find some additional tools like Compare (to define how this software compare and find new or modified data from existing data), Conflict Resolution (to resolve any conflict occurred during mono or bi-directional synchronization), Schedule (to schedule backup or synchronization), etc.
Redo Backup & Recovery
Redo Backup & Recovery is another one of completely free, open source backup software. Through this software, you can backup standard data along with the registry data. Plus, it lets you save the backup data in local storage, external storage as well as over the internet.
In order to run this software, you can directly boot this software using the CD or Pendrive. Bootup process only takes about 30 seconds after which, you are ready to take backup of your data. There are many other tools and features that come with it, such as Restore tool (to restore back data to the original location), File Manager, Image Viewer, Text Editor, Web Browser, File Recovery, Partition Editor, Usage Analyzer, Hardware Lister, Bootable USB Creator, and more.
How to take data backup using Redo Backup & Recovery:
- First, go to its Settings menu and select Redo Backup & Recovery option.
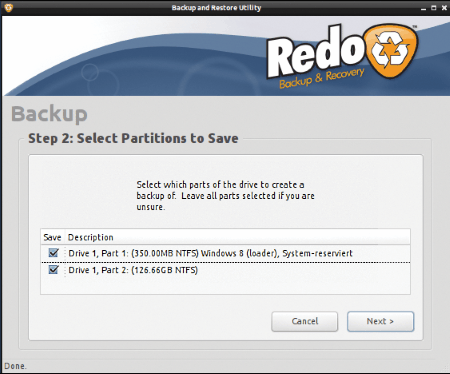
- Now, a window with two options will open up namely Recovery and Backup. Select the Backup option to start the backup setup process.
- In the setup process, the first step is to select the drive that has data which you want to backup.
- In second step, select the partition and specific folder or directory that you want to backup.
- The third step is to choose the destination location. In this step, select the Connected directly to my computer option to save data in local or USB storage device. If you want to save data over internet, then select the Shared over a network option and choose one of the available FTP servers to upload the backup data over the network.
Overall, it is a quite unique software because it doesn’t need an operating system to run. Still, it comes with a really good GUI with all the essential features to take data backup.
Create Synchronicity
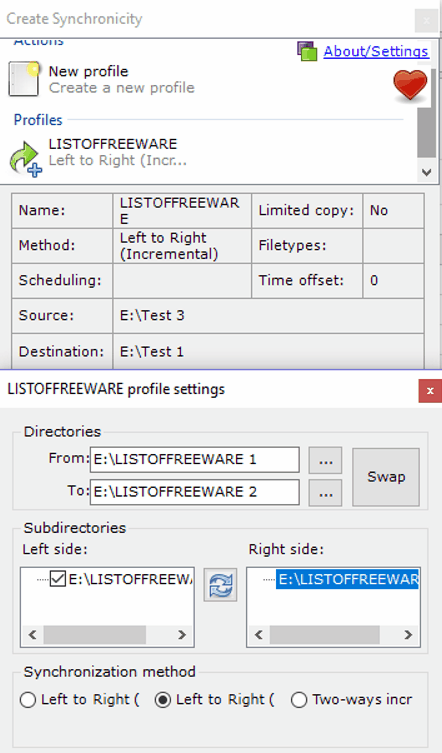
Create Synchronicity is a lightweight and open source backup software for Windows. It is also used as a file synchronizer to maintain similar data between two folders or directories. Actually, it doesn’t have any dedicated backup option. So, you have to use the synchronization feature to backup your data. It provides three synchronization methods to synchronize and backup your data.
Let’s take a look at the available synchronization methods:
- Left to Right (Mirror): This method copies all the data of source location to the destination. Plus, all the modifications and deletion made to the source location are also copied on the destination to maintain the similar data.
- Left to right (Incremental): This method saves new and modified data from the source location to the destination location. However, the deleted data of the source location would not get deleted from the destination location.
- Two Way Incremental: This method copies all new and modified data in both ways without deleting any.
To take backup through this software, first, create and set up the profile. In the profile settings, enter the source data path and destination data path in From and To fields. After that, select one of the three synchronization methods and press the Save button. The newly created profile will add to the main menu. Now, just right on the profile and select the Synchronize button to start the backup. Few other options like Schedule synchronization, Preview, View Log, etc. are also available on the profile’s right-click menu.
SMARegisTRY Backup
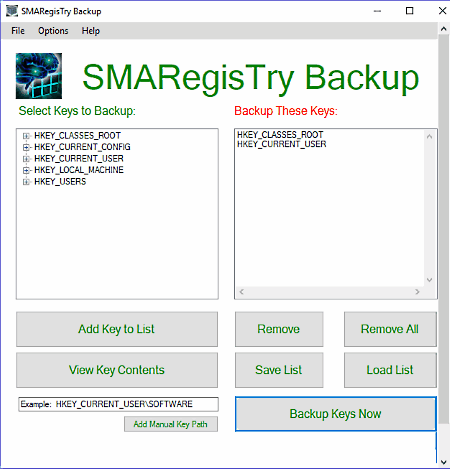
SMARegisTRY Backup is another free open source backup software for Windows. Using this software, you can backup all registry data and keys to local storage or to a portable storage device. Besides registry, it does not backup any other type of data.
This software detects and shows almost all registry on its interface from where you can select and save them as a backup. If all registries are not auto-detected by this software, then manually add the path of keys to its Add Manual Key Path field. On the main interface, you get two main fields; one is Select keys to backup (shows all the detected registries) and other is Backup these keys field (you need to add registries from the first field to save them as backup). Now, to take the backup, select one or all the registries from Select keys to backup field and press the Add key To List button to add registries to the second field. Lastly, press the Backup Keys Now button to save the registries to the specified location.
This backup software cannot only backup registry, but it can also restore all the registry data back to the system registry location. Overall, it is really good software to make a backup of registry and keys, but its disability to backup other types of data is its biggest disadvantage.
MetroBackUp
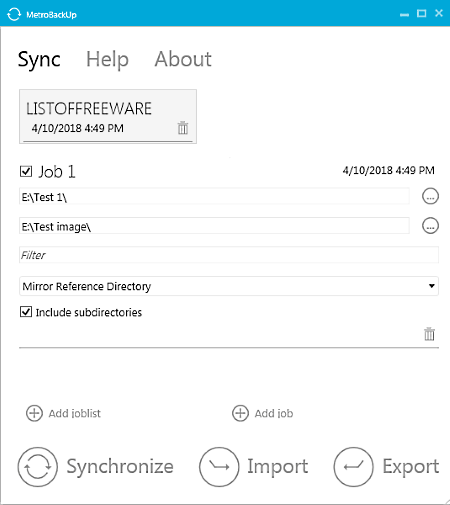
MetroBackUp is yet another free open source backup software for Windows. Using this software, you can backup all types of data, folders, and directories without much hassle. This backup software also uses synchronization modes to take backup of the data. In it, you get three modes namely Mirror Reference Directory (adds and delete data of the destination folder to make it similar to source folder), Mirror Reference Directory without deleting the data (this mode is similar to the previous mode but with one exception that, it does not delete data from destination folder), and Synchronize in both direction mode (makes changes on both source and destination folder).
How to take backup of data using MetroBackUp:
- First, create a job list by pressing the Add job list button.
- After that, press the Add job button and enter source and destination location paths. Do not forget to select one of the three synchronization modes from this job section.
- Lastly, click on the Synchronize button to start the backup process.
This software also keeps a log of all the backups made through it. This log file can also be exported in XML format by pressing the Export button.
Flash Backup
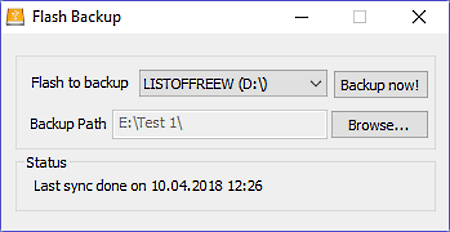
Flash Backup is the next open source backup software for Windows. This software can only be used to backup data from USB storage devices such as Flash Drives, Portable Hard Disk Drives, Portable SDD’s, etc. As soon as you connect your USB storage device to PC, this software immediately detects your device. You can also connect multiple USB storage devices to computer at a time and it will detect all of them. You can select or toggle between external storage devices using its Flash to Backup menu. After selecting a storage device, choose the backup path by pressing the Browse Button. The backup can be made on both the local storage of the PC or in an external storage device. After specifying destination path, press the Backup now! button to start the backup process.


Naveen Kushwaha
Passionate about tech and science, always look for new tech solutions that can help me and others.
About Us

We are the team behind some of the most popular tech blogs, like: I LoveFree Software and Windows 8 Freeware.
More About UsArchives
- May 2024
- April 2024
- March 2024
- February 2024
- January 2024
- December 2023
- November 2023
- October 2023
- September 2023
- August 2023
- July 2023
- June 2023
- May 2023
- April 2023
- March 2023
- February 2023
- January 2023
- December 2022
- November 2022
- October 2022
- September 2022
- August 2022
- July 2022
- June 2022
- May 2022
- April 2022
- March 2022
- February 2022
- January 2022
- December 2021
- November 2021
- October 2021
- September 2021
- August 2021
- July 2021
- June 2021
- May 2021
- April 2021
- March 2021
- February 2021
- January 2021
- December 2020
- November 2020
- October 2020
- September 2020
- August 2020
- July 2020
- June 2020
- May 2020
- April 2020
- March 2020
- February 2020
- January 2020
- December 2019
- November 2019
- October 2019
- September 2019
- August 2019
- July 2019
- June 2019
- May 2019
- April 2019
- March 2019
- February 2019
- January 2019
- December 2018
- November 2018
- October 2018
- September 2018
- August 2018
- July 2018
- June 2018
- May 2018
- April 2018
- March 2018
- February 2018
- January 2018
- December 2017
- November 2017
- October 2017
- September 2017
- August 2017
- July 2017
- June 2017
- May 2017
- April 2017
- March 2017
- February 2017
- January 2017
- December 2016
- November 2016
- October 2016
- September 2016
- August 2016
- July 2016
- June 2016
- May 2016
- April 2016
- March 2016
- February 2016
- January 2016
- December 2015
- November 2015
- October 2015
- September 2015
- August 2015
- July 2015
- June 2015
- May 2015
- April 2015
- March 2015
- February 2015
- January 2015
- December 2014
- November 2014
- October 2014
- September 2014
- August 2014
- July 2014
- June 2014
- May 2014
- April 2014
- March 2014
